Wednesday, December 29, 2010

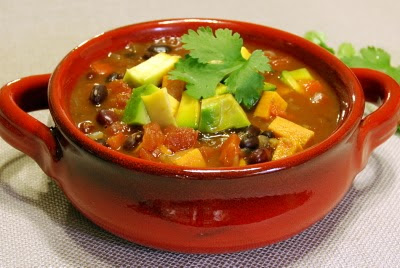
Sweet Potato Chili

  
 It's soup season here in my neck of the woods! We didn't have nearly as much snow as some areas did over the holidays, but we certainly had enough by my standards. With the cold, windy weather and the over-indulgences of holiday fare, I felt that a good healthful soup was in order. I found a recipe in Simple Vegetarian Pleasures that fit the bill nicely- It didn't hurt either that I had all of the ingredients! 

 I halved the recipe because I wasn't too sure how hubby would like meatless chili, but he gave it a "thumbs up!" The potatoes gave it a subtle sweetness that was perfectly tempered by the savory peppers, onions and spices. Loaded with heart healthy ingredients and beta carotene, it's a dish I'll definitely make again.

 This recipe as written is what I would classify as a mild chili. If you're more a fan of hot and spicy, you may want to add more chili powder or even some cayenne to "kick it up" a notch. That's between you and your taste buds though. :)


Sweet Potato Chili
adapted from Simple Vegetarian Pleasures, by Jeanne Lemlin
Ingredients (recipe is halved from the original)
1 Tablespoon olive oil
1 large onion, diced
3 small garlic cloves, minced
1 red bell pepper, diced
1scant Tablespoon chili powder (or to taste)
1 scant teaspoon cumin
1/2 teaspoon dried oregano
2 cups water (1/2 cup more can be added to cover if needed)
1 (14.5 oz) can diced tomatoes with their juice
2 Tablespoons tomato paste
1 med-large sweet potato, peeled and cut into 1/2 inch dice
1 can (15 oz.) black beans, rinsed and drained
1 can (15 oz.) kidney beans, rinsed and drained
chopped cilantro and avocado for garnish if desired
Directions
  • Heat oil in a large saucepan over medium heat. Add the onion and garlic. Cook, stirring frequently, until onions are translucent. Stir in the pepper and cook for about 10 minutes, stirring often.
  • Sprinkle the chili powder and cumin over the pepper and onion and cook an additional 2 minutes, stirring often.
  • Add all of the remaining ingredients (except for the cilantro and avocado) and bring the mixture to a boil. Cover and cook until sweet potatoes are tender. (mine took about 25-30 minutes) 
  • Serve with cilantro and avocado if desired.
  • Note: The original recipe called for a scant 1/2 teaspoon of salt, but I didn't add it. I also used "no salt added" beans, making the recipe even more heart healthy.
  • Variation: (I'm going to try this next time.) Add 1/4 cup of quick cooking barley in with the rest of the ingredients.
Come join SoupaPalooza at TidyMom and Dine and Dish sponsored by KitchenAid, Red Star Yeast and Le Creuset
This post is linked to Cookbook Sundays on Brenda's Canadian Kitchen and Seasonal Sunday at Real Sustenance.

    Tuesday, December 21, 2010

    Merry Christmas!


    Wishing you all a very merry Christmas, and abundant blessings in the coming New Year!
    ~Betty

    Monday, December 6, 2010

    Hermits- Cookies that Definitely Should Not Keep to Themselves


      Betty Crocker says that Hermits were a favorite cookie back in 1900, and after making these I've decided that it was not without reason. They're soft, spicy, chewy, and loaded with candied ginger and raisin puree. Browned butter makes them soft and cakey, just right for a hearty, satisfying snack. These Hermits are a new twist on an old favorite, and they'd be at home either clutched in a little fist and enjoyed with a cold glass of milk or served on an elegant party tray with a steaming cup of spiced apple cider.


    If you haven't started your holiday baking, you should definitely put this recipe on your list. It's from the Holiday Cookies from America's Test Kitchens Holiday 2010 issue. (Yep, it's the one from my giveaway.) You didn't think I could resist buying one for myself too, did you?

    Hermit Cookies- Printable recipe here
    slightly adapted from Holiday Cookies from America's Test Kitchens (Holiday 2010)
    Makes about 2 dozen large cookies
    Ingredients
    2 cups all-purpose flour (plus extra if needed for forming rolls of dough)
    1/2 teaspoon baking soda
    1/2 teaspoon salt
    1 cup raisins
    2 Tablespoons crystallized ginger, chopped fine
    1 stick unsalted butter (8 Tablespoons)
    1 teaspoon ground cinnamon
    1/4 teaspoon ground allspice
    3/4 cup packed dark brown sugar
    1/2 cup molasses
    2 large eggs
    1 and 1/2 Tablespoons orange juice
    3/4 cup confectioners sugar

    • Combine flour, baking soda and salt in a bowl.
    • Process raisins and ginger together in food processor or blender. My raisins were very dry and wouldn't process, so I splashed in about a Tablespoon of coffee to soften them. Orange juice or water would work well too, if you have the same problem.
    • Heat butter in saucepan over medium low heat, swirling occasionally, until nutty brown in color. (about 10 minutes- Watch it carefully. Once it starts to brown, it browns quickly.) Add spices to the butter, and cook until fragrant. (about 15 seconds)
    • Add the butter mixture to the raisin mixture. Mix together and then cool completely.
    • Add brown sugar, molasses, and eggs to the raisin/butter mixture. Stir until completely incorporated. 
    • Fold in flour mixture and refrigerate, covered, until firm. (at least 1 1/2 hours- I did mine overnight.)
    • When you are ready to bake, preheat oven to 350°F. Line two cookie sheets with parchment paper. Divide dough into four equal parts. Roll each part into a 10 inch log on a floured surface, then place on prepared baking sheet. My dough was very sticky, so I used flour liberally to make my four rolls. (I'm sure this was because I added extra liquid to soften my raisins.) Put two logs on each cookie sheet, leaving about 3 inches between the rolls. (They will spread.)
    • Bake until edges are set but center is still soft, 15 to 20 minutes. Cool on sheet for 5 minutes, then transfer parchment to wire rack to cool completely.
    • Repeat for second two cookie rolls. 
    • Make glaze. Whisk together orange juice and confectioners sugar. Drizzle mixture over cooled logs. Let set until glaze hardens. Cut logs into bars. The original recipe called for making them 2 inches wide, but I made mine a bit smaller.
    • Variation: Use a maple glaze in place of the orange.  Mix together 3/4 cup of confectioners sugar, 1 1/2 Tablespoons of milk or water and a bit of maple flavoring to taste.

    Friday, December 3, 2010

    Winners!


    Sorry I'm so late getting this winners' post up, but my grandson goes back to Texas tomorrow and we've been trying to squeeze in as much "grandma fun" as possible the last two weeks. To make amends, I had him draw not one, but two names.


     And the winners?


    and


    Sarah of Baking Serendipity.

    If the two of you will email me with your contact information, I'll get your Holiday Cookie books in the mail asap! (There's still plenty of December left for baking!) Thanks so much everyone!

    Wednesday, November 24, 2010

    A Giveaway! and Felix K.'s 'Don't even try to say these aren't the best you've ever eaten because they are' Chocolate Chip Cookies


     Is there room in your recipe box for another Chocolate Chip Cookie? I have my favorites, but I'm always trying out new recipes just to see if I can find what I consider to be "THE" cookie. My grandson arrived Saturday evening for a two week stay, and one of the first things he requested was to make cookies with his Mimi. And what kind did he want? Chocolate chip, of course.

     I came across this recipe earlier this year when Anna at Cookie Madness gave it good reviews. And with a name like Felix K.'s "Don't even try to say these aren't the best you've ever eaten because they are" Chocolate Chip Cookies, I had to try them. (I love a challenge!)


     The verdict? Well they're definitely in the running for their lofty title- they really are very good and I'll surely make them again.  There's a slightly crisp edge to these cookies giving them a good bite, but the rest of the cookie is good and chewy, just like I like it. They're sturdy cookies, but not dry, and they keep their shape nicely even without chilling the dough before baking. (That's a plus for me because when I really want cookies, waiting for the dough to chill can seem like forever.)

     Here's the link to the recipe for Felix K's 'Don't even try to say these aren't the best you've ever eaten because they are' Chocolate Chip Cookies. The only change I made was to use Smart Balance 50/50 blend (sticks) instead of butter. I also made the cookies smaller than the original recipe called for. (Three tablespoons of dough makes a really big cookie!) I used my 2 tablespoon cookie scoop instead, and just slightly flattened the tops before baking.

     And in honor of my little grandson's love of cookies, and to thank you all for being such wonderful friends, I'd love to give away a little something for your holiday baking pleasure- a copy of Holiday Cookies from America's Test Kitchens.


     All you have to do is leave a comment on this post. If I can figure out how to work the random number thingy, I'll use it to select a winner. If the non-technological side of my brain wins out, I'll have my grandson pick a number out of a hat (or a cookie jar, which seems more appropriate somehow.) Comments close on Nov. 30th- I want someone to have plenty of time to use these lovely cookie recipes!

    Disclaimer:  This is not a sponsored give-away, and I am not being compensated in any way. I just saw this on the magazine rack in the store and thought it would be fun to share!

    Thursday, November 18, 2010

    Cranberry Orange Nut Bread


     No French Fridays this week for me. Instead, I'm sharing this recipe for Cranberry Orange Nut Bread. One of my daughters-in-law made this bread for us a couple of Thanksgivings ago. We loved it, and she was sweet enough to share her recipe.


     Full of tart cranberries and crunchy nuts, this orange flavored quick bread makes a delightful not-too-sweet afternoon pick-me-up with a hot cup of coffee or tea. Toasted and spread with a bit of cream cheese, it's also a great breakfast treat.The recipe makes two loaves, so enjoy one now and freeze one for later!

    Did you know? Cranberries are also called bounce-berries, because the good ones bounce when they're ripe!

    Cranberry Orange Nut Bread
    recipe from Madeleine
    (makes 2 loaves)
    4 cups all purpose flour
    1 and 1/2 cups sugar
    1 tsp. baking soda
    1 tsp. salt
    2 eggs, beaten
    1 and 1/2 cups orange juice
    1/2 cup very light flavored olive oil (or canola oil)
    2 cups fresh cranberries,cut in half
    1 cup chopped nuts
    2 tsp. orange zest
    • In a large bowl, whisk together first four ingredients. 
    • In a separate bowl, mix together remaining ingredients.
    • Add the wet ingredients to the dry ingredients and stir until combined.
    • Pour into two greased and lightly floured loaf pans. 
    • Bake at 375° F for 55-60 minutes. 
    • Cool pans on wire rack for 10 minutes. 
    • Remove loaves from pans and continue to cool completely on a wire rack. 

    This post has been added to Foodie Friday at Designs by Gollum.

      Friday, November 12, 2010

      French Fridays with Dorie- Roast Chicken for Les Paresseux


       Roast chicken is one of those kitchen basics that I've never been able to master. Mine is usually passable, but often dry and flavorless. So Dorie's version, Roast Chicken for Les Paresseux- lazy people- was my choice this week for French Fridays with Dorie.  The recipe was incredibly easy, and I'd have to say that it's as perfect for busy people as it is for lazy ones.

       The verdict? A keeper! Roast in my trusty cast iron dutch oven- with rosemary, thyme, oregano and garlic- that one little bird made the whole house smell divine. Potatoes and carrots added about halfway through the cooking time were perfectly done. (The carrots were like candy- please don't skip them! Next time I'll add more.) I let my bird rest upside down for a few minutes before serving, and even the breast meat (that I normally eschew) made lovely moist flavorful slices.


       This recipe includes what Dorie calls "the bread trick." A thick slice of bread is placed in the dutch oven under the chicken, so that it absorbs the chicken drippings and gets browned and crispy. Many who have reviewed this recipe have loved the bread, but alas I can not count myself in the number. Maybe my palate is not as refined as it should be for this to be considered a treat, as I didn't care for it even spread with the luscious creamy roast garlic or the tasty liver that was tucked inside my lovely organic bird. It was beautifully browned and crisp on the bottom, but soggy where the chicken lay on it. And it just didn't appeal to me. Sorry Dorie.

       But the chicken? It was absolutely lovely and I'll definitely make it again exactly as I did this one. Whether lazy or busy, it would be the perfect choice for a dinner that doesn't need to be fussed over. This recipe can be found in Dorie Greenspan's newest book, Around My French Table. To see what others have made this week, visit French Fridays with Dorie!

      Monday, November 8, 2010

      Caramel Stuffed Apple Cider Cookies


       I am not a bossy person by nature. I pretty much go with the flow- I'm a middle child for heaven's sake.  But I'm going to tell you to do something. Now. Make these cookies. Make a cup of tea. Perch one of these puppies over your steaming hot tea for just a minute. Then take a bite, close your eyes and swoon over the gooey caramel apple deliciousness that is this cookie.  I mean, it is fall. And what screams "Fall" more than caramel and apple cider?


       This is another awesome recipe from  Laura at The Cooking Photographer.  (If you don't' know her blog, you really should make a visit- she has so many lovely recipes and photos!) All you'll need- in addition to what you probably already have in your pantry- is a bag of Kraft Caramels and a box of Alpine Instant Spiced Cider. (Yep, those little packets of powder that you mix with hot water.) These two magical ingredients take an ordinary sugar cookie base and transform it into this perfect tea-time treat.


       These cookies are best enjoyed slightly warm, either from sitting atop your tea mug or microwaved for a few seconds. My favorite method? My tea mug of course. (I even used a pair of chopsticks this morning to suspend my cookie, since it was smaller than my big mug.) The warmth of the rising steam from the tea makes the caramel melt ever-so-slightly into a gooey center, surrounded by a crispy sweet-tart apple flavored cookie. Now tell me you can resist that!

      Caramel Stuffed Apple Cider Cookies
      Ingredients
      1 cup softened butter
      1 cup granulated sugar
      1/2 teaspoon salt
      1 box (7.4 oz) Alpine Spiced Apple Cider Instant Original Drink mix -not sugar free- all 10 packets (I found this in my grocery store near the hot chocolate mixes.)
      2 eggs
      1 teaspoon vanilla extract
      1 teaspoon baking soda
      1/2 teaspoon baking powder
      1 teaspoon ground cinnamon
      3 cups all purpose flour
      1 bag Kraft Caramels (14 oz)

      Directions
      • Preheat oven to 350° F. Line cookie sheets with parchment. (You really need the parchment!)
      • In a small bowl whisk together flour, baking soda, baking powder and cinnamon.
      • With your mixer (or an energetic spoon) cream together butter, sugar, salt and all 10 packages of apple cider drink mix powder, until light and fluffy.
      • Beat in eggs, one at a time. Add vanilla and mix well.
      • Gradually add flour mixture to butter/egg mixture. Mix until just combined.
      • Refrigerate for about an hour. (If you're really impatient you don't have to do this, but it makes it so much easier to work with.)
      • When you are ready to bake, unwrap your caramels. 
      • Scoop out cookie dough ball about the size of a walnut. (I used a rounded cookie scoop-full. My scoop holds about a Tablespoon.)
      • Flatten the ball of dough slightly in the palm of your hand. Press the unwrapped caramel into the center of your dough and seal the dough around it, covering it completely. Place on parchment covered cookie sheets 2 inches apart.
      • Bake 12-14 minutes, or until very lightly browned around the edges. Please don't over-bake! Once the cookies are done, slide the parchment off of the baking sheet right out onto the counter. Allow cookies to partially cool on the parchment. When cookies are cool enough to be firm but still slightly warm, carefully twist off of parchment and allow to finish cooling upside down (either on the parchment or on a rack.) If you forget about them and they cool too much and stick to your parchment, put them into the freezer for a few minutes and they'll pop right off.
      • Yield: about 4 dozen, depending on how large you make your cookies (or how many caramels have been snitched out of your bag before you begin.) Store in an airtight container.

      Friday, November 5, 2010

      French Fridays with Dorie- Pumpkin Gorgonzola Flan


       Maybe it's because I was feeling a little bit silly.

      Maybe it's because I'm a huge fan of Jon Scieszka's sense of humor.

      Maybe it's because I spend most of my waking hours with 7 and 8 year olds.

      Whatever the reason was, I just couldn't help myself. The entire time I was making these delightful little flans, one thing kept running through my head. 

      Are you ready?

      Run, run, run, as fast as you can!
      You can't catch me, I'm the Stinky Cheese Flan!

      (I do hope you're familiar with the delightful book, The Stinky Cheese Man and Other Fairly Stupid Tales- written by Jon Scieszka and illustrated by Lane Smith- from which the preceding line was butchered.) If you're not, please take a moment to indulge your inner child here.


       Now that that's out of my system, I have to tell you that this was one of Dorie's recipes that I approached with trepidation. Pumpkin and gorgonzola? I wasn't really too sure I'd love the combination, but I'm glad I forged ahead and tried it. It was super simple to put together, and definitely a dish I wouldn't have tried without the commitment to cooking through Dorie's newest book, Around My French Table

       Dorie says to serve it with crème fraîche and a drizzle of honey, but I found that the drizzle of honey by itself was a perfect complement. The creamy  pumpkin, crunchy walnuts, savory gorgonzola and sweet honey made for a delightful combination of textures and flavors. Each spoonful begged for a repeat performance!

       To see what others have made from Dorie's cookbook this week, look here. You might find this Pumpkin Gorgonzola Flan, a Potato Gratin, a Caramel-Topped Semolina Cake, or Roast Chicken for Les Paresseux! Aren't choices wonderful?

      Update: As participants of the group, we were asked not to share the recipe. I have since found the recipe online and have included a link to it. Girl Cooks World has shared the recipe here!

      Saturday, October 30, 2010

      French Fridays with Dorie: Marie-Hélène's Apple Cake


         This recipe for French Fridays with Dorie comes from Dorie's friend, Marie-Hélène who, from Dorie's description, keeps her recipes stored in her head- just like my mom. You know the type- they throw in a "dollop" of this or maybe a "handful" of that, and everything they make always turns out perfectly. (I'm still trying to make biscuits as good as the ones my mom makes!) Luckily, Dorie was able to figure out the recipe for this lovely little cake so that even I could put it together without a bit of trouble.

        This mouth-watering rustic cake almost seemed more like a pudding to me. Or maybe even a crustless deep dish pie. It was chock full of apples all lightly bound together with a super moist cake batter flavored with vanilla and rum. And SO many apples...I used four different kinds- Cameo, Fortune, Macintosh and Golden Delicious- to give the cake a variety of textures and flavors. I used the Rum specified in the recipe this time, but I think apple brandy would be a great choice the next time I make it.


       This cake would be a delightful mid-afternoon treat with a cup of coffee or tea. (Maybe you could even count it as a serving of fruit!) You can find the recipe in Dorie's new book Around My French Table, or on Epicurious, where Dorie shared the recipe herself. Look here to see what other fabulous bloggers have done with the recipe!

       Thanks so much for all of your "Get Well" wishes for my husband. He's doing much better and will soon be home!

      Wednesday, October 27, 2010

      Eileen's Best Banana Bread


       When life gives you speckled bananas, there's nothing to do but make some bread. Specifically, some heart healthy banana bread.  I haven't been at home very much these last several days and these babies definitely got a bit past the "flecked with brown and have a golden hue" stage. I was needing some comfort food last night, and banana bread fit the bill.

       Why heart healthy? I'm blogging from the hospital ICU waiting room these days. I took hubby to the Emergency Room last week (right after the Hachis Parmentier, I might add) where it was determined that he was having a heart attack and would need major intervention. Monday morning he was in surgery having a very talented man- to whom I will forever be thankful- bypass a few five badly blocked coronary arteries. He's all fixed up now, but groggy, sore and anxious to feel better.


       No butter or eggs in this banana bread, but still it was tender, moist and delicious. It was just sweet enough and full of chopped walnuts giving each bite a wonderful depth of flavor. I used this Cooking Light recipe containing ground flaxseed which adds heart-healthy omega-3 fatty acids. I think we'll be eating a lot more of those in the future. :)


      Eileen's Best Banana Bread
      adapted from Cooking Light (Eileen Solberg) October 2009
      Ingredients
      3/4 cup all purpose flour (fluff, scoop and level)
      3/4 cup whole wheat flour (I used white whole wheat)
      1/4 cup ground flaxseed
      1 teaspoon baking powder
      1/2 teaspoon baking soda
      1/2 teaspoon salt
      1 cup mashed ripe banana (about 2 large)
      1/2 cup plain fat free Greek (or regular) yogurt
      3/4 cup sugar (I used a little bit less and it was plenty sweet)
      1/4 cup light flavored olive oil (or canola)
      1/2 cup chopped walnuts
      1 teaspoon vanilla

      Directions
      • Preheat oven to 325° F 
      • Coat a 5"x9" loaf pan with cooking spray.
      • Lightly spoon flours into dry measuring cups. Level with a knife. In a large mixing bowl, combine flours with flaxseed, baking powder, baking soda and salt.
      • In another bowl, combine mashed banana, yogurt, sugar, oil, walnuts and vanilla.
      • Add the banana mixture to the flour mixture and mix just until combined.
      • Pour into prepared loaf pan.
      • Bake for 1 hour and 10 minutes or until a wooden pick inserted in the center comes out clean. (Check after one hour.)
      • Cool in pan on rack for 10 minutes. Remove from pan and finish cooling on rack.

      Friday, October 22, 2010

      French Fridays with Dorie- Hachis Parmentier


       Hachis Parmentier, or Shepherd's Pie, is this week's recipe for French Fridays with Dorie. Meat and potatoes- good hearty comfort foods- are the main ingredients here. Dorie's version calls for beef and sausage, but she does say to use what you have on hand! I had venison, so that's what went in mine. I also added back the carrots and some nice "beefy" portabella mushrooms. (And of course, a splash of red wine for the venison!) If I make it again, I'll probably add a bit of extra cheese on top- mine seemed to get lost into the potatoes without making a nice brown crust.

       In retrospect,I think I should have baked mine in a smaller (diameter) dish- my potatoes were a little too thin and the sauce bubbled up through them in several places. (I was too anxious, I suppose, to use my new two dollar copper pan I got from the thrift shop yesterday.) Even so, it did make for a good hearty supper on a chilly evening.

       To see what others have done with this delicious recipe from Dorie Greenspan's new book, Around My French Table, look here!


      Tuesday, October 19, 2010

      Skeleton Cookies


      Skeleton Parade
      The Skeletons are out tonight,
      they march about the street
      with bony bodies, bony heads and
      bony hands and feet.

      Bony, bony, bony bones
      with nothing in between
      Up and down and all around
      They march on Hallowe'en!
      Jack Prelutsky


       Skeleton Cookie Rewind! I could hardly wait for October to roll around so I could make these spooky cute little skeletons again. I posted them last year but I thought their little bones deserved another rattle.


       I made these little guys with my favorite Iced Spice Cookie recipe, but your favorite gingerbread man recipe would work just as well. Pipe on their bones and features with some royal icing and you've got yourself some cute little skeletons all ready for a skeleton parade. Are you scared yet?

      Friday, October 15, 2010

      French Fridays with Dorie- Spicy Vietnamese Chicken Noodle Soup


       Today was a lovely, rainy day. A day that was perfect for this soup I've been looking forward to all week. Soup that was Dorie's pick for week three of French Fridays with Dorie. Soup that was probably the best soup I have ever made in my entire life. No kidding!


       Dorie describes this spicy soup as a mix-up of two traditional Vietnamese soups- pho ga, a clear chicken broth with noodles, and la sa ga, a curried coconut milk soup. I should probably say that it's a mix up of three different soups, as I added my own twist to the recipe and added shrimp and mushrooms. (My favorite additions to spicy noodle soup!)


       The spices were perfectly balanced and made each spoonful of soup a delight. The mint and basil leaves sprinkled on top- surprising little bursts of flavor- added just the right finishing touch!  I have to admit that I added a bit too much chili oil to my first bowl which caused a bit of momentary distress. That was short-lived though and I was much more prudent with my next one.


      The recipe can be found in Dorie Greenspan's latest book, Around My French Table.  I've made three recipes from the book so far, and have loved them all! If you'd like to see what others have done with this recipe, follow this link and enjoy!

      Wednesday, October 13, 2010

      Candy Corn Cookie Crunch


       Need a festive snack for Halloween? This sweet and salty one is cute, quick and easy. Just mix together some pretzels, chopped up Oreos, peanuts and candy. Bind the mixture together with some melted white chocolate, break into chunks and enjoy!

        This yummy treat would be cute in little bags for your goblin visitors later this month. I found the original recipe on Your Home Based Mom- she has a version for every holiday, I think! Could this snack be the reason for the jack-o-lantern's toothless grin?

      Candy Corn Cookie Crunch
      adapted slightly from Your Home Based Mom. She has detailed instructions here.
      Ingredients
      1 lb. almond bark candy coating or white chocolate
      14 Oreos, broken into pieces- I used the Halloween ones with orange filling
      1 and 1/2 cups pretzels, broken- I used the thin straight ones
      1 cup candy corn
      1/2 cup peanuts
      1/4 cup Reeses Pieces
      1/2 cup Peanut M&Ms (fall colors)
      Halloween sprinkles

      Cover a cookie sheet with waxed paper or foil. Spread the broken pretzels, broken cookies, peanuts, and about 3/4 of the candy corn on the prepared cookie sheet. Melt the white chocolate or candy coating until smooth, according to package directions. 

      Drizzle the melted white chocolate over the pretzel mixture, spreading with a spatula if needed. Before it sets, sprinkle on the remaining candy corn, M&Ms, Reeses Pieces, and sprinkles. Place the tray into the refrigerator until set. Break into pieces and enjoy! 


      Monday, October 11, 2010

      Uncle Will's Molasses Cookies

       Uncle Will's Molasses Cookies


        Who doesn't love the scent of spicy molasses cookies wafting from the kitchen? They are definitely my favorites, especially at this time of year. There's nothing like a molasses cookie warm from the oven to make you feel all happy and content inside! There are several different versions (here and here) that I like to make, but I'm always open for trying a new recipe. I found these cookies on The Cooking Photographer's blog, and the story she wrote about their background was so compelling they went right to the top of my "must make" list!

       In a nutshell, these cookies are from a recipe passed down through family members from a 1930's baker (Uncle Will) in the Rosebush, Michigan area. The recipe has been modified slightly to adjust for modern ingredients, but otherwise is pretty close to the original. I loved this cookie for not only its warm subtle spices, but for its soft, chewy texture. It's a perfect, old fashioned "cookie jar" cookie that tempts you to reach in for one every time you pass by. Thankfully, some things never go out of style!


      Uncle Will's Molasses Cookies
      Recipe slightly adapted from The Cooking Photographer
      Ingredients
      1 lb. seedless raisins (about 3 cups) * (see note)
      3 cups granulated sugar
      1 and 1/2 cups butter (3 sticks), softened (original recipe called for lard)
      1/2 cup molasses
      3 eggs
      1 Tablespoon cinnamon
      1 Tablespoon allspice
      1 Tablespoon ground cloves
      1 Tablespoon salt
      1 Tablespoon baking soda
      6 cups all purpose flour

      Directions
      • Finely chop, puree or grind raisins to a paste.* Set aside.
      • In a large mixing bowl cream together butter and sugar.
      • Add raisin puree and molasses. Mix well.
      • Add eggs, mixing after each addition.
      • Stir in cinnamon, allspice, cloves, salt and baking soda. Mix well.
      • Add half of flour. Mix well
      • Add rest of flour. Mix just until everything is combined.
      • Divide the dough into 4 or 5 portions. Flatten each and refrigerate at least a couple of hours, but preferably overnight for flavors to develop.
      When you're ready to bake:
      • Preheat oven to 350 degrees Fahrenheit.
      • Generously flour the surface you are using.
      • Roll one portion of dough out to about 1/4 inch. (The dough tends to be sticky, so make sure you flour your surface, the surface of the dough, and your rolling pin.)
      • Cut with round cookie cutter, place rounds about an inch apart on parchment covered baking sheets, and bake for about 12 minutes.
      • Allow cookies to cool on the cookie sheet for a few minutes; remove to rack to cool completely.
      • This recipe makes LOTS. Once baked, the cookies freeze well in an airtight bag. You can also place the well-wrapped portions of unbaked dough in your freezer. ( Let these sit out and thaw a bit before rolling out.)
      Alternately: Scoop tablespoonfuls of dough onto parchment covered baking sheet. Flatten with a glass dipped in sugar. Bake as directed above.


      *The original recipe instructs you to soak your raisins in boiling water before pureeing them. My mom told me that when she was a girl back in the 30's, raisins were much harder (drier) and seedier than they are now, and soaking was necessary when using them in recipes such as this one. Since my raisins were fairly fresh, I skipped the soak that was called for in the original recipe.

       This post has been added to the Hearth and Soul Blog Hop.
      H‘nSgirlichef

      Friday, October 8, 2010

      French Fridays with Dorie: Gérard's Mustard Tart

       Here I am, coming in just under the wire with Gérard's Mustard Tart, this week's offering for French Fridays with Dorie. Truthfuly, these lovely tarts almost didn't get made. At first, I was a bit apprehensive about the recipe because of the predominantly featured mustard. The original recipe also called for leeks and carrots, neither of which I was in the mood for preparing tonight. But then I caught sight of a small basket of tiny grape tomatoes- some of the last of the season- that I picked up at my brother's last week end. Tomatoes that were just the right size for the little tart pans in my cupboard.

       I cut the recipe down just a bit to make four small tarts. I already had pastry in my freezer that I had previously made, so I went with that rather than Dorie's. (I was tired tonight, okay?) The combination of Dijon and stone ground mustard really added a lovely flavor- I was surprised that I liked it so much! I will definitely try these again, maybe even with the carrots and leeks next time. (This would be fabulous made in mini muffin tins for appetizers.) I had one of these warm from the oven and another one cold for a snack. They were fabulous both ways! If you'd like the recipe, it can be found in Dorie's newest book, Around My French Table. To see what others did with the recipe, look here and drool!

       I'll be back soon with a recipe for some lovely molasses cookies I just made. Can you smell the cloves and ginger? I can, and I can't wait for the last batch to cool!

      Friday, October 1, 2010

      French Fridays with Dorie- Gougères

      Gougères for French Fridays With Dorie

      Today was the first rainy day we've had in a while, and tonight when I got home from work heavenly smells were coming from the kitchen- hubby was putting together some beef and barley soup for supper. And what's better than a steaming bowl of soup on a chilly rainy evening? I can answer that... It's a steaming bowl of soup accompanied by these cheesy little puffs, gougères. 

      I've been in a culinary rut recently, and when I got the chance to join a group that's baking through Dorie Greenspan's newest book, Around My French Table, I decided to take the plunge and venture a little bit out of my comfort zone.  I love Dorie's books- reading one of her recipes is like having a best friend in the kitchen with me. She shares the background of each recipe and also ways that she might change it up in her own kitchen- the photographs alone keep me poring over the pages.

      Dorie recommends serving these with champagne, but tonight was was more of a "soup and hot tea" night here. They were great with hubby's soup, but I'm thinking that the possibilities for these savory little puffs are endless. Dorie (sounds like we're on a first name basis here, doesn't it?) says that these freeze well unbaked, so I scooped some of them onto cookie sheets and froze them for later. They'll be great quick appetizers either by themselves or stuffed with chicken salad or even a little bit of herbed cheese.

      We've been asked to not share Dorie's recipes, but I found this one for the gougères that Dorie shared herself on NPR a couple of years ago. Enjoy!

      Tuesday, September 21, 2010

      Cushaw Squash Pie


      Looks like pumpkin pie, smells like pumpkin pie, but it's NOT your average, run of the mill pumpkin pie. What is it?


      It's a Cushaw Squash Pie! The Cushaw (or Kershaw) Squash, sometimes called a Tennessee Sweet Potato, is an heirloom winter squash grown mostly in the southern United States. It's hardy, heat tolerant and resistant to squash borers, which makes it easier to grow without pesticides. If you're careful about where you grow it, the seeds can be saved from one year to the next, ensuring a steady supply of this versatile squash that can be used for both sweet and savory dishes.


      Many southern cooks prefer the sweet yellow flesh of the Cushaw for making pumpkin pies. After tasting this pie that I made from a recipe found  on Chickens in the Road  I'm not surprised. The squash pie had  the same warm spices as pumpkin pie, but had a milder taste and silky texture. Actually, you can use Cushaw squash in any recipe that calls for pumpkin. Next up for me? Probably Cushaw Butter, which I've heard is a family tradition in parts of Tennessee. 

      I really hope you're able to find one of these heirloom treasures at your local farmer's market. I'm saving the seeds from mine so I'll be sure to have more next year!


      Prepare the Squash:
      Preparing the squash is easy. Wash it, cut it in half, remove the seeds and stringy part, and bake it cut side down on a lightly greased baking sheet. (350 degrees for about an hour and fifteen minutes or until tender when pierced with a fork) After scooping out the baked flesh, mash it well or put through a Foley food mill. Proceed as you would with any other pumpkin recipe.  (The seeds can be roasted like you would roast pumpkin seeds.)

      Spiced Cushaw Pie
      recipe adapted from Chickens in the Road
      You'll need:
      Your favorite pastry for a nine inch pie 
      2 cups prepared squash (or pumpkin)
      2/3 cup brown sugar
      1 teaspoon ground cinnamon
      1/2 teaspoon ground ginger
      1/2 teaspoon salt
      1/2 teaspoon freshly ground nutmeg
      1/4 teaspoon ground cloves
      3 large eggs, beaten
      1 teaspoon vanilla
      12 oz. can evaporated milk
      1 Tablespoon melted butter
      Directions:
      In a small bowl, mix together beaten eggs, evaporated milk and vanilla. In a large bowl, combine squash, melted butter, sugar, cinnamon, ginger, salt, nutmeg and cloves. Add milk mixture to squash mixture and mix until well combined. Pour into pie pan (9 inch) lined with an uncooked pastry shell . (Use your favorite pie crust recipe.) Bake at 375 degrees Fahrenheit (lower half of oven) for an hour, or until a toothpick inserted in the center comes out clean. (Mine took a bit longer.) Chill and serve. Keep refrigerated.


      This post is linked to:
      H‘nSgirlichef


      Monday, September 13, 2010

      Fresh Apple Cake


       I've been a bad blogger. AWOL. These last two weeks have been a bit crazy and something had to go. So blogging got shoved to the back burner until I got all of my school stuff under control. And all the other "stuff" too. Well maybe not all of it, but enough of it to be able to sit down and maybe think  about what's been going on in my kitchen. And to dust off my poor neglected camera.

       Thanks to my brother, I've been blessed with several baskets of "just a little bit less than perfect" honey crisp apples. With this wonderful bounty, I've been making applesauce, apple butter and this lovely little apple cake. This is another recipe from my mom, that she got many years ago from someone at church. (There are some really good cooks at our little church. Homecomings with dinner on the grounds are always an occasion to eat way too much good food!)  This cake has just the right combination of spices and will fill your kitchen with scents of apple and cinnamon goodness. The apples (and raisins if you choose to add them) make the cake incredibly moist. You could add a caramel glaze if you like, but I found that it didn't really need another thing. And if by chance you have any of this lovely cake left over, it's even better the next day.


      Fresh Apple Cake

      Ingredients:
      3 cups apples, peeled cored and chopped (I chopped mine pretty small)
      1/2 cup golden raisins (optional)
      1 cup nuts, chopped
      2 eggs, beaten
      3/4 cup oil (I used canola)
      1 cup brown sugar
      1 cup granulated sugar
      2 cups all purpose flour
      1/4 tsp. ground cloves
      1/4 tsp. ground nutmeg
      1/2 tsp. ground cinnamon
      1/2 tsp. salt
      1 1/2 tsp. baking powder
      1 tsp. vanilla extract

      Directions:
      • Grease and flour tube or bundt pan. Preheat oven to 350 degrees Fahrenheit.
      • In a large bowl, whisk together the eggs and oil. 
      • Add sugars and vanilla and mix well.
      • Sift together flour, salt, spices and baking powder. Stir flour mixture into sugar mixture. 
      • Stir in apples, nuts and raisins. 
      • Put apple mixture into prepared pan and bake for 55 to 60 minutes. 
      • Cool for 5 minutes in pan and then invert onto wire rack to finish cooling.

      Friday, August 27, 2010

      Back to School with Better-for-you-Brownies


       Well, it was back to school for me this week. (I apologize for being derelict in my blogging. It's just that I really can't afford to quit my day job.) Back to teacher's meetings and trainings and setting up a classroom to welcome my students next week. Contrary to all of my protests about going back to work, I do like this time of year. It's a new beginning- another New Year- another January so to speak- just without the cold weather. Like a box of crayons the first time you open them, or a newly sharpened pencil. A new class with new faces and new joys and new challenges. A brand spanking new year. 

       And every New Year should have resolutions, right? Along with my long list of professional resolutions (with which I will not bore you) I have a few personal ones which I'm going to make public just to help myself stay accountable for them. They're not unreasonable- really! They are (in no particular order of importance):

      • Eat breakfast every morning.
      • Take time to pack a healthful lunch. 
      • Take a walk every day. 


      So you're probably wondering where the brownies fit into the scheme of things. I was browsing through the new Woman's Day magazine at the checkout line in the grocery store and saw a bevy of bars that looked absolutely scrumptious. They were all made with whole-wheat flour and offered lower fat and sugar than my traditional recipes. So I bought the magazine to try some of them. Teachers get hungry, you know.

       Many of my colleagues are also trying to begin the new year with healthier choices, so I thought that instead of a calorie laden treat in the teacher's lounge I'd bring in these chocolaty bars. They definitely won't entirely replace the traditional gooey fudge brownie in my life, but right now they're an alternative that I can share without all the guilt!


      Better-for-you-Brownies
      recipe from Woman's Day, September 2010
      Ingredients:
      1 cup (6 oz.) semisweet chocolate chips
      1/2 stick (1/4 cup) unsalted butter, cut up
      1 cup packed light brown sugar
      1 cup unsweetened applesauce
      4 large egg whites
      1 cup white whole-wheat flour
      1/4 cup unsweetened cocoa
      1/2 tsp. salt
      1/2 cup coarsely chopped walnuts

      Directions:
      • Heat oven to 350 degrees Fahrenheit. Line a 9x13 pan with nonstick foil. (Leave plenty of foil on each edge so you can lift it out later.)
      • Put the chocolate chips and the butter in a large microwave safe bowl. Microwave on high, stirring every 30 seconds, until butter and chocolate are melted and smooth. (It only took mine one and one-half minutes.)
      • Whisk in brown sugar, applesauce and egg whites until mixed well. Stir in flour, cocoa and salt just until blended.
      • Spread into foil lined pan. Sprinkle walnuts on top.
      • Bake for 20 minutes or until a wooden pick inserted in the center comes out clean. Cool completely in the pan on a wire rack.
      • Carefully lift the sheet of brownies out by the edges of the foil and place onto a cutting board. Cut lengthwise into four strips, and then cut each strip into 6 pieces.
      Per bar: 118 calories, 2 g protein, 17 g car, 1 g fiber, 6 g fat, 5 mg chol, 61 mg sodium
      Related Posts with Thumbnails