Showing posts with label chocolate. Show all posts

Sunday, February 1, 2015

Chocolate Peanut Butter Globs


Neither judge a book by its cover, nor a cookie by its name! While the moniker "Glob" is not commonly associated with a cookie jar confection, this is a delicious exception to the rule.

Lots of chocolate, walnuts, pecans and peanut butter chips all held together by just a bit of flour, make a huge chunky brownie-like cookie that just begs for a nice tall glass of cold milk.

This recipe comes from Ina Garten's Barefoot Contessa Foolproof. No need to chill the dough, so you can have these ready on short notice, when you have a chocolate craving that just won't quit. Now how easy is that?


Chocolate Peanut Butter Globs
recipe from Barefoot Contessa Foolproof

Ingredients
6 Tblsp. unsalted butter (3/4 stick)
12 oz. semi-sweet chocolate chips, divided
2  oz. unsweetened chocolate
2 extra large eggs
1 Tblsp. instant espresso powder
2 tsp. vanilla extract
3/4 cup granulated sugar
1/3 cup + 1 Tblsp. all purpose flour (I have also used gluten free flour with good success.)
1 tsp. baking powder
1/4 tsp. Kosher salt
1 cup whole walnut halves (NOT chopped)
1 cup whole pecan halves (NOT chopped)
2/3 cup peanut butter chips

Directions
  • Preheat oven to 325 F.
  • In the top part of a double boiler over hot water, melt the butter, the unsweetened chocolate, and 6 oz. of the chocolate chips. Stir until just melted. Remove from heat and let cool 15 minutes. You don't want it to cook your eggs!
  • In a small bowl, stir together 1/3 cup flour, baking soda and salt. Set aside.
  • In another bowl, mix together walnuts, pecans, peanut butter chips, remainder of the chocolate chips and 1 Tblsp. flour. Set aside.
  • In the bowl of an electric mixer (paddle attachment), mix together the eggs, espresso powder and vanilla extract.
  • Add sugar to egg mixture. Beat (medium-high) for two minutes until the batter is thick and falls back on itself in a ribbon.
  • With mixer on low, add cooled, melted chocolate mixture to egg mixture until combined.
  • Fold in the flour mixture with a spatula.
  • Fold in nuts and chips.
  • With two soup spoons (or a large cookie scoop) drop mixture onto parchment covered cookie sheets.
  • Bake exactly 15 minutes. Cool on cookie sheet.
  • Yield: 20-22 large cookies

Sunday, May 26, 2013

"The Chewy" Chocolate Chip Cookie


     Okay. So I haven't been spending too much time in the kitchen, as evidenced by my neglected little space here.  My right hand has been out of commission ever since an unfortunate tumble on a riser left me with a torn ligament. Who knew that school pictures were so hazardous? Repairs have been made, but I'll be in a cast for a while yet.

      My grandson in TX requested cookies, so I couldn't let a little thing like a bum thumb get in the way. I looked to Alton Brown and his mixer friendly recipe for  The Chewy, and he did not disappoint me. The only change I made was to use dark brown instead of light brown sugar. And I chilled the dough overnight, which made it even harder to scoop left handed, but made for a nice compact cookie that didn't spread too much in the oven.

     This cookie lived up to its descriptive name, and was still pronounced "yummy" (and still chewy) after a few days in the hands of the postal service. It's definitely a "keeper" recipe, especially since my trusty mixer did most of the hard work! And my grandson's smiles across the miles made it totally worth it. :)


The Chewy
Recipe from Alton Brown, Food Network
I followed the recipe linked above with a few minor changes I've indicated below.
Ingredients- If you have a food scale, I recommend weighing the ingredients- especially the flour.
2 sticks (16 Tblsp.) unsalted butter
12 oz. bread flour (about 2 1/2 cups)
1 tsp. Kosher salt
1 tsp. baking soda
2 oz. granulated sugar (about 4 1/2 Tblsp.)
8 oz. light brown sugar (about one cup) I used dark brown.
1 large egg
1 large egg yolk
1 oz. whole milk (2 Tblsp.)
1 1/2 tsp. vanilla extract
12 oz. chocolate chips
Directions:
  • Melt butter over low heat. Cool slightly.
  • In a stand mixer (using paddle attachment) mix butter and both sugars on med. speed for 2 minutes.
  • Sift together flour, salt and baking soda. (I like to sift onto a piece of waxed paper.)
  • In a small bowl, whisk together the egg, the egg yolk, milk and vanilla. Add to butter and sugar in mixer (on low speed) until combined.
  • Gradually pour in flour mixture, scraping down sides of bowl as needed.
  • Once flour has been incorporated, reduce mixer speed to "stir" and add chocolate chips.
  • Chill dough for at least an hour. (I chilled mine overnight)
  • Preheat oven to 350F.
  • Scoop dough onto parchment covered baking sheets.
  • Bake 13-15 minutes, depending on your oven and the size of your cookies. I used the medium sized scoop from Pampered Chef, and baked them about 14 minutes. Using this scoop, the recipe yielded about 3 1/2 dozen cookies.
  • Slide parchment (cookies and all) onto racks to cool. Remove cookies from parchment to rack when they've cooled enough to firm up.


Tuesday, December 20, 2011

Irish Cream Chocolate Chip Parfaits and a Handmade Keepsake Ornament

Oh yes, I did. 
     Those really are Irish Cream dipped chocolate chip cookies nestled snugly between luscious layers of whipped cream. And they're sitting in my refrigerator getting more delicious by the minute. As they mellow, the Irish Cream soaked cookies become almost cake-like, and each spoonful is a bite of creamy goodness studded with crunchy chocolate chips suspended in silky whipped cream.

     Surprisingly enough, the best cookies for this recipe are the crunchy store-bought ones. (Chips Ahoy, if you can get them.) I've included a link in the recipe for a non-alcoholic Irish Cream if you prefer not to go the alcoholic route, but I'm also thinking that any sweet milky coffee-type drink (like a bottled frappuccino) would work.

     My friend Felicia introduced me to this wonderfully quick and easy make-ahead dessert. (Can you believe there are only three ingredients?) She makes hers in a 9x12 dish, but I thought it would also be cute in individual serving jars. But isn't most anything cuter in a Weck jar?


     Speaking of cute, here's what has been keeping my attention these last few weeks. Yep, grandson has moved back to VA and we've been having lots of family fun together. (Yay!) Here's a little project that we did together that makes a great keepsake ornament. (Grandmas love these things!) This is one of my favorite ornaments, and I've been making these with my students for years.


This idea came from Little Giraffes, and they have a link to a printable tag here. Instructions: Paint child's palm and fingers white. Have them wrap their hand and fingers around a ball shaped ornament to transfer their handprint. Decorate with paint markers, and don't forget to put your child's name and date! Include a tag with this poem:
These aren't just five snowmen, 
As anyone can see.
I made them with my hand 
Which is a part of me.
And now each year when you trim the tree
You'll look back and recall,
Christmas of 2011
When my hand was just this small!

I'll be back soon with more holiday goodies- my baking partner is back and we plan to get into lots of cookie trouble together!

Irish Cream Chocolate Chip Parfait Recipe
recipe from Felicia
Ingredients
1 pkg. Chocolate Chip cookies, crunchy ones- not soft (Chips Ahoy work beautifully.)
Whipped cream (made from a pint of heavy cream) or 1 tub Whipped topping
Irish Cream liqueur or non-alcoholic Irish Cream (I'm thinking that even a bottled frappuccino would work here.)
  • Pour about 1/2 cup of Irish Cream into a bowl. (More if you need it) Dip cookies one at a time into the Irish Cream. I usually let them stay in a few seconds and then turn them over to make sure they're completely covered. Don't leave them in long enough to get soggy- they'll fall apart.
  • For a 9x12 baking dish: Start with a layer of dipped cookies and then top with a layer of whipped cream. Repeat the layers and finish with a sprinkling of crushed cookies.  
  • For parfait glasses or canning jars: Alternate layers of dipped cookies and whipped cream. End up with whipped cream as the top layer and then sprinkle with some crumbled cookies. 
  • Cover and refrigerate for at least a couple of hours (can be done a day ahead) before serving so the cookies have a chance to absorb the liqueur and soften.


Wednesday, October 5, 2011

Triple Threat Brownies (Or should I say Triple Treat?)


     Disclaimer: These brownies are only sort of homemade. They're homemade in the sense that you make them at home. But they are very easy. You can put them together very quickly. And they are very good. Here's what you'll need:


     Double Stuff Oreos, brownie mix, and refrigerated cookie dough. Yep, that's it. Three things. (If you don't count the extra ingredients that go in the brownie mix, anyway.)

     Here's what you do. First, line a 9x9 baking pan with parchment paper or nonstick foil. Press that refrigerated chocolate chip cookie dough evenly over the bottom of the pan. Cover the dough with a layer of Oreos. Mix your brownies according to the directions on the box and pour the batter right over the top of the Oreos. That's it. Bake it at 350 degrees for about 40-45 minutes, or until the brownie layer is done. Cool completely in the pan, then slice and swoon.

     Since I'm trying to practice moderation in all things sweet, I cut them into small bars. But if you want something a little more festive, you could cut them big enough to hold a scoop of vanilla ice cream with some fudge sauce poured over the top. Visit Kevin and Amanda for their wonderfully decadent "even more homemade" version of these. Just be prepared to drool!

Monday, June 6, 2011

Rocky Road Fudge Bars


     Two weeks of school left (not that I'm counting,) and end of year preparations have left our teaching staff stressing over assessments, data collection and school improvement plans for next year. The kids, on the other hand, are already making plans for their upcoming weeks of freedom and have visions of bare feet, water parks and lazy summer days dancing in their heads. When patience gets thinner and teacher survival mode kicks in, chocolate can be a girl's best friend.

     Luckily I found these Rocky Road Bars on The Sweet Details (formerly Eating in Winnipeg) just in time to make a T.G.I.F. treat for the teacher's lounge. They turned out gooey and decadent, with walnut studded layers of chocolate, cream cheese and marshmallows. Just what the doctor ordered. Every time I passed by them I found myself cutting off just a little sliver of chocolaty deliciousness to help get me through the day.


     The chocolate chips and walnuts gave these luscious bars just the right toothsome bite, while the marshmallows and creamy fudge frosting made them gooey and delicious. I hope you try these- they're  perfect for calming frazzled nerves and putting a smile on your face. I guarantee. :)

     If you're looking for more delicious treats, check out Amanda's new blog, The Sweet Details. You'll find many more recipes there to tempt your taste buds!


Rocky Road Fudge Bars
Ingredients
Base:
1/2 cup (one stick) butter or margarine
1 oz. unsweetened chocolate, chopped
1 cup all purpose flour
1 cup sugar
1 teaspoon baking powder
1 teaspoon vanilla
2 eggs
3/4 cup chopped nuts (I used walnuts.)
Filling:
1 (8 oz.) package cream cheese, (I used Neufchatel.) softened- Reserve 2 oz. for frosting
1/4 cup (half stick) butter or margarine, softened
1/2 cup sugar
2 Tablespoons all purpose flour
1/2 teaspoon vanilla
1 egg
1/4 cup chopped nuts (I used walnuts.)
1 (6 oz.) pkg. semi-sweet chocolate chips
2 cups miniature marshmallows
Frosting:
1/4 cup (one half stick) butter or margarine
1/4 cup milk
1 oz. unsweetened chocolate, chopped
Reserved (2 oz.) cream cheese
3 cups powdered (confectioner's) sugar, sifted
1 teaspoon vanilla

Directions:
  • Heat oven to 350F. Grease and flour 13x9 inch pan. (I used non-stick foil.) In a large saucepan, melt 1 stick of butter and one oz. chocolate over very low heat, stirring until smooth. Remove from heat. Stir in one level cup flour and remaining base ingredients. Mix well and spread in prepared pan.
  • In small bowl combine 6 oz. softened cream cheese, 1/4 cup softened butter, 1/2 cup sugar, 2 Tablespoons flour, 1/2 teaspoon vanilla and one egg; beat one minute at medium speed until smooth and fluffy. Stir in 1/4 cup nuts. Spread over chocolate mixture. Sprinkle evenly with chocolate chips.
  • Bake at 350F for 25-35 minutes, or until toothpick inserted in center comes out clean. (I baked mine 30 minutes.) Remove from oven and immediately sprinkle with marshmallows. Return to oven and bake an additional two minutes.
  • While marshmallow layer is baking, in large saucepan combine 1/4 cup butter, 1/4 cup milk, 1 oz. chopped unsweetened chocolate, and reserved 2 oz. cream cheese. Cook over low heat, stirring until smooth. Remove from heat; stir in confectioner's sugar and vanilla until smooth. Immediately pour hot frosting over puffed marshmallows and lightly swirl with knife to marble. Refrigerate one hour or until firm. Cut into bars. Store in refrigerator.


Saturday, January 22, 2011

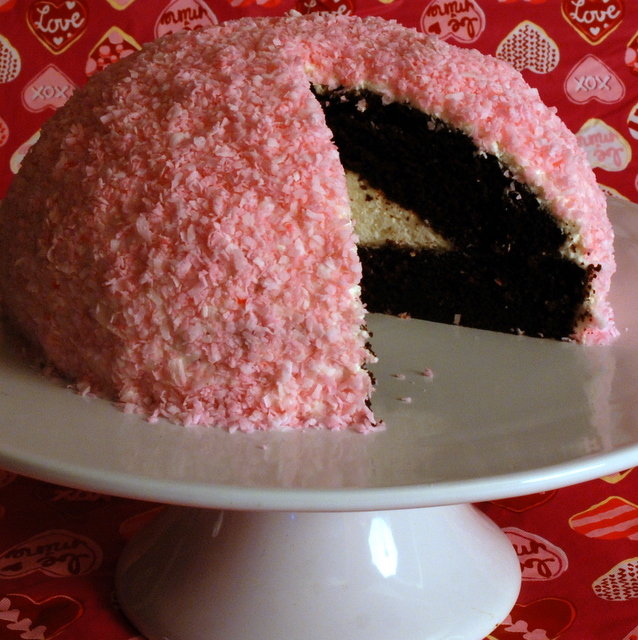
Ode to a Pink Sno Ball


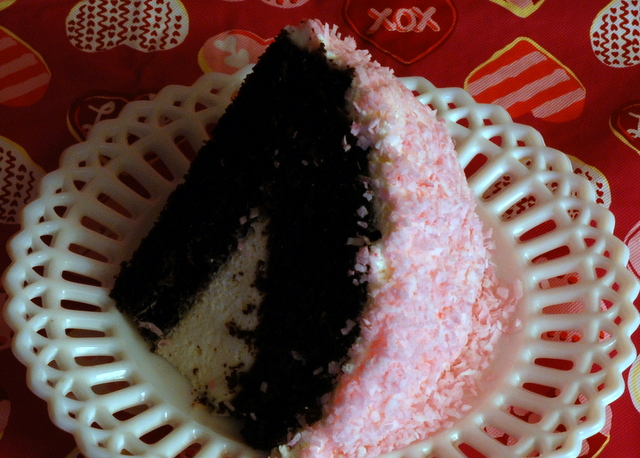
Oh lovely Sno-Ball, your glowing pink coconut beckons. Your silken vanilla creme- a treasure hidden deep within your chocolate deliciousness- concealed under your marshmallow dome. You stole my heart years ago, and I am still hopelessly smitten.


 How about you? Do you hold the same affinity for that time honored Hostess treat? Do you watch for the changing colors of Sno Balls like you watch for the changing of the seasons?

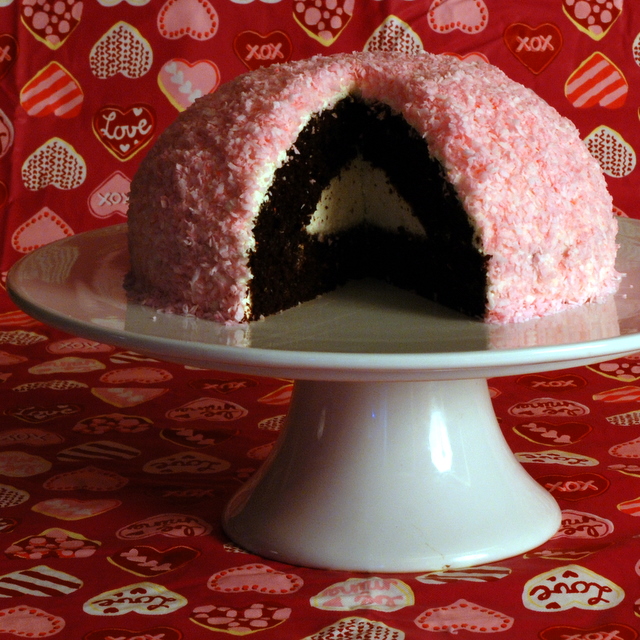
 One of my students gave me the January Cook's Country magazine for Christmas (Thanks again, M.!) and this Chocolate Snowball Cake was pictured inside the back cover. Being a long time lover of those tasty Hostess treats, I knew I had to pay homage to the Sno Ball I've known and loved, by baking this tasty tribute.


 It was absolutely wonderful even though it hasn't replaced the original Sno Ball in my heart of hearts. (It must be something about the preservatives and the crinkly plastic wrapper that keeps bringing me back.) It has, though carved out its own special place in my world, the perfect treat for a birthday or as a special sweet for my Valentine.


No special pan is needed to make your own little bit of nostalgia. You could even use a cake mix if you want. If you're not a chocolate fan, make your cake any flavor you like. It won't be a Sno Ball, but I'm sure it will still be yummy!


For the Sno Ball Cake, you'll need:
  • Two nine-inch layers of cake- I used Hershey's Black Magic cake (recipe follows) but you could use your favorite.
  • A two-quart bowl- I used a Pyrex bowl. It is helpful if the bowl is glass so you can see through it when you arrange your cake in it. Mine was opaque though, and it worked fine. (original recipe called for a 1 1/2 quart bowl)
  • Plastic wrap to line your bowl
  • One recipe of Marshmallow Frosting (recipe follows)
  • Two cups of shredded sweetened coconut plus 2 drops of red or pink food color
Marshmallow Frosting
Ingredients:
1/2 cup water
2 teaspoons unflavored gelatin
10 tablespoons (1 1/4 sticks) unsalted butter, softened (as in not liquid but really, really soft)
2 teaspoons vanilla extract
1/8 teaspoon salt
3 cups marshmallow cream (about 9-10 oz)
Directions:
Combine water and gelatin in large bowl and let sit until gelatin softens, about 5 minutes. Microwave until mixture is bubbling around edges and gelatin dissolves, about 30 seconds. (Mine took at least a minute, but my microwave is small. Your mixture does need to heat and be bubbling around the edges.) Stir in butter, vanilla and salt until combined. Let mixture cool until just warm to touch, about 5 minutes. (Mine did not take this long to cool.) Whisk in marshmallow creme until smooth. I whisked about one third of the marshmallow creme at a time. When you finish, the mixture will be thin. Refrigerate the mixture until it is thick and spreadable, about 30 minutes.

To Assemble Sno Ball Cake:
  •  Prepare Marshmallow Frosting and put in refrigerator to set. 
  • Combine coconut and food coloring (I whirled it together in my food processor)
  • Line your bowl with plastic wrap, leaving the ends overhanging the edges of the bowl.
  • Cut one of the cooled cake layers into 8 even wedges. Line the bowl with the cake wedges, packing gently so there are no spaces between wedges. This was where I ran into trouble the first time I made it. I couldn't get them to fit together in the bowl.The second time though, I trimmed the top edge (diagonally) off of each of the three sides of each wedge. After trimming the wedges they fit together nicely. There shouldn't be any gaps on the inside or in the parts touching the bowl. If you have any gaps on the inside, fill them with with parts you trimmed off.


  • Fill cake lined bowl "cavity" with one cup of the marshmallow frosting.
  • Top with the remaining nine inch layer cake, trimming it to fit the inside of the bowl.
  • Pull the edges of the plastic wrap over the cake, and put it in the refrigerator about one hour.
  • Unwrap the cake and carefully invert it onto serving dish. Remove plastic.

  • Spread remaining marshmallow mixture evenly over the cake and sprinkle with coconut. (I found the frosting to be  difficult to spread evenly, but the coconut covered it nicely.)
  • Slice, serve and enjoy your little bit of nostalgia! :)


Hershey's Black Magic Cake
Recipe from Hershey's
Ingredients
2 cups sugar
1 3/4 cups all purpose flour
3/4 cup cocoa powder
2 teaspoons baking soda
1 teaspoon baking powder
1 teaspoon salt
1 cup buttermilk
2 eggs
1 cup strong coffee
1/2 cup vegetable oil
1 teaspoon vanilla

Directions
  • Preheat oven to 350°F 
  • Grease and flour 2 nine-inch round cake pans.
  • In your mixer bowl, combine dry ingredients.
  • Stir in eggs, coffee, oil and vanilla.
  • Beat on medium speed for two minutes.
  • Divide batter evenly between the two pans. (Batter will be thin.)
  • Bake 30-35 minutes or until toothpick inserted in the center comes out clean.
  • Remove from oven and cool on wire rack for 10 minutes. Remove from pans and finish cooling on racks.
This post is linked to Ingredient Spotlight: Cocoa @ Eat at HomeFull Plate Thursday at Miz Helen's Country Cottage, and  Sweets for a Saturday at Sweet as Sugar Cookies.

    Wednesday, November 24, 2010

    A Giveaway! and Felix K.'s 'Don't even try to say these aren't the best you've ever eaten because they are' Chocolate Chip Cookies


     Is there room in your recipe box for another Chocolate Chip Cookie? I have my favorites, but I'm always trying out new recipes just to see if I can find what I consider to be "THE" cookie. My grandson arrived Saturday evening for a two week stay, and one of the first things he requested was to make cookies with his Mimi. And what kind did he want? Chocolate chip, of course.

     I came across this recipe earlier this year when Anna at Cookie Madness gave it good reviews. And with a name like Felix K.'s "Don't even try to say these aren't the best you've ever eaten because they are" Chocolate Chip Cookies, I had to try them. (I love a challenge!)


     The verdict? Well they're definitely in the running for their lofty title- they really are very good and I'll surely make them again.  There's a slightly crisp edge to these cookies giving them a good bite, but the rest of the cookie is good and chewy, just like I like it. They're sturdy cookies, but not dry, and they keep their shape nicely even without chilling the dough before baking. (That's a plus for me because when I really want cookies, waiting for the dough to chill can seem like forever.)

     Here's the link to the recipe for Felix K's 'Don't even try to say these aren't the best you've ever eaten because they are' Chocolate Chip Cookies. The only change I made was to use Smart Balance 50/50 blend (sticks) instead of butter. I also made the cookies smaller than the original recipe called for. (Three tablespoons of dough makes a really big cookie!) I used my 2 tablespoon cookie scoop instead, and just slightly flattened the tops before baking.

     And in honor of my little grandson's love of cookies, and to thank you all for being such wonderful friends, I'd love to give away a little something for your holiday baking pleasure- a copy of Holiday Cookies from America's Test Kitchens.


     All you have to do is leave a comment on this post. If I can figure out how to work the random number thingy, I'll use it to select a winner. If the non-technological side of my brain wins out, I'll have my grandson pick a number out of a hat (or a cookie jar, which seems more appropriate somehow.) Comments close on Nov. 30th- I want someone to have plenty of time to use these lovely cookie recipes!

    Disclaimer:  This is not a sponsored give-away, and I am not being compensated in any way. I just saw this on the magazine rack in the store and thought it would be fun to share!

    Friday, August 27, 2010

    Back to School with Better-for-you-Brownies


     Well, it was back to school for me this week. (I apologize for being derelict in my blogging. It's just that I really can't afford to quit my day job.) Back to teacher's meetings and trainings and setting up a classroom to welcome my students next week. Contrary to all of my protests about going back to work, I do like this time of year. It's a new beginning- another New Year- another January so to speak- just without the cold weather. Like a box of crayons the first time you open them, or a newly sharpened pencil. A new class with new faces and new joys and new challenges. A brand spanking new year. 

     And every New Year should have resolutions, right? Along with my long list of professional resolutions (with which I will not bore you) I have a few personal ones which I'm going to make public just to help myself stay accountable for them. They're not unreasonable- really! They are (in no particular order of importance):

    • Eat breakfast every morning.
    • Take time to pack a healthful lunch. 
    • Take a walk every day. 


    So you're probably wondering where the brownies fit into the scheme of things. I was browsing through the new Woman's Day magazine at the checkout line in the grocery store and saw a bevy of bars that looked absolutely scrumptious. They were all made with whole-wheat flour and offered lower fat and sugar than my traditional recipes. So I bought the magazine to try some of them. Teachers get hungry, you know.

     Many of my colleagues are also trying to begin the new year with healthier choices, so I thought that instead of a calorie laden treat in the teacher's lounge I'd bring in these chocolaty bars. They definitely won't entirely replace the traditional gooey fudge brownie in my life, but right now they're an alternative that I can share without all the guilt!


    Better-for-you-Brownies
    recipe from Woman's Day, September 2010
    Ingredients:
    1 cup (6 oz.) semisweet chocolate chips
    1/2 stick (1/4 cup) unsalted butter, cut up
    1 cup packed light brown sugar
    1 cup unsweetened applesauce
    4 large egg whites
    1 cup white whole-wheat flour
    1/4 cup unsweetened cocoa
    1/2 tsp. salt
    1/2 cup coarsely chopped walnuts

    Directions:
    • Heat oven to 350 degrees Fahrenheit. Line a 9x13 pan with nonstick foil. (Leave plenty of foil on each edge so you can lift it out later.)
    • Put the chocolate chips and the butter in a large microwave safe bowl. Microwave on high, stirring every 30 seconds, until butter and chocolate are melted and smooth. (It only took mine one and one-half minutes.)
    • Whisk in brown sugar, applesauce and egg whites until mixed well. Stir in flour, cocoa and salt just until blended.
    • Spread into foil lined pan. Sprinkle walnuts on top.
    • Bake for 20 minutes or until a wooden pick inserted in the center comes out clean. Cool completely in the pan on a wire rack.
    • Carefully lift the sheet of brownies out by the edges of the foil and place onto a cutting board. Cut lengthwise into four strips, and then cut each strip into 6 pieces.
    Per bar: 118 calories, 2 g protein, 17 g car, 1 g fiber, 6 g fat, 5 mg chol, 61 mg sodium

    Friday, August 6, 2010

    Mini Brownie Bites


     Did you ever have one of those days when you just needed a little bit of chocolate?  Today was one of them for me. School is starting back up soon, and I feel like I haven't gotten anything accomplished that I wanted to. Back in June, when I looked at the weeks spreading out before me that I would have off, I made grandiose plans of cleaning my basement, baking and blogging, making jam, canning tomatoes, reading that stack of books that just keeps getting taller, ........you know how it goes. Now I'm looking at just a couple of weeks left. Will I have time for it all? I don't know, but I did have time to make these. These didn't solve my time management issues but they sure were tasty.


     Little nuggets of chocolate nutty goodness that were ready in a jiffy, these were probably the quickest and easiest cookies that I've made in a while. Six ingredients and about 10 minutes were all I needed to have these cooling in my  kitchen. I made these this afternoon, and I'm having trouble keeping myself from picking up one of these two-bite cookies every time I pass by them.

     I found this recipe scribbled on the back of an envelope stuck in my "try this" file. It was originally called Seven Minute Chocolate Cookies, but after making these I took the liberty of renaming them. They were so much like a brownie in taste and texture that I thought their new name was much more fitting. Enjoy them with a cold glass of milk and say "Thank you very much." (You're welcome.)

    Mini Brownie Bites
    Recipe found scribbled on the back of an envelope in my "Try this" file. If you happen to know where it came from originally, please let me know!
    Ingredients:
    1/4 cup butter (1/2 stick)
    1 pkg. (12 oz.) semisweet chocolate morsels
    1 can (14 oz.) sweetened condensed milk
    1 tsp. vanilla
    1 cup all purpose flour
    1 cup chopped pecans ( I used about a cup and a half, because I didn't want to put such a small amount back in the freezer. I liked the extra nuts.)

    Directions:
    • Combine the butter (cut into chunks), semisweet morsels and condensed milk in a heavy bottom saucepan.
    • Gently cook and stir over low heat until butter and morsels are about 3/4 melted. Remove from heat and stir until butter and morsels are completely melted. 
    • Stir in vanilla and flour. Fold in pecans.
    • Drop by level Tablespoons onto a parchment covered baking sheet. (I used a tablespoon cookie scoop.) If you do not have parchment, lightly grease your cookie sheet.
    • Bake at 350 degrees Fahrenheit for 7 to 10 minutes. Do not over-bake. Cookies should lose some of their shine when they are done. They will still be soft, but will have a bit of a crust. Cool 5 minutes on baking sheet and remove to rack to finish cooling.
    • note: As the batter cools, subsequent batches may take longer to bake.
    • yield: about 5 doz small cookies

    Monday, July 26, 2010

    Yellow Butter Cake with My Mom's Chocolate Frosting


     Unless you count my one son who always wants lemon meringue pie, this is THE birthday cake requested at my house- yellow cake with chocolate frosting. I must confess that in the past I have made the cakes from a mix, but this time I was on a mission to make a very special cake for my hubby's birthday.

     Blogging about food (and reading other food blogs) has made me much more adventurous and confident in my baking endeavors, so I decided to throw caution to the wind and make this one from scratch. Now I've made plenty of other kinds of cakes from scratch, but I've never tried just a simple yellow butter cake. (Mainly because so many of the "scratch" cakes I've tried have been dry and tasteless.) I knew I wanted to use my Mom's recipe for the frosting, but I didn't really have a "go to" recipe for yellow cake.


     When Memoria at Mangio da Sola went on her search for the perfect yellow cake, I followed along with interest thinking I'd use her winning recipe. But as fate would have it, my internet wasn't working (again) when I went to get the recipe so I had to look around for another. I settled for one that I found was in the Baking at Home with the Culinary Institute of America cookbook.  I made it exactly as directed and found it to be moist and delicately flavored, with a wonderful tender crumb. In other words, absolutely delicious! What was I so afraid of? I topped it off with my Mom's signature chocolate frosting that she's been making forever, and it was perfect.

    The next time I make this (and there will be a next time) I will probably try to increase the frosting to cake ratio because for me, (even though the cake was moist, tender and flavorful) cake is a great excuse to eat frosting.  How about splitting those two layers to make four layers? With some pastry cream sandwiched between them?  I'm sure I'll be able to find some excuse to experiment with this further before I do more birthday baking!

    Yellow Butter Cake
    from Baking at Home With the Culinary Institute of America
    Ingredients:
    3 1/2 cups cake flour
    2 cups sugar
    1 Tablespoon Baking Powder
    1/2 tsp. salt
    1 cup (2 sticks) unsalted butter, diced, at room temperature
    1 cup whole or low-fat milk (divided use)
    4 large eggs (room temperature)
    2 large egg whites (room temperature)
    2 tsp. vanilla
    Directions:
    • Preheat oven to 350 degrees Fahrenheit. Coat two 8" pans with cooking spray.
    • Into the bowl of your mixer, sift together flour, sugar, baking powder and salt.
    • Add butter and milk.
    • Using the whisk attachment of your mixer, mix together on medium speed until smooth, about 4 minutes. Scrape down sides of bowl as needed.
    • In a separate bowl, mix together milk, eggs, egg whites and vanilla.
    • Add egg/milk mixture to flour mixture in three additions, mixing for two minutes after each addition. Scrape sides of bowl after each addition.
    • Divide the batter between prepared pans. Bake 35-40 minutes or until layers spring back when touched in the center.
    • Remove from oven and allow cakes to completely cool in their pans on wire racks. Release sides and bottoms of cakes with metal spatula or knife. Unmold and finish with filling and/or frosting.
    My Mom's Chocolate Frosting
    (I doubled this recipe for this cake. When my mom makes this, it always comes out perfect. I think it must be the way she holds her mouth or something. It's hit or miss for me. I've even watched her do it and I do it exactly the same way. Sometimes the frosting gets too hard, and sometimes I have to cook it again to get it just right. But whatever I do to it, it always tastes great and is what everyone expects to have on their yellow cakes around here.)

    Ingredients:
    1 and 1/2 blocks unsweetened baking chocolate (1 and 1/2 ounces)
    1 cup sugar
    1/2 stick butter (4 tablespoons)
    1/3 cup milk
    pinch of salt
    1 tsp. vanilla
    Directions:
    Over very low heat in a heavy saucepan, melt together chocolate, butter, milk, sugar and salt. Once chocolate is melted, raise the heat and bring mixture to a boil. Boil for exactly one minute. Take off heat and add vanilla. Allow mixture to cool for about 10 minutes. Beat frosting with a wooden spoon until no longer shiny. It should be spreading (not pouring) consistency. Quickly spread frosting on the cake, because at this point it will begin to set.


    Tuesday, July 6, 2010

    Presidential Chocolate Chip Cookies


    Surely a glass of milk and these chocolate chip cookies made the tough business of running a country a little bit easier! This chocolate chip cookie recipe is from Roland Mesnier, former White House Executive Pastry Chef- he baked for five different U.S. Presidents over the course of over 25 years. I found this recipe in my University's alumni magazine several years ago, and I pull it out from time to time when I want something a little different than my "go-to" recipe for chocolate chip cookies. The molasses in this cookie makes it wonderfully chewy and gives it a complex flavor. Enjoy this presidential perk without any of the strings attached!

    Chocolate Chip Cookies
    Ingredients:
    3 cups plus 3 Tablespoons all purpose flour
    1 teaspoon baking soda
    1/4 teaspoon salt
    2 sticks unsalted butter, softened
    1 cup granulated sugar
    2/3 cup packed light brown sugar
    2 large eggs
    1/4 cup molasses
    1 Tablespoon vanilla extract
    2 cups chocolate chips
    1 cup chopped walnuts

    Directions:
    •  Mix together flour, baking soda and salt. Set aside.
    • Cream together the butter, sugar and brown sugar. Beat in eggs, molasses and vanilla extract.
    • Add flour mixture to butter mixture. Stir just until incorporated.
    • Stir in chocolate chips and walnuts.
    • Chill dough for at least one hour. (Dough can be made the day before you want to bake.)
    • Preheat oven to 400 degrees F. (The high temp. browns the outside of the cookie while keeping the inside moist and gooey.)
    • On a parchment covered baking sheet, drop dough by heaping tablespoons about 2 inches apart.
    • Bake just until light golden, for 8-10 minutes. (Do not overbake! They will become over-brown on the outside and dry on the inside.)
    • Cool on the cookie sheet for 5 minutes and transfer to a rack to cool completely. They will keep fresh in an airtight container for 2-3 days.
    • Makes about 70 cookies*
    • * Don't want that many cookies at one time? Dough balls can be individually frozen (before baking) and kept in a container in the freezer for baking at a later time. (Up to 1 month) When you want to bake the frozen cookies, let them stand at room temp. for 30 minutes and then bake as directed.


    Friday, June 25, 2010

    Ice Cream Cookie Sandwiches, Waffle Style


    When my friend Rita sends me a recipe, I know it's going to be a keeper. (She's the one responsible for delightfully simple and delicious recipes like Cake in a Mug and Heavenly Pineapple Cake .) When she shared her recipe for Chocolate Chip Oatmeal Waffle cookies on facebook the other night, it only took me one hour from inspiration to cleanup to finish the entire batch. We were munching cookies in record time- Talk about quick and easy!
     

    The cookies were soft and cake-like when they first came out of the waffle iron, but crisped up a little as they cooled. They tasted curiously delicious just as they were, but I thought they would be superb with ice cream. The texture of the waffle cookies lent itself perfectly to pairing with a generous scoop in the middle- I used vanilla, but you could go for whatever flavor floats your boat. (You could even use homemade ice cream for an even more special treat.)

    I individually wrapped mine and put them in the freezer. They're pretty steadily disappearing, but I'm not surprised, considering the sweltering heat we've been having here. I'll probably make another batch and hide them for later. You never know when you'll need a cool tiny treat from your stash in the freezer. Just remember- it's nice to share.


    Oatmeal Chocolate Chip Waffle Cookie Sandwiches (printable recipe here)
    cookie recipe from Rita
    Ingredients:
    1/2 cup (1 stick) butter, melted
    1/2 cup + 2 Tablespoons packed brown sugar (I used dark because that's what was already open.)
    2 large eggs
    1 tsp. vanilla
    3/4 cup + 2 Tablespoons all purpose flour
    1/2 tsp. baking soda
    1/4 tsp. salt
    1 cup quick cooking oats
    3/4 cup mini chocolate chips (If you use regular size chips, chop them into small bits.)

    Directions:
    • Preheat waffle iron (I used the High setting on my George Foreman.)
    • Combine flour, baking soda, salt and oats. Set aside. 
    • Mix together butter, brown sugar, eggs and vanilla. 
    • Add flour mixture to butter mixture. Mix until combined.
    • Stir in chocolate chips.
    • Spray your waffle iron with Pam or brush with vegetable oil. (My waffle iron is non-stick, so I brushed on some oil one time before I started and didn't have a sticking problem. Depending on your waffle iron, you may need to repeat this.)
    • Using a small (about a Tablespoon) scoop, evenly space scoops of batter (dough?) onto your waffle iron. They do spread a little, so I suggest you space them far apart until you see how much room you have once they spread. I was able to do six cookies at a time.
    • Close the waffle iron and cook until batter is set and lightly browned. (This took just a little more than a minute for the small cookies.) Carefully remove cookies to a cooling rack.
    • Yield: about 3 dozen waffle cookies
    To assemble ice cream sandwiches. Wait for waffle cookies to cool completely. Put a small scoop of slightly softened ice cream on one cookie, then top with another. Press lightly together. Tightly wrap in plastic and store in the freezer. Enjoy!

    Monday, May 31, 2010

    Aunt Eva's Mud Hen Bars


    I made these Mud Hen Bars today in honor of my little hen Prissy, who is currently setting a clutch of fifteen eggs under the azalea bush by the front porch. Fifteen? You have to admire that kind of ambition. She's been hiding her eggs for the last couple of weeks, and then the other evening she didn't come to roost. We hunted her down yesterday and found her in a cozy, well hidden nest. And even though she's not a Mud Hen, (the poultry kind or otherwise) the fact that the recipe had the word hen in it was close enough for me.


    I found this recipe for bars last fall on Food O' del Mundo, and immediately knew that someday I would have occasion to make them. And today, in Prissy's honor, here they are. And even though I initially chose them only for their name, they have earned a permanent place in my recipe box. They have a bottom layer like a thick chewy sugar cookie, a middle layer full of chocolate, nuts and marshmallows, and a delicate crunchy meringue layer on top. I chose to use pecans in mine because that's what I had the most of, but I think that others would be equally delicious.


    So by my calculations, we should have some chicks running around in about 18 days or so- check back for chick updates. :) In the mean time, you should try these bars even if you don't have a setting hen in your yard. They'd be great to take to summer picnics or potlucks, as they're extremely quick and easy to whip up on short notice. Enjoy!


    Aunt Eva's Mud Hen Bars
    slightly adapted from Food O' del Mundo

    Ingredients:
    1/2 cup butter
    1 cup granulated sugar
    3 eggs (2 of the eggs should be separated)
    1 1/2 cups flour
    1 tsp. baking powder
    1/4 tsp. salt
    1 cup chopped nuts
    3/4 cup chocolate chips
    1 cup mini marshmallows
    1 cup brown sugar

    Directions:
    • Sift together flour, baking powder and salt. Set aside. 
    • Cream together butter and white sugar until completely blended. 
    • Beat in one whole egg and 2 egg yolks. Reserve whites for meringue topping.
    • Add flour mixture to butter mixture. Mix until blended.
    • Spread into  a foil covered 9x13 pan. (Tip: I like to cover my pan with foil, leaving plenty hanging over the ends. When the bars cool I can lift the entire pan of bars out- this makes them so much easier to cut.)
    • Sprinkle the nuts, chocolate chips and nuts evenly over the batter.
    • Beat reserved egg whites until stiff. Fold in brown sugar. (Tip: To prevent lumps, sift your brown sugar before adding it to the whites.)
    • Spread the egg white meringue mixture evenly over nuts, chips and marshmallows.
    • Bake at 350 degrees for 30 to 40 minutes, until batter is set and meringue is lightly browned and crunchy on top.
    • Cool completely. Using the foil hanging over the edges of the pan, gently lift the baked bars out of the pan. Peel the foil away and cut into bars. Enjoy!

    Friday, April 16, 2010

    Dreamy Orange Cream Cookies


         "Orange" you glad it's spring?  I am. Who can resist the orange creamy goodness of a Dreamsicle? I can't. When I saw these cookies (baked by The Girl Who Ate Everything) on Tastespotting, there was a batch of them in the oven within the hour. Little bits of tart orange zest surrounded by a soft cookie and creamy white chocolate? This cookie took me right back to my younger years when a Dreamsicle on a hot summer day was a real treat.

         Halfway through dropping these cookies on the baking sheet though, some mini chocolate chips magically hopped into the dough, and voila!...Orange Cream Cookies. If you're fond of Orange Creams, and get tired of pinching the chocolates in the box until you find the right ones, these cookies are definitely for you. One dough- two cookies. Who can lose?


    Dreamy Orange Cream Cookies
    adapted from Baked Perfection
    Ingredients:
    2 1/2 cups all purpose flour
    3/4 teaspoon baking soda
    1/2 teaspoon salt
    1 cup butter, room temperature
    1/2 cup granulated sugar
    1/2 cup firmly packed light brown sugar
    1 large egg
    1 teaspoon vanilla extract
    2 tablespoons orange zest (about 2 oranges)
    2 cups white chocolate chips- (If you're making the Orange Cream version, reduce the white chocolate chips to 1 cup, and add 1 cup of semi-sweet mini chocolate chips.)
    Directions:
    • Preheat oven to 375 degrees.
    • In a small bowl, whisk together the flour, baking soda and salt. Set aside.
    • In a large bowl (or your mixer bowl) cream butter and both sugars until light. Beat in the egg, vanilla and orange zest until completely incorporated.
    • Add flour mixture a little at a time until combined.
    • Stir in chips until they are distributed evenly throughout the mixture.
    • Drop by rounded teaspoonfuls onto parchment covered (or greased) cookie sheets. Bake 8-10 minutes or until there's a touch of brown around the edges. (Don't flatten your balls of dough or overcook them.) 
    • Cool the cookies on the cookie sheet before transferring them to a rack to cool completely.

    Thursday, March 25, 2010

    Chocolate Peanut Butter Crispy Bars


    Chocolate-peanut butter-graham cracker-caramel goodness sittin' on a Ritz cracker. Yep, a Ritz cracker. Who would have believed it? This crispy gooey delight is reminiscent of a Twix candy bar. Crispy layers sandwiched with a caramel filling and covered with chocolate. And easy? You don't even need your oven.  You'll need your stovetop and about 20 minutes to have these chilling inside your refrigerator, with you chilling outside of it peeking every 5 minutes to see if your bars are set and ready to eat.


    I found this recipe on Buns in My Oven and they looked so deliciously tempting I had to try them. Another recipe in Taste of Home used Waverly Crackers, which I think would also be awesome, but you know that everything's better when it sits on a Ritz! (Andy Griffith said so.) You should try these. Really, you should. But don't hate me if you sit down with a cold glass of milk and eat way too many of them. Not that I'd know anything about that.

    Chocolate Peanut Butter Crispy Bars (Printable Recipe here)
    adapted from Buns in my Oven
    Ingredients:
    1 1/2 cups graham cracker crumbs
    3/4 cup white sugar
    3/4 cup brown sugar
    3/4 cup butter (1 and 1/2 sticks)- melted
    1/3 cup half and half or milk
    Ritz Crackers- Enough to make 3 layers in your 9x13 pan. My pan used about 2 1/2 sleeves.
    1 3/4 cups semi-sweet chocolate chips
    1 cup creamy peanut butter
    Directions:
    • In a medium saucepan over medium heat, combine melted butter, sugars, milk and graham cracker crumbs. Bring to a boil. Stirring constantly, cook about 5 more minutes. Make sure to stir constantly- the sugar will burn. Don't even ask me how I know that.
    • Grease a 9x13 pan. (To make the bars easier to lift out, you could line your pan with greased-or nonstick-foil or greased parchment.) Cover the bottom of your prepared pan with a layer of Ritz crackers.
    • Spread half of the graham cracker-sugar mixture evenly over the layer of Ritz crackers. Repeat with another layer of Ritz crackers and the rest of your graham cracker-sugar mixture.
    • Top with a third layer of Ritz crackers.
    • In your microwave on low power, melt together the chocolate chips and peanut butter. (Don't overcook...Melt the chips part-way and stir to finish melting.)
    • Spread the chocolate mixture over the top layer of Ritz crackers. Put in the refrigerator to set completely. Cut into bars and hide some away for yourself, because they'll disappear fast!

    Saturday, March 13, 2010

    Triple Coconut Macaroons


    I truly believe that coconut and chocolate were made for each other, and these macaroons are proof. Dipped in dark chocolate, the chewy sweet bundles of coconut goodness put Mounds bars to shame. Each one is a perfect "two-bite" treat just waiting to be enjoyed with a cup of tea or coffee. I only made half of a recipe, leaving me with a half can of Coco Lopez. PiƱa Coladas anyone?

    Triple Coconut Macaroons  (printable recipe)
    slightly adapted from Cooks Illustrated magazine
    (Makes about 4 dozen cookies)

    Ingredients:
    1 can (15 oz.) can cream of coconut (I used Coco Lopez)
    2 tblsp. light corn syrup
    4 egg whites (from 4 large eggs from happy hens, of course)
    2 tsp. vanilla extract
    1/2 tsp. almond extract
    1/2 tsp. salt
    3 cups unsweetened shredded desiccated coconut- you can find this in the natural or organic foods section of most larger grocery stores
    3 cups sweetened flaked coconut
    10 ounces semisweet chocolate chips (optional) for dipping
    Directions:
    • Preheat oven to 375 degrees. 
    • Whisk together cream of coconut, corn syrup, egg whites, extracts and salt in a small bowl; set aside.
    •  Combine both types of coconut in a large bowl; mix together, breaking up clumps.
    • Pour set aside ingredients into coconut and gently mix together. Chill for about 20 minutes.
    • Roll coconut mixture into small (about an inch) balls and place about 1 inch apart on parchment covered baking sheets.  If you have more patience than I did, shape the balls into pyramids with moistened fingers. :)
    • Bake until light golden brown, about 15 minutes. Cool on cookie sheets until slightly set, then transfer to a cooling rack to cool completely.
    • Melt chocolate (if desired) in a double boiler or in microwave on 50% power. Dip the bottom of each macaroon into the chocolate and then place on parchment paper to set. Let cool until chocolate hardens.

    Saturday, March 6, 2010

    Dulce de Leche Squares

     
    These Dulce de Leche bars were a delicious mistake invention. They were supposed to be Caramel bars with  a lovely homemade caramel in the middle, but we won't discuss what happened there. Luckily I remembered the can of Dulce de Leche hiding in the cupboard, and voila...Dulce de Leche bars! With the coconut in the crust, the caramel and chocolate, they reminded me of Samoas, one of my favorite Girl Scout cookies. They just needed some toasted coconut on top (which I didn't have because I'd used it all in the macaroons that I'll post later.) I liked that the crust was not sweet... it made a perfect base for the creamy caramel and fudgy frosting. They were very easy to make, and would be perfect for the special time when you want to make someone happy. And that includes yourself. Cut these small..share the love.


    Dulce de Leche Bars (printable recipe)

    Ingredients
    Bottom crust:
    1 cup all purpose flour
    1/4 teaspoon salt
    1 scant teaspoon baking powder
    1/2 cup desiccated coconut (This can often be found in the organic or health food section of the grocery store.)
    1 stick butter
    Middle layer:
    1 can Dulce de Leche (I found it in the Mexican food section of my grocery.)
    Topping:
    4 squares semi-sweet chocolate (I used Bakers) broken into pieces for easier melting
    1/2 stick butter
    2 teaspoons light corn syrup
    1 teaspoon vanilla

    Directions:
    • Preheat oven to 325 degrees. Grease an 8"x8" baking pan. Cut parchment to fit into the bottom to make the bars easier to remove. Lightly grease parchment.
    • For crust: Mix together flour, baking powder, salt and coconut. Melt butter and mix with the dry ingredients. Press into prepared pan.
    • Pour Dulce de Leche over the crust. Bake at 325 degrees for about 15 minutes. Remove from oven and cool.
    • Place butter, chocolate and corn syrup into a small saucepan or double boiler. Melt over very low heat to avoid burning the chocolate. When chocolate and butter have melted, remove from heat and add vanilla. When mixture has partially cooled, whisk together until smooth and glossy. Pour over cooled Dulce de Leche. Allow chocolate layer to harden, and cut into small squares.

    Tuesday, February 16, 2010

    Chocolate Crinkles

     
    Cookies and grandkids go together, don't they? Laz was here today and we decided to make cookies.  Chocolate Crinkle cookies. The coating of sugar on these cookies makes the most unique patterns when you bake them.  Laz named them Zebra Cookies...that's pretty descriptive! They were quite easy to make and were delicious- chewy and fudgy like brownies. The edges were just a tiny bit crunchy, giving way to a soft chewy center.


    The recipe came from the book cookies, by Jill Snider. (Thank you Madie and John!) It's one I bookmarked before Christmas but never got the chance to make. The fact that the recipe uses oil in place of butter was one of the reasons it was on my "to try" list. For a more grown-up treat, try adding a little bit of instant espresso powder to the mixture.

    Chocolate Crinkles (printable recipe here)
    from the book cookies, by Jill Snider
    Ingredients:
    1 cup all purpose flour
    1 tsp. baking powder
    1/4 tsp. salt
    1 cup packed brown sugar
    1/4 cup vegetable oil (I used light flavored olive oil)
    2 squares (1 oz. each) unsweetened chocolate- chopped, melted, and cooled
    2 eggs
    1/2 tsp. vanilla (I used 1 tsp.)
    3/4 cup confectioner's sugar, sifted

    Directions:
    • On a sheet of waxed paper or in a bowl, combine flour, baking powder and salt. Set aside.
    • In a large bowl, whisk together brown sugar, oil, melted chocolate, eggs and vanilla until smoothly blended. 
    • Gradually stir in flour mixture, mixing until smooth. 
    • Cover and freeze for 30 minutes or refrigerate for 2 hours for easy handling.
    • Put confectioner's sugar in a small shallow dish. Shape dough into 1 inch balls. Roll balls in confectioner's sugar until evenly coated. 
    • Place about 2 inches apart on cookie sheet. (I covered my cookie sheet with parchment.)
    • Bake in preheated (350 degrees) oven for 8-12 minutes or until set and tops are cracked and dry. 
    • Cool for 5 minutes on sheet, then transfer to a rack and cool completely. Makes about 3 dozen cookies. 


    Related Posts with Thumbnails