Friday, January 29, 2010

Texas Sheet Cake


Back in another lifetime, before husband, kids, or grandbaby, I lived with my friend Denise. She got married, I got married, and unfortunately we lost touch. But I do still have her recipe for Texas Sheet Cake. Delicious fudgy Texas Sheet Cake. And it's just as good now as it was back in 1980.

It's a great cake to make for a crowd...it's super easy, super fast to make, and is big enough for seconds (which you'll likely want.) It uses ingredients you probably have on hand, and mixes together so fast you can be in chocolate heaven in no time at all. Thank you Denise, wherever you are!

Texas Sheet Cake (printable recipe here)

Cake Ingredients
2 cups all purpose flour
2 cups sugar
1/2 tsp salt
2 sticks butter
1 cup water
4 tablespoons cocoa (I heaped them.)
2 eggs
1/2 cup buttermilk (If you don't have buttermilk, put 1 tablespoon of vinegar in a measuring cup and fill to the 1/2 cup mark with regular milk.This works just as well as buttermilk.)
1 teaspoon vanilla
1 teaspoon baking soda
  • Preheat oven to 350F.
  • In large bowl, mix together flour, sugar, and salt.
  • In a saucepan, melt 2 sticks of butter. Stir in cocoa and then add water. Bring to a brief boil and remove from heat.
  • Beat together eggs and buttermilk. Add vanilla and baking soda and mix well.
  • Pour the butter mixture into the flour mixture and stir together. Add the egg mixture and mix well. Pour into a greased 12x18x1 baking sheet. Bake for 20 minutes. (I've also made it without greasing the pan, and it did just fine.)
While the cake bakes, make the icing-
In a medium saucepan, heat together 1 and 1/2 sticks butter, 4 Tablespoons cocoa powder (heaped if you like), and 6 tablespoons milk. Bring to a brief boil and remove from heat. Stir in 1 teaspoon vanilla and gradually add 1 box (1 lb.) powdered sugar. Stir in 1 cup of chopped nuts if desired. Pour the hot icing on the hot cake as soon as it comes out of the oven. Cool and enjoy!


Monday, January 25, 2010

Corniest Corn Muffins

GRITS (Girls Raised In The South) love good cornbread. They especially like cornbread paired with a big "mess" of greens! When my mom cooked a big pot of winter kale this weekend and shared it with me, there was nothing left to do but bake cornbread. Cornbread is good just about any way you make it. It's good baked in muffin tins, in a heavy iron skillet, and in my favorite...this cast iron pan that makes them look like little ears of corn. (I always have been partial to cute food.) This recipe is from Dorie Greenspan's book, Baking From My Home to Yours. The only change I made was to cut the sugar back by half. Y'all Northerners can put it back in if you are so inclined.

Dorie Greenspan's Corniest Corn Muffins
from Baking From My Home to Yours
1 cup all purpose flour
1 cup yellow cornmeal, preferably stone-ground
6 tablespoons sugar
2 1/2 teaspoons baking powder
1/4 teaspoon baking soda
1/2 teaspoon salt
Pinch of freshly grated nutmeg (optional)
1 cup buttermilk
3 tablespoons unsalted butter, melted and cooled
3 tablespoons corn oil
1 large egg
1 large egg yolk
1 cup corn kernels (add up to 1/3 cup more if you'd like) - fresh, frozen or canned (in which case, they should be drained and patted dry)
     Center a rack in the oven and preheat the oven to 400 degrees F. Butter or spray the 12 molds in a regular-size muffin pan or fit the molds with paper muffin cups. Alternatively, use a silicone muffin pan, which needs neither greasing nor paper cups. Place the muffin pan on a baking sheet.
     In a large bowl, whisk together the flour, cornmeal, sugar, baking powder, baking soda, salt and nutmeg, if you're using it. In a large glass measuring cup or another bowl, whisk the buttermilk, melted butter, oil, egg and yolk together until well blended. Pour the liquid ingredients over the dry ingredients and, with the whisk or a rubber spatula, gently but quickly stir to blend. Don't worry about being thorough- the batter will be lumpy, and that's just the way it should be. Stir in the corn kernels. Divide the batter evenly among the muffin cups.
     Bake for 15-18 minutes, or until the tops are golden and a thin knife inserted into the center of the muffins comes out clean. Transfer the pan to a rack and cool for 5 minutes before carefully removing each muffin from its mold.
Dorie's printable recipe can be found here.

Saturday, January 23, 2010

Chocolate Cake...in a mug in a minute!


Do you ever feel like you need just a little something sweet? Maybe something gooey and chocolate? You look in the refrigerator, you look in the cupboards, but nothing looks appealing? It doesn't have to be a lot...just enough to quell that craving for a little treat. But you don't want to wait forever for it and mess up your whole kitchen making it. If you ever have that feeling, then you're gonna love this!

My friend Rita sent me a recipe for a lovely little cake you mix up and cook in a mug. Yep, a mug. You can also eat it out of the same mug, therefore keeping the number of dirty dishes to a minimum. (At my house this is very important.) And it cooks in the microwave. For only one minute! And after eating your chocolaty mug full of goodness, you have no leftovers to tempt you later. What a concept!. In its naked state the little cake is chocolaty good. If you want to walk on the wild side, top it with a little chocolate syrup and whipped cream. With a cherry on top. Because you want to.


Chocolate Cake in a Mug- recipe from Rita
(printable recipe)
Spray microwave safe coffee mug with non-stick spray.
(I just oiled mine with a couple of drops of light flavored olive oil.)
Add into the mug the following:
2 tablespoons sugar
1/4 teaspoon baking powder
2 teaspoons cocoa powder
pinch of salt
2 tablespoons milk
1/2 teaspoon vanilla
2 teaspoons oil
2 tablespoons CAKE flour
Stir with a fork until smooth and no lumps.
Microwave on HIGH for 60 seconds!! (I have a mini-microwave that's really low power so I added 20 seconds.)
You can eat it right out of the mug or turn it out onto a plate. (But why dirty another dish?)
Enjoy it by itself or with chocolate syrup or whipped cream.

Thursday, January 21, 2010

Some Like it Hot!

                                                                   Habanero Gold Jelly
Jelly, that is. I meant to make this in August, when the habanero peppers were at their sizzling peak at my brother's produce stand. But I didn't. I meant to make it again in November, right after I used my very last jar. But the peppers I bought for it slowly disintegrated in my vegetable bin, forgotten behind a head of cabbage. This time however, I was determined to follow through...those neglected peppers were calling me, and I'm so glad I listened this time!
Since I made it last weekend, I've eaten it almost every day. (Trying to make up for lost time?) This jelly (more of a jam, really) is superb over cream cheese on toasts or crackers. Its sweet/savory combination of apricots, peppers, and red onions also makes an unforgettable glaze for pork or chicken. It's a great jelly to make in the winter...the habaneros will warm you right up!

Habanero Gold Jelly
(printable recipe)

1/3 cup finely sliced dried apricots
3/4 cup white vinegar
1/4 cup finely diced red onion
1/4 cup finely diced sweet red pepper
1/4 cup finely diced habanero peppers, including seeds (omit the seeds and membranes if you're a wimp you prefer a milder heat)
3 cups granulated sugar
1 pouch Certo liquid pectin
  • Cut apricots into 1/8 inch slices. (I dice these slices as well.) Measure into a large deep stainless steel saucepan with vinegar; let stand 4 hours.
  • Individually, cut onion and peppers into 1/8 inch slices; cut slices into 1/4 inch dice. Measure each ingredient; add to apricots.
  • Stir in sugar.
  • Over high heat, bring to full rolling boil. Stirring constantly, boil hard for 1 minute.
  • Remove from heat.
  • Immediately stir in pectin, mixing well.
  • Pour jelly into hot jars, dividing solids equally among jars and filling each jar to within 1/4 inch of top rim. Wipe rims. Apply lids.
  • Process 10 minutes in boiling water bath. Cool upright, until lids pop down, about 30 minutes.
  • When lids are concave, but the jelly is still hot, carefully grasp jar without disturbing lid and invert, twist, or rotate each jar to distribute solids throughout the jelly. The jar can be inverted temporarily but do not allow it to stand upside-down for prolonged periods. Repeat as necessary during the cooling/setting time, until solids remain suspended in the jelly.

Monday, January 18, 2010

Sweet Potato Pound Cake


I love sweet potatoes. I love them baked the best, either plain or with a little bit of butter. Good sweet potatoes don't need much help in the sweetness department. (Unless you're talking sweet potato pie. My mama makes the best sweet potato pie in the universe. She leaves out all of those spices that make it a pumpkin pie "wannabe." But I digress.) This cake...sugar,spices and all... has me smitten. The orange juice glaze perfectly complements the spicy goodness of the sweet potatoes, and just makes me want another slice. Evil cake. Someone gave my mama the recipe and she shared it with me. It has sweet potatoes in it doesn't it? It just has to be good for you.

Guess who took this picture? It's from a 4 year old's eye view!

Sweet Potato Pound Cake
(printable recipe)

1 cup butter, softened
2 cups sugar
2 1/2 cups sweet potatoes, cooked and mashed
4 eggs from happy hens
3 cups flour
1/2 tsp. salt
2 tsp. baking powder
1 tsp. baking soda
1/2 tsp. nutmeg
1 tsp. cinnamon
1 tsp. vanilla extract
2 tsp. lemon extract
  • Cream butter and sugar.
  • Add potatoes and beat until light and fluffy.
  • Add eggs, one at a time: beat well after adding each egg.
  • Add dry ingredients, then vanilla and lemon.
  • Beat well and pour into greased and floured tube pan.
  • Bake at 325 degrees or 1 hr. 15 minutes, or until golden brown.
  • Glaze with a mixture of 1 cup confectioners sugar and 2-3 tblsp. orange juice.

Saturday, January 16, 2010

A Whole Lotta Cookin' Goin On!


Mahi Mahi with Brown Sugar Soy Glaze and Mushroom Ravioli

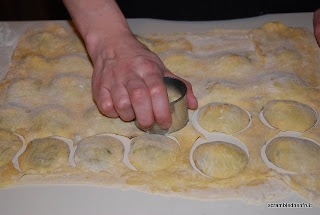
My kids are the greatest. Last Saturday night they cooked a delicious meal...glazed mahi mahi and hand made mushroom ravioli. The fish was flaky and tender, the sauce divine.
And the ravioli? Hand made mushroom, garlic, onion, swiss cheese ravioli? Just thinking about it makes me want more. You'll have to talk to John and Madeleine for that recipe, but I was able to find Scott's fish recipe to share with you. I hope you enjoy it as much as we did! (Did I mention that I think my kids are the greatest?)

Mahi Mahi with Brown Sugar Soy Glaze
adapted by Scott from a recipe found here
Ingredients:
6 scallions
3 tablespoons packed brown sugar
2 1/2 tablespoons soy sauce
2 tablespoons balsamic vinegar
1 tablespoon water
4 (6 ounce) skinless mahi mahi filets
1 1/2 tablespoons

Directions
  • Preheat oven to 200 degrees F
  • Cut white and pale green parts of scallions crosswise into 2-inch pieces. Thinly slice enough scallion greens to measure 3 tablespoons.
  • Stir together brown sugar, soy sauce, balsamic vinegar and water in a small bowl until sugar is dissolved.
  • Pat fish dry and sprinkle with salt. Heat oil in a 12-inch nonstick skillet over moderately high heat until hot but not smoking. Cook fish on one side until browned, 3 to 4 minutes. Turn fish over and brown 1 minute. Add soy sauce mixture and simmer, covered, until fish is almost cooked through, about 3 minutes. Transfer fish with a slotted spatula to a heatproof platter and keep warm in oven. (Fish will cook through from residual heat.)
  • Add 2-inch scallion pieces and juices from fish platter to sauce and boil, stirring occasionally, until glaze is very thick and reduced to less than 1/4 cup, about 5 minutes. Spoon glaze over fish and sprinkle with scallion greens.

Saturday, January 9, 2010

Chai-Spiced Crumb Coffee Cake


Chai-Spiced Crumb Coffee Cake...or should it be Tea Cake? Either one, it's definitely a keeper. I came across this recipe while looking for a treat for today, since my house was wonderfully full of my family. It ended up being a perfect afternoon "pick-me-up"; the cake was moist and delicate, and the topping...oh the topping...was sweet and full of those wonderful spices that make Chai one of my favorite treats. You can find the recipe here on Tartelette. Make one soon and invite me over. I'll bring the coffee!

Thursday, January 7, 2010

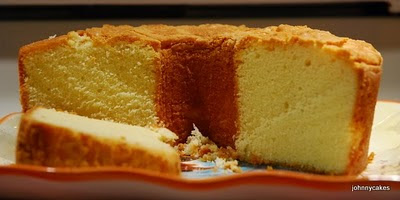
Mama's Cold Oven Pound Cake

photos by Johnny

My Mama makes the BEST pound cake in the world. Tender crumb on the inside, with a slightly chewy crust...yummmm. Not too sweet, it's equally good all by itself with a cold glass of milk, or dressed up with strawberries and whipped cream. My mama's secret? Use a hand mixer. She says to beat it well, but not to death. Her pound cake is always better than mine because I'm lazy and use my KitchenAid. (See the big bubbles in mine? My mama's never has those.) Her cake always has a fine crumb and lovely light texture-never heavy. But if you're lazy like me, the bubbles don't make a bit of difference in the taste. However you make it, it's really good. I'd never lead you astray on something as important as pound cake.


Mama's Cold Oven Pound Cake (printable recipe)

Ingredients:
1 cup butter
1/2 cup shortening
scant 3 cups sugar
3 cups cake flour
1/2 teaspoon salt
1 cup milk
4 eggs from happy hens
1 tsp. vanilla (2 if you don't use the butter and nut)
1 tsp. butter and nut flavoring (optional)

Cream together butter, shortening, and sugar.
Beat in half of the cake flour, half of the milk, and the salt until combined.
Beat in eggs, one at a time. (Beat each one in until it disappears into the batter.)
Beat in the rest of the cake flour, milk, and flavorings.

Pour batter into a greased and floured tube pan. Put in a cold oven and set temperature to 325 degrees. Bake for 1 hour. Increase temperature to 350 degrees and bake for 30 minutes longer or until cake is done. (cake tester comes out clean)
Related Posts with Thumbnails