Showing posts with label quick and easy. Show all posts

Sunday, November 6, 2016

Chocolate (or not) Sprinkle Cookies


     My daughters-in-law introduced me to these delightful little shortbread gems. They call them "Rusty Logs" and once you've made them it'll be easy to see how they got the name. These cookies might not win any beauty contests, but what they lack in showiness they make up for in flavor. Oats give them a nutty crunch that keeps little (and big) hands reaching into the cookie jar.


     I decided to take some license with the recipe and dressed some up in party clothes for Christmas. You could make these for any occasion just by changing up the sprinkles! The ones that work best (in my opinion) are the "ice cream" type softer sprinkles, but any kind would dress up the edges of this slice and bake type cookie.


     They're more widely known as "Chocolate Shot" cookies, but  I call those little bits sprinkles, not shot. Is it a regional thing do you suppose?  No matter what you call them, they're great, versatile little cookies that are as easy to make as they are to eat. Enjoy! :)

Betty

Chocolate Sprinkle Cookies (AKA Rusty Logs) Recipe
Printable recipe here

Ingredients
1 cup confectioner's (powdered) sugar
1 cup butter, softened but not melted (I use salted)
2 tsp. vanilla extract
1 1/2 cups all purpose flour
1/2 tsp. baking soda
1 cup rolled oats
chocolate "shot" or sprinkles (2 or 3 small (1.5 oz.) bottles or one large tub) You could also use multicolored sprinkles, or even colored sugar.

Instructions
  • Cream together butter and sugar
  • Add vanilla and mix well
  • Sift or whisk together flour, baking soda, and oats. Add to butter mixture and mix until combined.
  • Refrigerate about 1/2 hour, or until dough is firm enough to work with.
  • Divide dough in half and form into two rolls, each having a diameter of about 1 1/2 inches.
  • Pour chocolate sprinkles onto wax paper.
  • Roll formed dough "logs" in chocolate sprinkles until evenly coated.
  • Wrap rolls in wax paper or plastic wrap and refrigerate until firm, or overnight.
  • Slice into cookies about 1/4 - 1/3 inch thick and arrange on parchment covered baking sheets.
  • Preheat oven to 325 degrees Fahrenheit.
  • Bake cookies 18-25 minutes, or until very lightly browned. Remove to a rack to cool.
  • Yield: about 3 dozen

Friday, March 13, 2015

Spotted Dog: An Irish Tea Cake


     I had to go pretty far back on my family tree to find my Irish roots, but they're definitely there.  Just enough of them, I suppose, to appreciate this beautiful loaf of what I've always called Irish Soda bread, even though now I've discovered that it really isn't.


     Did you know that there are rules for making Irish Soda Bread? The Society for the Preservation of Irish Soda Bread tells us that any ingredient other than flour, baking soda, sour milk and salt make your loaf an imposter. This loaf, my friends, is definitely an imposter. A tasty one, but an imposter nonetheless.


     This loaf has a bit of added sugar, some butter, a lot of currants- ingredients that deny it the title of an authentic Irish Soda bread, but make it oh-so-delicious. The lovely loaf they do make is called Spotted Dog. I think I like that even better.


     Spotted Dog is a quick and easy loaf to put together to enjoy at breakfast or tea time. Warm out of the oven and slathered with butter? That would be the top o' my mornin' for sure! Leftovers make a great toast too.
     This recipe makes two loaves; enjoy one now and freeze one for later. Better yet, share with a friend. Just please make sure you cut a deep X  into the top of your loaf before baking. Why? To let the fairies out, of course. Who wants to suffer the wrath of toasted fairies? :)


Spotted Dog: An Irish Tea Cake
Adapted from this recipe and this recipe
Ingredients:
4 cups all purpose flour
1 tsp. salt
1 Tblsp. baking powder
1 tsp. baking soda
1/2 cup sugar
1/2 cup cold butter (1 stick) cut into small cubes
2 cups currants or raisins
1 egg, beaten
1 3/4 cups buttermilk
1 tsp. vanilla extract

Instructions:
  • Preheat oven to 350F. Grease a baking sheet or cover with parchment paper.
  • In large mixing bowl, sift together flour, salt, baking powder, baking soda, and sugar.
  • Cut butter into dry ingredients with a fork or dough blender until mixture resembles large crumbs.
  • Stir in currants or raisins.
  • Whisk together the beaten egg, the buttermilk, and the vanilla extract.
  • Make a well in the center of your dry ingredients.
  • Pour buttermilk mixture into the well and gently mix together until the dough is evenly blended. Do not over-mix.
  • Turn sticky dough out onto a generously floured surface. With floured hands, gently knead dough just enough (just flop it over a couple of times) and form into two softball sized balls of dough. Do not over-knead! It will make your bread/cake tough. You don't need your dough to be smooth and shiny- you want a nice craggy surface to make that beautiful crust!
  • Place your dough balls onto your prepared baking sheet and slightly flatten them into round loaves. Leave plenty of room between your loaves for rising.
  • Cut an X shape into the top of each loaf, all the way to the edges. This lets the fairies out!
  • Bake for 40 minutes, or until loaves are browned and sound hollow when you tap them.
  • Slice, slather with butter, and enjoy!

Friday, January 2, 2015

Scandinavian Almond Bars


     You're not tired of cookies yet, are you? I hope not, because this is a great little recipe to tuck away in your bag of cookie tricks. It's a versatile treat, reminiscent of an almond pastry. It's equally as perfect with your coffee or tea in the morning as it is a pick-me-up in the afternoon.

     This beauty is elegant enough for special occasions, but simple enough to have on hand to fill your cookie jar. To me it's everything a grown-up sugar cookie should be- crunchy edges, a chewy middle and the delicate flavor of almonds and vanilla. (Is it just me, or does anyone else think of Jergens lotion whenever they open up the bottle of almond extract? Do they even make that anymore?)


     I came upon this recipe quite by accident when one of my students brought it to school for an  assignment where they had to bring an example of something from home that had different types of measurements. I've been making these cookies ever since...Who knew that homework could be so rewarding?

     To add to their appeal, they're delightfully easy to make and look like you've spent hours on them. They also freeze well in an airtight container with wax paper between layers. Double the recipe so you can always have them on hand for little cookie emergencies! (And please don't tell me you've never had one of those. :)

Happy New Year to everyone! 
May 2015 bring you joy and good health!

Scandinavian Almond Bars
Recipe from Better Homes and Gardens Biggest Book of Cookies

Cookie Ingredients
1 and 3/4 cups all purpose flour
2 tsp. baking powder
1/4 tsp. salt
1/2 cup butter, softened (1 stick)
1 cup sugar
1 egg
1/2 tsp. almond extract
2 Tblsp. milk
1/2 cup sliced almonds (I used more than this, but I love almonds.)

Icing Ingredients
1 cup sifted powdered sugar
1/4 tsp. almond extract
enough milk (3-4 tsp.) to make drizzling consistency

Cookie Directions
  • In a small bowl, sift together flour, baking powder and salt; set aside.
  • In mixing bowl, beat together softened butter and sugar.
  • Beat in egg and almond extract until combined.
  • Beat in flour mixture. This mixture will be crumbly but will get better as you work with it.
  • Divide dough into four equal portions. Shape each portion into a 12 inch long roll. Place two rolls 4 to 5 inches apart on a parchment (or silpat) covered cookie sheet. 
  • Flatten each roll until it is 3 inches wide. 
  • Brush flattened (3"x12") logs with milk; sprinkle with almonds.
  • Bake at 325F for 12-15 minutes or until edges are lightly (barely!) browned. (I baked mine for 13 minutes, but ovens vary.)
  • While still warm and soft on the cookie sheet, cut each cookie "slab" diagonally into 1-inch wide strips. Carefully transfer cookies to a wire rack and let cool. Drizzle with Almond Icing; let dry.
  • Almond Icing: Stir together 1 cup sifted powdered sugar, 1/4 tsp. Almond extract and enough milk to make drizzling consistency.
  • Store in an airtight container. These cookies are even better after they sit overnight!

Friday, May 31, 2013

Spicy Grilled Shrimp


     Since my chopping hand has been on the fritz, Hubby has been making most of our meals. I'm down with that, especially since he's a really good cook and has become quite proficient with his newest obsession  preferred method of cooking. 

     He has made these shrimp several times, and they disappear as soon as they come off the grill. They're great for an appetizer, but they'd also be fabulous on a summer salad or with pasta. They have the perfect amount of heat for me just the way they are, but if you're a fan of hot and spicy you may want to "kick it up" with a little extra cayenne!

     I hope to share more of Hubby's grilling adventures with you soon! My cast comes off in three weeks, but I'm sure my hand will need at least a little more time to recover. I know when I've got it good. :)
 

Spicy Grilled Shrimp
Mark Bittman, from Fish, The Complete Guide to Buying and Cooking

Ingredients
2 lbs. large shrimp (raw), peeled and de-veined, rinsed and dried
1 large clove garlic
1 Tablespoon coarse salt (I use only about a teaspoon and it's plenty for us)
1/2 tsp. cayenne pepper
1 tsp. paprika
2 Tablespoons olive oil
2 tsp. lemon juice

Instructions
Finely mince garlic and mix with salt. Use the flat blade of your knife  or a mortar and pestle to make a paste with the garlic and salt. Mix in cayenne, paprika, olive oil and lemon juice. Combine with shrimp until  the shrimp is evenly covered with the spice mixture.
Grill or broil shrimp (hot fire) 2-3 minutes per side, or until done. Serve immediately or at room temperature, with lemon wedges if desired.

Monday, March 18, 2013

Easy Cherry-Almond Coffee Cake


     Okay Spring...any time now. Today we woke up to a dusting of snow that eventually changed over to a biting cold rain. Not the kind of weather that makes you think of daffodils and bunnies, is it? I was tempted to just pull the covers back up over my head and go back to sleep 'til I heard the birdies singing and felt some warm sunshine peeking through my window.

     I might have been tempted out of bed with this Cherry-Almond Coffee Cake, but unfortunately it was long gone. I made it a couple of weeks ago, and boy do I wish I had a slice now. The good thing about it is it's super quick and easy to put together, and it looks and tastes like you spent hours. Tart little bursts of cherry preserves in each bite of creamy almond filling will give you a sunny outlook even if the weather won't cooperate.

     The original recipe from Pillsbury used apricot preserves, which I'm sure would be equally delicious. I had cherry jam in my refrigerator love cherries with almond so that's what I went with. Why not make both and see which one you like best? 

Easy Cherry-Almond Coffee Cake
Very slightly adapted from this Pillsbury recipe
Ingredients:
Coffee Cake
1 pkg. (3 oz.) cream cheese, softened
1/2 cup (4 oz.) almond paste, crumbled
1 can (8 oz.) refrigerated crescent dinner rolls
1/3 cup cherry preserves
Topping
1/2 cup powdered sugar
2 teaspoons milk
1 Tablespoon sliced almonds

Directions
  • Heat oven to 375F. Grease cookie sheet or line with parchment. With a mixer on low speed, beat cream cheese until smooth and creamy. Beat in crumbled almond paste until well mixed.
  • Unroll dough onto cookie sheet or parchment. Press into a 13x7inch rectangle, pressing perforations to seal. 
  • Spoon the cream cheese mixture lengthwise down the center 1/3 of the rectangle. Evenly spread the preserves on top of the cream cheese mixture.
  • On each long side of the dough, make cuts 1 inch apart to the edge of the filling. Fold opposite strips of dough over the filling, and cross the strips in the center to resemble a braid. Seal ends.
  • Bake 18-22 minutes or until golden brown. Cool completely on a cooling rack.
  • Mix powdered sugar and milk until smooth. Drizzle over cooled braid and sprinkle with almonds.
  • ***You can assemble this up to 2 hours ahead of time. Cover with plastic wrap and refrigerate. Uncover and bake as directed in the recipe.


Wednesday, November 14, 2012

Loaded Baked Potato Soup


     Soup weather is here! I don't know about you, but I think soup is the perfect supper. A big pot of soup simmering on the stove makes the house smell good, and holds promises of  a warm bowl of comfort on a chilly evening. Put on your warm wooly socks and snuggle up with a steaming bowl of goodness that'll warm you up from the inside out!

     This potato soup, from Cooking Light magazine, is a lightened version of the decadent loaded baked potato soup so popular in restaurants. Creamy texture? Check. Chunks of tender potato? Check. Melty cheese? Check. Crunchy bacon? Check. The only thing this isn't loaded with is calories. Pair it up with  a nice salad and you've got yourself a hearty, satisfying meal. It's surprisingly quick and easy to make, and if you hide some you're lucky, you'll have enough left over for tomorrow's lunch. :)


Loaded Baked Potato Soup
recipe from Cooking Light magazine, Nov. 2012

Ingredients:
4 (6oz.) red potatoes
2 tsp. olive oil
1/2 cup chopped onion (I love onion in potato soup, so I used more)
1 1/4 cups (fat free, lower sodium) chicken broth
3 Tablespoons all-purpose flour
2 cups low-fat milk, divided
1/4 cup reduced fat sour cream
1/2 tsp. salt (or season to taste if salt intake is not an issue for you)
1/4 tsp. freshly ground black pepper (I love pepper, so I used more)
Garnishes: cooked and crumbled bacon, cheddar cheese, thinly sliced green onions or chives

Instructions:
  • Pierce potatoes with a fork. Microwave at High for 13 minutes, or until potatoes are tender. Cut in half; cool slightly.
  • While potatoes are cooking, heat a large saucepan over med-high heat. Add oil to pan, swirling to coat. Add onion and saute, stirring frequently, until onions are translucent. Add broth to pan.
  • Combine flour and 1/2 cup of the milk in a small bowl, stirring until smooth. Add flour mixture to the pan with the remaining 1 1/2 cups of milk.
  • Bring soup to boil, stirring frequently. Cook 1 minute.
  • Remove soup from heat. Stir in sour cream, salt and pepper.
  • Discard potato skins if desired. Coarsely mash potatoes into soup. 
  • Top soup with grated cheese, crumbled bacon and onions or chives.
  • Makes 4 servings


Tuesday, December 20, 2011

Irish Cream Chocolate Chip Parfaits and a Handmade Keepsake Ornament

Oh yes, I did. 
     Those really are Irish Cream dipped chocolate chip cookies nestled snugly between luscious layers of whipped cream. And they're sitting in my refrigerator getting more delicious by the minute. As they mellow, the Irish Cream soaked cookies become almost cake-like, and each spoonful is a bite of creamy goodness studded with crunchy chocolate chips suspended in silky whipped cream.

     Surprisingly enough, the best cookies for this recipe are the crunchy store-bought ones. (Chips Ahoy, if you can get them.) I've included a link in the recipe for a non-alcoholic Irish Cream if you prefer not to go the alcoholic route, but I'm also thinking that any sweet milky coffee-type drink (like a bottled frappuccino) would work.

     My friend Felicia introduced me to this wonderfully quick and easy make-ahead dessert. (Can you believe there are only three ingredients?) She makes hers in a 9x12 dish, but I thought it would also be cute in individual serving jars. But isn't most anything cuter in a Weck jar?


     Speaking of cute, here's what has been keeping my attention these last few weeks. Yep, grandson has moved back to VA and we've been having lots of family fun together. (Yay!) Here's a little project that we did together that makes a great keepsake ornament. (Grandmas love these things!) This is one of my favorite ornaments, and I've been making these with my students for years.


This idea came from Little Giraffes, and they have a link to a printable tag here. Instructions: Paint child's palm and fingers white. Have them wrap their hand and fingers around a ball shaped ornament to transfer their handprint. Decorate with paint markers, and don't forget to put your child's name and date! Include a tag with this poem:
These aren't just five snowmen, 
As anyone can see.
I made them with my hand 
Which is a part of me.
And now each year when you trim the tree
You'll look back and recall,
Christmas of 2011
When my hand was just this small!

I'll be back soon with more holiday goodies- my baking partner is back and we plan to get into lots of cookie trouble together!

Irish Cream Chocolate Chip Parfait Recipe
recipe from Felicia
Ingredients
1 pkg. Chocolate Chip cookies, crunchy ones- not soft (Chips Ahoy work beautifully.)
Whipped cream (made from a pint of heavy cream) or 1 tub Whipped topping
Irish Cream liqueur or non-alcoholic Irish Cream (I'm thinking that even a bottled frappuccino would work here.)
  • Pour about 1/2 cup of Irish Cream into a bowl. (More if you need it) Dip cookies one at a time into the Irish Cream. I usually let them stay in a few seconds and then turn them over to make sure they're completely covered. Don't leave them in long enough to get soggy- they'll fall apart.
  • For a 9x12 baking dish: Start with a layer of dipped cookies and then top with a layer of whipped cream. Repeat the layers and finish with a sprinkling of crushed cookies.  
  • For parfait glasses or canning jars: Alternate layers of dipped cookies and whipped cream. End up with whipped cream as the top layer and then sprinkle with some crumbled cookies. 
  • Cover and refrigerate for at least a couple of hours (can be done a day ahead) before serving so the cookies have a chance to absorb the liqueur and soften.


Thursday, November 10, 2011

Broccoli Ramen Salad


     Colorful and crunchy, with a tangy yet sweet dressing, this easy salad is great with anything from fried chicken to hot dogs. It's perfect for potlucks, tailgates, fall picnics or to accompany a quick sandwich at home for lunch. It's even still delicious the day after it's prepared, when all of the flavors have melded together and the dressing has soaked into the ramen noodles.

     The hardest (ha!) part of the preparation is chopping the onion and smashing the dry noodles into bits (fun!) which makes this ideal for those times when you need something in a hurry. And who doesn't need fast food now and then?

Broccoli Ramen Salad
1 bag Broccoli Slaw Mix (12 oz.) If you can't find this already bagged, it's just a mixture of julienne broccoli stems, julienne carrots and shredded red cabbage
1 pkg. Ramen Noodles (Beef, Chicken or Oriental flavor)
1/2-1 cup sliced almonds
1/4 cup oil (Canola or light flavored olive)
1/3 cup sugar (up to 1/2 cup if you prefer a sweeter taste)
1/2 cup vinegar
1/4 cup dried cranberries
1/2 medium red onion, finely diced

Break up the ramen noodles (in the bag) and place them in a large bowl with the broccoli slaw mix, almonds, cranberries and onion.
Mix together oil, vinegar, sugar and seasoning packet (optional) from the ramen noodle soup. Pour over the slaw mixture and toss together. If you prefer not to use the seasoning packet, you may want to add some salt. Serve immediately (ultimate crunch!) or refrigerate to serve later.

Miz Helen’s Country Cottage

Monday, October 10, 2011

White Chicken Chili

    
     Who says chili has to be red? Not me. One of my favorite kinds of chili is this white chicken one, which really hits the spot when the weather starts getting cooler. Several years ago I was unable to eat tomatoes in any form, so this chili was  the one I turned to. I can eat tomatoes now but I still love this as a change of pace from the beefy tomato based ones usually associated with the name.  

     This is a heart healthy recipe, especially if you stick to low sodium chicken broth and beans. If you can only find regular beans, rinsing and draining them helps to remove excess sodium. (Another option would be to use dried beans that you've pre-soaked.) A heart healthy topping would be avocado, one of my favorites with any kind of chili. Spice it up with peppers and salsa, and it'll keep you warm from the inside out!

White Chicken Chili
3 chicken breast halves (about 1 1/2 lbs.) cut into small cubes*
1 large onion, chopped
2 cloves garlic, chopped
2 Tblsp. olive oil
1 qt. chicken broth (homemade or canned)
2 small cans chopped green chiles (I used some Hatch chiles that I'd roasted and frozen- yum!)
1 bag frozen white corn (or canned)
3 cans white beans, drained**
2 tsp. cumin
1/2 tsp. black pepper
cayenne or white pepper to taste (I love the spiciness that the white pepper gives it.)
For garnish:
shredded pepper-jack cheese
low fat sour cream
fresh cilantro
chopped avocado
salsa or hot sauce, green or red
  • Saute chicken, onions and garlic in olive oil and spices.
  • Add rest of ingredients (except cheese and other garnishes) and simmer on low for about an hour, or until flavors have blended well.
  • Serve with shredded cheese.
  • Top with sour cream, fresh cilantro, salsa or chopped avocado if desired.
*If you prefer, you can use cooked chopped chicken (a rotisserie would be handy) and add it when you add the beans.
**You can use any combination of beans you like. Great Northern are my favorites for this, but I've also used them in combination with Cannelini, Chickpeas, and even black eyed peas. Hominy is good in this also!


Wednesday, October 5, 2011

Triple Threat Brownies (Or should I say Triple Treat?)


     Disclaimer: These brownies are only sort of homemade. They're homemade in the sense that you make them at home. But they are very easy. You can put them together very quickly. And they are very good. Here's what you'll need:


     Double Stuff Oreos, brownie mix, and refrigerated cookie dough. Yep, that's it. Three things. (If you don't count the extra ingredients that go in the brownie mix, anyway.)

     Here's what you do. First, line a 9x9 baking pan with parchment paper or nonstick foil. Press that refrigerated chocolate chip cookie dough evenly over the bottom of the pan. Cover the dough with a layer of Oreos. Mix your brownies according to the directions on the box and pour the batter right over the top of the Oreos. That's it. Bake it at 350 degrees for about 40-45 minutes, or until the brownie layer is done. Cool completely in the pan, then slice and swoon.

     Since I'm trying to practice moderation in all things sweet, I cut them into small bars. But if you want something a little more festive, you could cut them big enough to hold a scoop of vanilla ice cream with some fudge sauce poured over the top. Visit Kevin and Amanda for their wonderfully decadent "even more homemade" version of these. Just be prepared to drool!

Thursday, May 26, 2011

Red, White and Blue Strawberries: Memorial Day Rewind


Are you picnicking this weekend? Do you need to bring a treat?  I don't know about the temperature where you are, but here in VA it's hot, and heating up the kitchen doesn't thrill me. These strawberries, however, do. I posted them last year, but a treat as quick, easy and summery as this one deserves repeating.

I saw these red, white and blue beauties on Baking Bites a while back and immediately thought of all of the occasions they'd be perfect for. Memorial Day? Fourth of July?  Any holiday that calls for a festive touch of red, white and blue would benefit from these luscious berries.


Make some to share while strawberries are still in season- I guarantee they'll be appreciated.  I hope you all have a lovely weekend- have fun and keep safe!


Red, White and Blue Strawberries
recipe from Baking Bites
You'll need:
Strawberries- As many as you plan to dip
1 pkg.white chocolate chips or white dipping chocolate (bark)- found with baking supplies
Blue sanding sugar or sprinkles (The kind you decorate cookies with)
Directions:
  •  Wash your strawberries and let them dry thoroughly. Pat dry if necessary. Set aside.
  • Line a baking sheet or tray with wax paper or nonstick foil.
  •  Pour about half of the sanding sugar into a small bowl.
  • In another small bowl, melt white chocolate according to directions on package. I usually melt it in small increments in the microwave on low power until about 80% of it is melted. I then stir it until it is completely melted. If it is too thick, add about 1/2 teaspoon shortening (like Crisco) and stir until melted and smooth.
  • Holding a strawberry by the leaves on the stem end, dip into the white chocolate to cover about 2/3 of the berry. Let the excess chocolate drip back into the bowl. (If there's a "glob" of chocolate on the end of the berry, scrape it off onto the side of the bowl.)
  • Dip the bottom third of the chocolate covered berry into the blue sanding sugar.
  • Carefully place each berry onto the prepared tray or baking sheet to set.  (They will set quicker in the refrigerator.) Refrigerate until time to serve. These are best served the same day they are prepared!


    Tuesday, May 17, 2011

    Curried Turkey Wraps


        Are you in a brown bag rut?  I admit that I am. Peanut butter and jelly is always a quick and easy option for a workday lunch, but it does get tiresome after a while. I'm always on the lookout for tasty alternatives that are quick and easy to put together, and also satisfying enough to keep hunger pangs away all afternoon.

         I found the recipe for these wraps in an old Cuisine at Home magazine as I was browsing at my favorite thrift store. Thankfully, it turned out to be a delightful change from my usual lunchtime fare.  The curried cranberry-apricot cream cheese spread paired with thinly sliced turkey made the perfect sweet-savory combination, while the cucumber and lettuce gave it just the right toothsome crunch. Paired with an apple, it was just enough to keep me on my toes until the three o'clock bell.
     
          Wraps are definitely one lunchtime option worth further investigation. They're easy to customize according to your tastes, and also to what's in your refrigerator. What's your favorite brown bag lunch?  I'm always open to suggestions!

    Curried Turkey Wraps
    recipe from Cuisine at Home, June 2004
    4 oz. cream cheese, softened (I used Neufchatel)
    1/4 cup dried cranberries, chopped
    1/2 tsp. curry powder
    2 Tablespoons apricot jam (I used my habanero gold jam.)
    Juice of 1/2 lime
    4 (12 inch) flour tortillas
    6-8 leaves red lettuce
    8 oz. deli-style roast turkey, thinly sliced
    1 cup cucumber: seeded and thinly sliced (I used an English hothouse cucumber.)
    1/2 cup cilantro leaves (optional)
     
    Directions:
    • Combine cream cheese, chopped cranberries, apricot jam and lime juice.
    • Warm tortillas gently in a dry skillet until soft and pliable.
    • Spread 1/4 of the cream cheese mixture on one tortilla. 
    • Layer lettuce, turkey, cucumber and cilantro on top of lettuce. (To keep fillings from squeezing out, leave the top edge of the tortilla filling-free, then roll it up from the bottom.)
    • Roll up tightly, and then cut in half at an angle.
    • Repeat with remaining tortillas.

    Project LunchBox – FamilyFreshCooking.com

    Tuesday, April 12, 2011

    Baked Shrimp with Tomatoes and Feta


         Need a quick and easy weeknight meal? This baked shrimp dish fits the bill. Looking for a quick dinner using ingredients I already had, I found this recipe in Ellie Kreiger's book The Food You Crave.  The only change I made to the recipe was to use Thai basil in place of parsley, which gave it a little different flavor than the parsley would have. I think the next time I make this I'll add some crushed red pepper to spice it up just a bit. Orzo and a nice salad rounded out this healthful meal quite nicely!

    Baked Shrimp with Tomatoes and Feta
    Recipe from Ellie Krieger 
    (my changes noted)
    Ingredients
    1 Tablespoon olive oil
    1 medium onion, diced
    2 cloves garlic, minced
    2 (14.5 oz.) cans diced no-salt-added tomatoes with juice
    1/4 cup finely minced flat leaf parsley ( I used Thai basil instead)
    1 Tablespoon finely minced fresh dill
    1 1/4 lbs. medium shrimp, peeled and de-veined (I used frozen shrimp, uncooked.)
    1/4 teaspoon salt
    1/4 teaspoon freshly ground black pepper
    2/3 cup crumbled feta (about 3 oz.)

    Cooking Instructions
    • Preheat oven to 425 degrees F.
    • Heat oil in an ovenproof skillet. Saute onion until soft, about three minutes. Add garlic and cook another minute, taking care not to brown the garlic. 
    • Add tomatoes with juice. (I thought this was a little too watery, so when I make this again I'll leave out some of the juice.)  Reduce heat and simmer about five minutes, until mixture has thickened a bit.
    • Remove from heat and stir in parsley (or basil), dill, shrimp, salt and pepper. 
    • Crumble feta on top of all.Bake for about 12 minutes, or until shrimp are done and cheese is melted. Serve with brown rice or orzo.

    Tuesday, April 5, 2011

    Cake Batter Krispie Treats

         
          Ever since I saw these cute little squares on How Sweet It Is, they've been on my mind. They may look like your run of the mill crispy rice treats, but these have a little extra "oomph" from the addition of sprinkles and your favorite cake mix. They're easy to put together, a great project to make with kids, and perfect for those times when you find out that somebody needs a treat for a class party or a bake sale and you have exactly thirty minutes (give or take a few) to get it out of the door.

          And what's more, they're just plain fun. Don't sprinkles put a smile on your face? They do mine. (So do cute little chirping chicks wearing bunny ears for that matter.) Cut these little treats into cute shapes if you want to watch the smiles appear!

         And speaking of smiles, here's something else that has put a smile on my face.  My sister thinks they look like Shrek feet.


         These are what came from my quest to find shoes that don't hurt my feet when I'm working out at the gym. They mimic barefoot walking (or running) and are supposed to:

    • strengthen muscles in the feet and lower legs
    • improve range of motion in ankles, feet and toes
    • stimulate neural function important to balance and agility
    • eliminate heel lift to align the spine and improve posture and
    • allow the body to move naturally.
         We've only gotten a few strange looks so far, and they're great conversation starters. Hubby and I love them so much we've each gotten a second pair.  Because when my feet are happy, the world is a happier place!


    Cake Batter Krispie Treats
    recipe from Jessica at How Sweet It Is

    You'll need:
    1 (10 oz.) bag of miniature marshmallows
    3 Tblsp. butter
    6 cups Crispy Rice cereal
    1/4 cup dry cake mix (I used yellow)
    1 (1.75 oz) jar of sprinkles

    Melt butter in large saucepan over low heat. Add marshmallows and stir until they began to melt. Add in cake mix one spoonful at a time, stirring until combined. Stir in cereal until it is completely coated with the marshmallow mixture. Sprinkle in half of the sprinkles and gently mix. Press into a lightly greased baking dish (I used 9x13) and top with remaining sprinkles. Let sit for about 30 minutes before cutting. Jessica recommends cutting them with a knife sprayed with nonstick spray.

    This post is linked to Full Plate Thursday at Miz Helen's Country Cottage.

    Monday, March 28, 2011

    Butter Pecan Shortbread Cookies


         True confession: I'm a thrift store junkie- one thrift store in particular actually. Our community has a wonderful opportunity shop that is sponsored by a local church. All of the merchandise is donated and all of the workers are volunteers. Everything is very reasonably priced, and all of the profits go to charities. It's a winning situation for everyone! I volunteer twice a week to sort and shelve book donations. It feeds my passion for helping to making sure that everyone who needs a book is able to have one (or a dozen.) It does my heart good to see a child poring over a book while his or her parents shop. 

         As I was dropping an old copy of  Everyday Food into the "free magazine" box on Saturday, I saw these cookies on the cover. That magazine came home with me and I had those cookies in the oven within the hour! Verdict? They were delightful! These buttery shortbread cookies would be perfect for the little sweet that you need with your tea or coffee, crunchy with pecans and melt-in-your-mouth tender. They'd also be the perfect choice to make for drop in guests, as the recipe is quick, easy, and only makes a dozen nice sized cookies. (Not so many hanging around for late night kitchen raids.) Me? I had one with a nice cup of Earl Gray tea while I curled up with a good book and watched what was hopefully the last snowfall of the season!

    Butter Pecan Shortbread Cookies
    From Martha Stewart's Everyday Food, May 2004
    Ingredients:
    1 cup all purpose flour
    1/3 cup sugar plus more for coating
    1/2 cup (1 stick) butter at room temperature
    3/4 cup pecan halves
    1 teaspoon vanilla
    1/8 teaspoon salt
    Directions:

    • Preheat oven to 350°F.
    • Spread pecans out onto a cookie sheet. Toast until fragrant, about 6 minutes. Cool, then finely chop. (When I make this again I'll chop mine a little finer- the size of the pecans made them hard to mold into shape.)
    • Cream butter and 1/3 cup sugar until light with electric mixer. (about 1 minute)
    • Beat in vanilla, salt and flour just until dough comes together.
    • Gently fold in pecans.
    • Separate dough into 12 pieces and shape into balls. Roll in granulated sugar.
    • Place sugar coated balls of dough 3 inches apart on a parchment covered baking sheet.
    • Gently flatten with the bottom of a glass. Reshape sides if necessary. Sprinkle with sugar.
    • Bake for about 15 minutes or just until cookies start to slightly brown. (Don't over-bake!) Rotate cookie sheet halfway through baking time for even baking.
    • After cookies come out of the oven sprinkle with more granulated sugar and cool on wire rack.
    This post is linked to Sweets for a Saturday!


      Sunday, February 13, 2011

      Chicken and Oat Burgers


       I will be the first to admit that I am not a good juggler. Oh, I manage OK when I have a routine and nothing major happens to get it out of kilter. But when I add something new to to my ever-growing list of things to do, I always end up dropping my blog something. So what's new? Hubby and I joined the local YMCA and have been making use of its many opportunities this week. We've both been working out and coming home feeling great, but exhausted. Eventually I'll figure out how to keep everything up in the air.

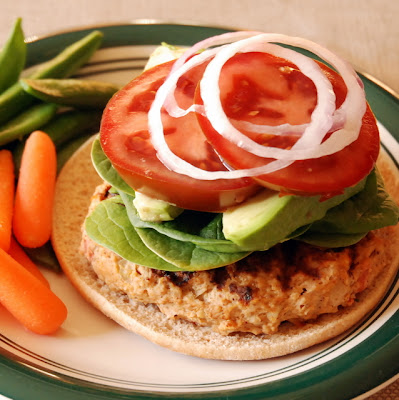
       I found the recipe for these burgers posted on the bulletin board as I was leaving one evening, and picked up the ingredients on my way home. Quick and easy to put together, we both enjoyed them- and not just because we were both ravenous from working so hard! Instead of being dry like many chicken burgers I've tried, they were juicy and full of flavor. Low fat, heart healthy and delicious, I know I'll make them again. I think the next time I make them though, I'll make half of the recipe into meatballs. They'll be awesome with spaghetti!


      Chicken (or Turkey) Oat Burgers
      adapted from a Cooking Light recipe

      Ingredients
      1 1/2 pounds ground chicken (or turkey) breast
      1 cup regular (not quick) oats
      1 cup finely chopped sweet onion
      1 Tablespoon chili powder
      1 teaspoon salt
      1 (14.5 oz) can no salt added tomatoes, drained and chopped
      2 egg whites from large eggs, lightly beaten
      *Wheat germ (optional) * I added about 1/2 cup because my chicken mixture wasn't firm enough to make patties. (I think it's because I didn't drain my tomatoes enough.)
      Directions:
      Combine first seven ingredients. If mixture is not firm enough to form into burgers, add wheat germ. Heat grill pan or electric grill (I used a George Foreman) on medium high heat. Coat surface with cooking spray. Divide mixture into 9 or 10 patties. (If the mixture is too wet to make into firm patties, use an ice cream scoop to scoop a patty sized amount onto the grill pan.) Cook patties 6 minutes on each side, or until done. (I cooked mine about 6 minutes in the George Foreman Grill. The time will really depend on the size of your burgers and the heat setting.)
      Serve on a whole wheat bun with your choice of toppings. They were really good with spinach, tomato, avocado, provolone cheese and a thin slice of red onion!

      Monday, January 31, 2011

      Easy Lentil Soup


        Can you believe that the school year is half over? It seems to me that it just started, but our new semester began today. Last Friday was a work day for teachers, and also the day of our second annual Soup Swap/ Luncheon.  All morning you could smell  simmering goodness coming from crock-pots plugged in throughout the building. It made doing report cards just a little bit easier knowing that the aromas wafting through the halls were previews of what was to come once lunchtime rolled around! While we watched the snow coming down outside, we relaxed and enjoyed a wonderfully diverse assortment of delectable soups, breads and desserts.

       My contribution this year was a Hearty Lentil Soup. Lentils are a nutritional powerhouse, packing 18 grams of protein and 15 grams of fiber in just one cup! There's less than one gram of fat per serving and absolutely no cholesterol in this heart healthy legume. What I really love about lentils is that they don't need to soak before cooking, which makes them a great choice for dinner when you haven't planned ahead of time. (Not that I'd know anything about that.) Most of your "hands on" time is just a bit of chopping, and then you can sit back and relax while the lentils simmer. Or you could use that time to make some homemade tortillas-a perfect accompaniment to this dish that's as easy on your heart as it is on your pocketbook. :)


      Lentil Soup
      recipe adapted slightly from Alton Brown
      Ingredients
      2 Tablespoons olive oil (I used 1 tablespoon)
      1 cup finely chopped onion
      1/2 cup finely chopped carrot
      1/2 cup finely chopped celery
      2 teaspoons kosher salt (I used less than this.)
      1 pound lentils, picked and rinsed-I used the regular brown lentils for this soup
      1 cup peeled and chopped tomatoes (I used 1 can of diced tomatoes.)
      2 quarts broth, vegetable or chicken (I used low sodium)
      1/2 teaspoon ground coriander
      1/2 teaspoon ground cumin
      1/2 teaspoon freshly ground grains of paradise- I did not have this spice, but I substituted a mixture of black pepper, cardamom and ginger.
      Directions
      • Heat olive oil in a soup pot or dutch oven, over medium heat. 
      • Add onions, carrot, celery and salt and "sweat" until the onions are translucent, about 6-7 minutes.
      • Add spices and cook one more minute, stirring
      • Add lentils, tomatoes and broth and stir to combine.
      • Bring to a boil, reduce heat to low and simmer 35-40 minutes or until lentils are tender.
      • Use a stick blender and puree to desired consistency.
      I'm sharing this post with:

      hearthandsoulgirlichef


      Monday, January 3, 2011

      Rustic Cabbage Soup and New Year's Intentions


        I've made many New Year's resolutions in my lifetime, all with good intentions. A few I've kept, but most I've unfortunately abandoned before the paint was dry on the brand new year.  So this year I've decided to make intentions rather than resolutions. I don't know if they'll stick any better but it certainly won't hurt to try.

        A New Year's Intention to use up food that I have in my freezer/ refrigerator/ pantry before I buy more led to this rustic soup. Another New Year's Intention- to eat more vegetables- fueled my search at 101 Cookbooks, a favorite website of one of my sons. I had cabbage that my brother had given me, curiously pink potatoes from the grocery store, and way too many cans of beans in the pantry.

       All of these made up into a hearty "peasant" soup loaded with veggies. I topped it with a drizzle of good olive oil and freshly grated Parmesan cheese (which you could leave off if you'd rather go the vegetarian route.) Some good crusty bread and a green salad rounded out a delectable (if not photogenic) supper for the two of us.

        Contrary to what it may look like here recently, I have not totally given up meat. I've just put it on the "back burner" for a while, so to speak. I definitely haven't given up on treats either- just trying to eat my veggies first like my mama always told me. :)

      Rustic Cabbage Soup
      slightly adapted from this recipe from 101 Cookbooks
      Ingredients
      1 Tablespoon extra virgin olive oil
      pinch of salt (I used only a small pinch- feel free to use more if you aren't on a salt restricted diet.)
      1/2 to 3/4 lb. potatoes, skins on, cut into 1/4 inch dice
      4 cloves garlic, chopped
      1/2 large sweet onion, sliced or chopped
      4-5 cups stock (your favorite)
      1 1/2 cups cooked white beans (or a can of white beans, drained and rinsed)
      1/2 medium cabbage, cored and sliced into 1/4 inch ribbons
      optional
      2-3 dried red chili peppers
      good quality olive oil for drizzling over top
      grated Parmesan cheese
      freshly grated black pepper to taste

      Directions
      • Heat 1 Tblsp. olive oil in a soup pot. Stir in pinch of salt and potatoes. Cook with the lid on until potatoes are beginning to get tender, about 5 minutes, stirring every once in a while to keep them from sticking.
      •  Add onions and garlic. Cook another few minutes until onions are translucent.
      • Add the stock and beans and bring to a simmer. (Add chili peppers if desired.)
      • Add the cabbage and cook another few minutes until the cabbage is tender.
      • Adjust the seasonings. Add salt and pepper if needed.
      • Remove hot peppers and serve with a drizzle of olive oil and grated parmesan (if desired.)

      This post has been added to the  Hearth 'n Soul Blog Hop at girlichef.

      Wednesday, August 11, 2010

      Pucker up! Lemon Cookies with White Chocolate Drizzle


      Need something to take your mind off of the heat?  These lovely lemon gems might just fit the bill. They  have the perfect blend of sweet white chocolate and tart lemony goodness and are perfect with a tall glass of iced tea. Each one leaves you wishing for "just one more!"


      I saw these Lemon Cookies on Jamie Cooks it Up! the other day when I was searching for something quick and easy to share with my thrift shop volunteer buddies Saturday morning. They all gave them a "thumbs-up," but what's not to love? Tart lemony cookie punctuated with white chocolate nuggets- yum!


      Disclaimer: Even if you're a purist and can't stand the thought of using a cake mix, you might want to reconsider and try these anyway. They won't disappoint! If you love a quick and easy cookie with the bright sunny taste of lemon, don't think twice- just go ahead and mix 'em up!


      Lovely Lemon Cookies with White Chocolate Drizzle
      Recipe slightly adapted from Jamie Cooks it Up!
      Ingredients:
      1 box lemon cake mix (dry)
      1 stick of butter, softened or melted
      1 egg
      1 Tablespoon fresh lemon juice
      zest from 1/2 lemon
      6 oz. white chocolate chips
      confectioners sugar (optional)
       Directions:
      • Mix together the dry cake mix, butter, egg, lemon juice and lemon zest.
      • Stir in all but about 1/4 cup of the white chocolate chips.
      • Roll the mixture into 1 1/2 inch balls. (Golf ball size).
      • Place balls of dough onto parchment lined baking sheet. I flattened mine just a bit.
      • Bake at 350 degrees Fahrenheit for about 8 to 9 minutes. You want them set, but not browned.
      • Remove to cooling rack. Cool completely, then drizzle with melted white chocolate.*
      • *To melt white chocolate, put it in a microwave safe bowl and microwave about 20 seconds. Stir and repeat. Don't worry if all of the chips aren't completely melted at this point. Keep stirring and they will melt. If they are still not a good "drizzling" consistency, stir in about 1/4 teaspoon of shortening.
      • If desired, sprinkle with confectioners sugar either in place of or in addition to the white chocolate drizzle.
      • Yield: About 18-20 large cookies, more if you make them smaller!
      Related Posts with Thumbnails