Showing posts with label cake. Show all posts

Tuesday, April 22, 2014

The Best Carrot Cake


     Carrots are good for you, right? And pineapple, coconut and walnuts? The stuff dreams are made of. This cake is full of 'em. Topped right out of the oven with a dreamy hot buttermilk glaze (that's really more of a butterscotch caramel glaze) and then with a layer of cream cheese frosting, this is a cake I look forward to making again.

     I made this for Easter dinner at my Mom's house. It was good the first day, and even better the next. I recommend making this when there are people to help you eat it. Trust me, no one will complain.  Next time I'll make layers- I needed this one to travel so I opted for a sheet cake. More layers = more frosting per bite. That can't be a bad thing, can it? I followed the recipe as written, and wouldn't change a thing. You can find the recipe- from Southern Living here.
   
Happy Earth Day!


Saturday, June 22, 2013

Fresh Blueberry Sour Cream Pound Cake


     School is out, berries are in, and my cast is off! Does picking up plump blueberries one by one between my thumb and forefinger and purposefully dropping them into my mouth count as physical therapy? Whether it does or doesn't, that's what's been going on here in my kitchen. Blueberries are gorgeous and fresh at the market right now, and hard to resist. I'm glad they're a good snacking option, because I've eaten my share along with someone else's too I'm afraid. (Hope it wasn't yours!)

     Some of my berries were lucky enough to find their way into this buttery pound cake that is currently tempting me from the confines of its cake dome. Those beautiful bursts of blue make each slice of it just as hard to resist as the berries themselves. I'm taking it to my Mom's tomorrow for Sunday dinner- hope I can wait!

Fresh Blueberry Sour Cream Pound Cake
recipe from Taste of Home

Ingredients:
6 eggs, separated (room temperature)
1 cup butter, softened (2 sticks)
3 cups sugar
1 teaspoon vanilla extract
1 teaspoon almond extract
1 teaspoon butter flavoring
3 cups all purpose flour
8 oz. (1 cup) sour cream
1/4 teaspoon baking soda
1 1/2 cups fresh blueberries (may use frozen- do not thaw!)

Instructions:
1. Cream butter and sugar until light and fluffy. Add egg yolks, one at a time, beating after each addition. Add extracts and butter flavoring.

2. Combine flour and baking soda. Add to creamed mixture alternately with sour cream, beating well after each addition.

3. In a separate bowl with clean beaters, beat egg whites on high until stiff peaks form. Fold egg whites into batter. Toss blueberries with about a tablespoon of flour. This keeps them from sinking to the bottom of the pan as the cake cooks. Fold blueberries into batter.

4. Spoon batter into a greased and floured 10 inch tube pan. Bake at 350F for 60-70 minutes, or until a toothpick inserted near the center comes out clean. Cool in pan for 10 minutes. Remove cake from pan to a rack to cool completely.


Wednesday, March 28, 2012

Cherry Almond Coconut Breakfast Loaf- Gluten Free


     It’s a "misty, moisty morning" and the dogwoods seem to have appeared overnight, mingling with the redbud trees to make a glorious spring pageant. After Saturday’s rain I can smell the earth just begging for the tiny little tomato plants growing in the windowsill. Spring has sprung.

     The warm weather and longer daylight hours have rekindled my enthusiasm for bringing my camera back into my kitchen, so I'm going to try to be more consistent with posting on my little blog. There are lots of things waking up around here that I can't wait to share!
   
  
     Sunday morning I woke up early, before the rest of the household stirred, and prepared these little loaves for breakfast. The original recipe for this lovely gluten-free-no-added-sugar-breakfast/snack came from Anja's Food 4 Thought. I changed it up just a bit to accommodate what I had on hand, and these loaves were the serendipitous results. As tasty as they were wholesome, they were a delightful addition to our morning. They disappeared so quickly that next time I'll be sure to double the recipe. Hmmm... Pineapple and macadamia nuts maybe?
     

Cherry Almond Coconut Breakfast Loaf
adapted from Anja's Carrot Coconut Breakfast Loaf
Ingredients
3/4 cup almond meal (I used almonds ground in my food processor.)
1 tsp. baking soda
1/2 tsp. cinnamon
2 eggs
1/2 tsp. vanilla extract
1/4 tsp. almond extract
1/4 cup coconut oil
1/2 cup mashed banana (about 2 medium bananas)
1/2 cup dates, pitted and chopped (If your dates stick together while chopping, sprinkle with some almond meal.)
1/2 cup carrots, grated
1/4 cup desiccated coconut
1/4 cup almonds, chopped
1/2 cup cherries (sweet or sour) pitted and chopped

Directions
  • Preheat oven to 375° F (180° C). Line three small loaf pans (or one standard size loaf pan) with lightly greased parchment paper.
  • In a small bowl, mix together almond meal, baking soda and cinnamon.
  • In another bowl, mix together eggs, extracts, coconut oil and mashed banana. ( I had trouble with my coconut oil not mixing well with the other ingredients, so I whirled the mixture around a few times in the food processor.)
  • Add almond meal mixture to wet ingredients; stir.
  • Gently stir in the remaining ingredients. Mix well to ensure that the chunky bits are evenly distributed.
  • Pour batter into prepared loaf pan(s) and bake for 40 minutes (35 for smaller loaf pans) or until a cake tester in the center of the loaf comes out clean.

Thursday, November 10, 2011

Gingerbread Bundt Cake


     Happy National Bundt Day! This Gingerbread Bundt Cake, made with stout beer and fresh ginger, is a great way to kick off your holiday baking season. The smell of molasses and ginger always makes me feel all warm and cozy, especially when the air is crisp and cool outside. Wouldn't this beautiful bundt would be a lovely addition to your Thanksgiving table? It's spicy, moist with the complex flavors of molasses and stout, and covered with a gingery glaze made with my favorite ginger ale of all time.


     Bottled in the Northern Neck since 1926,  Northern Neck Ginger Ale is a taste of home for me. I appreciate its crisp, peppery bite that sets it apart from others. It's only sold in cans and plastic bottles now, but I remember the signature green glass bottles with the bubbles on the front!


     And if a gingerbread bundt doesn't suit your fancy, head over to The Food Librarian. For the past three years, Mary has celebrated National Bundt Day by baking thirty bundts for each of the thirty days leading up to it! You can find her bevy of beautiful bundts here, and I bet you can find one that you'll want to bake. It's O.K. to celebrate the occasion a little late, especially if it involves eating  cake. :)


Stout Gingerbread Bundt Cake
from All-Time Best Holiday Recipes,  America's Test Kitchen
Ingredients
2 1/2 cups (12 1/2 oz.) all purpose flour
2 teaspoons baking powder
3/4 teaspoon baking soda
3/4 teaspoon salt
16 Tablespoons unsalted butter
2 Tablespoons ground ginger
2 teaspoons ground cinnamon
1 teaspoon ground allspice
1/4 teaspoon black pepper
4 large eggs, room temperature
1 1/2 cups (10 1/2 oz.) sugar
4 teaspoons grated or minced fresh ginger
3/4 cup robust or dark molasses
3/4 cup stout beer (I used Guinness)
Glaze
1 3/4 cups (7 oz.) confectioners sugar
3 tablespoons ginger ale
1 teaspoon ground ginger

Cake Instructions:
  • Preheat oven to 375 degrees. Grease and flour 12-cup Bundt pan.
  •  Whisk together flour, baking powder, baking soda and salt in a large bowl.
  • Melt butter in saucepan over medium heat. Stir in ground spices and cook until fragrant, about 30 seconds. Remove from heat.
  • Whisk eggs, sugar, and fresh ginger in large bowl until light and frothy. Stir in melted butter mixture, molasses, and stout until incorporated. Whisk flour mixture into egg mixture until no lumps remain.
  • Pour batter into prepared pan and gently tap pan on counter to release any air bubbles. Bake until skewer inserted into center comes out clean, about 45 minutes.Let cake cool in pan for 20 minutes, then turn out onto wire rack; let cool completely.
  • Prepare glaze: Whisk all ingredients in bowl until smooth. Pour glaze over cooled cake.
  • Enjoy! 


Wednesday, October 5, 2011

Triple Threat Brownies (Or should I say Triple Treat?)


     Disclaimer: These brownies are only sort of homemade. They're homemade in the sense that you make them at home. But they are very easy. You can put them together very quickly. And they are very good. Here's what you'll need:


     Double Stuff Oreos, brownie mix, and refrigerated cookie dough. Yep, that's it. Three things. (If you don't count the extra ingredients that go in the brownie mix, anyway.)

     Here's what you do. First, line a 9x9 baking pan with parchment paper or nonstick foil. Press that refrigerated chocolate chip cookie dough evenly over the bottom of the pan. Cover the dough with a layer of Oreos. Mix your brownies according to the directions on the box and pour the batter right over the top of the Oreos. That's it. Bake it at 350 degrees for about 40-45 minutes, or until the brownie layer is done. Cool completely in the pan, then slice and swoon.

     Since I'm trying to practice moderation in all things sweet, I cut them into small bars. But if you want something a little more festive, you could cut them big enough to hold a scoop of vanilla ice cream with some fudge sauce poured over the top. Visit Kevin and Amanda for their wonderfully decadent "even more homemade" version of these. Just be prepared to drool!

Thursday, June 23, 2011

A Butter and Sugar Hug for Monet- My Mama's Cold Oven Pound Cake


     My Mama has been making this pound cake for as long as I remember, and whenever I make it, it reminds me of home and my family and just wraps me up in a great big butter and sugar hug. I'm re-posting this recipe today for Monet, the sweet and insightful writer of anecdotes and apple cores, who needs some hugs right now. She and her family have been beset by tragedies recently, and Lizzy and Kate came up with the idea of making her a book of comfort food recipes- foods to soothe the soul. I know that food can't solve all of the problems in the world, but it sometimes makes them easier to bear. Here's a hug today Monet, from my mama and me.

My Mama's Cold Oven Pound Cake

     My Mama makes the BEST pound cake in the world. Tender crumb on the inside, with a slightly chewy crust...yummmm. Not too sweet, it's as good all by itself with a cold glass of milk as it is dressed up with strawberries and whipped cream. And toasted with a little bit of vanilla ice cream on top? There's nothing better, I'm sure. Mama's cake always has a fine crumb and lovely light texture-never heavy. And it always tastes better when she makes it- it's a buttery slice of home!


Mama's Cold Oven Pound Cake (printable recipe)

Ingredients:
1 cup butter
1/2 cup vegetable shortening
scant 3 cups sugar
3 cups cake flour
1/2 teaspoon salt
1 cup milk
4 eggs from happy hens
1 tsp. vanilla (2 if you don't use the butter and nut)
1 tsp. butter and nut flavoring (optional)

Cream together butter, shortening, and sugar.
My mama always used a hand mixer for this and her cake always turns out better than mine!
Beat in half of the cake flour, half of the milk, and the salt until combined.
Beat in eggs, one at a time. (Beat each one in until it disappears into the batter- don't over-beat.)
Beat in the rest of the cake flour, milk, and flavorings.

Pour batter into a greased and floured tube pan. Put in a cold oven and set temperature to 325 degrees. Bake for 1 hour. Increase temperature to 350 degrees and bake for 30 minutes longer or until cake is done. (cake tester comes out clean)

Monday, June 6, 2011

Rocky Road Fudge Bars


     Two weeks of school left (not that I'm counting,) and end of year preparations have left our teaching staff stressing over assessments, data collection and school improvement plans for next year. The kids, on the other hand, are already making plans for their upcoming weeks of freedom and have visions of bare feet, water parks and lazy summer days dancing in their heads. When patience gets thinner and teacher survival mode kicks in, chocolate can be a girl's best friend.

     Luckily I found these Rocky Road Bars on The Sweet Details (formerly Eating in Winnipeg) just in time to make a T.G.I.F. treat for the teacher's lounge. They turned out gooey and decadent, with walnut studded layers of chocolate, cream cheese and marshmallows. Just what the doctor ordered. Every time I passed by them I found myself cutting off just a little sliver of chocolaty deliciousness to help get me through the day.


     The chocolate chips and walnuts gave these luscious bars just the right toothsome bite, while the marshmallows and creamy fudge frosting made them gooey and delicious. I hope you try these- they're  perfect for calming frazzled nerves and putting a smile on your face. I guarantee. :)

     If you're looking for more delicious treats, check out Amanda's new blog, The Sweet Details. You'll find many more recipes there to tempt your taste buds!


Rocky Road Fudge Bars
Ingredients
Base:
1/2 cup (one stick) butter or margarine
1 oz. unsweetened chocolate, chopped
1 cup all purpose flour
1 cup sugar
1 teaspoon baking powder
1 teaspoon vanilla
2 eggs
3/4 cup chopped nuts (I used walnuts.)
Filling:
1 (8 oz.) package cream cheese, (I used Neufchatel.) softened- Reserve 2 oz. for frosting
1/4 cup (half stick) butter or margarine, softened
1/2 cup sugar
2 Tablespoons all purpose flour
1/2 teaspoon vanilla
1 egg
1/4 cup chopped nuts (I used walnuts.)
1 (6 oz.) pkg. semi-sweet chocolate chips
2 cups miniature marshmallows
Frosting:
1/4 cup (one half stick) butter or margarine
1/4 cup milk
1 oz. unsweetened chocolate, chopped
Reserved (2 oz.) cream cheese
3 cups powdered (confectioner's) sugar, sifted
1 teaspoon vanilla

Directions:
  • Heat oven to 350F. Grease and flour 13x9 inch pan. (I used non-stick foil.) In a large saucepan, melt 1 stick of butter and one oz. chocolate over very low heat, stirring until smooth. Remove from heat. Stir in one level cup flour and remaining base ingredients. Mix well and spread in prepared pan.
  • In small bowl combine 6 oz. softened cream cheese, 1/4 cup softened butter, 1/2 cup sugar, 2 Tablespoons flour, 1/2 teaspoon vanilla and one egg; beat one minute at medium speed until smooth and fluffy. Stir in 1/4 cup nuts. Spread over chocolate mixture. Sprinkle evenly with chocolate chips.
  • Bake at 350F for 25-35 minutes, or until toothpick inserted in center comes out clean. (I baked mine 30 minutes.) Remove from oven and immediately sprinkle with marshmallows. Return to oven and bake an additional two minutes.
  • While marshmallow layer is baking, in large saucepan combine 1/4 cup butter, 1/4 cup milk, 1 oz. chopped unsweetened chocolate, and reserved 2 oz. cream cheese. Cook over low heat, stirring until smooth. Remove from heat; stir in confectioner's sugar and vanilla until smooth. Immediately pour hot frosting over puffed marshmallows and lightly swirl with knife to marble. Refrigerate one hour or until firm. Cut into bars. Store in refrigerator.


Saturday, January 22, 2011

Ode to a Pink Sno Ball


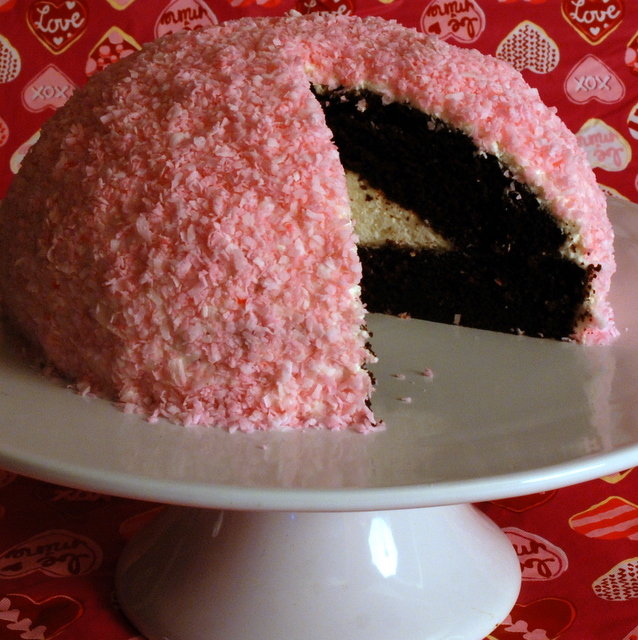
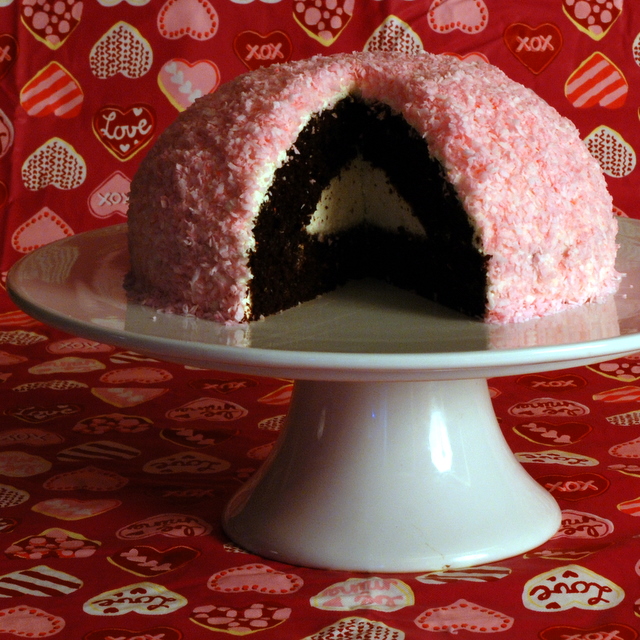
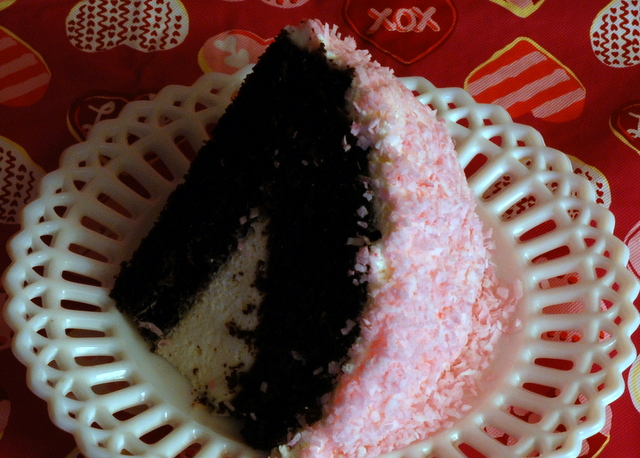
Oh lovely Sno-Ball, your glowing pink coconut beckons. Your silken vanilla creme- a treasure hidden deep within your chocolate deliciousness- concealed under your marshmallow dome. You stole my heart years ago, and I am still hopelessly smitten.


 How about you? Do you hold the same affinity for that time honored Hostess treat? Do you watch for the changing colors of Sno Balls like you watch for the changing of the seasons?

 One of my students gave me the January Cook's Country magazine for Christmas (Thanks again, M.!) and this Chocolate Snowball Cake was pictured inside the back cover. Being a long time lover of those tasty Hostess treats, I knew I had to pay homage to the Sno Ball I've known and loved, by baking this tasty tribute.


 It was absolutely wonderful even though it hasn't replaced the original Sno Ball in my heart of hearts. (It must be something about the preservatives and the crinkly plastic wrapper that keeps bringing me back.) It has, though carved out its own special place in my world, the perfect treat for a birthday or as a special sweet for my Valentine.


No special pan is needed to make your own little bit of nostalgia. You could even use a cake mix if you want. If you're not a chocolate fan, make your cake any flavor you like. It won't be a Sno Ball, but I'm sure it will still be yummy!


For the Sno Ball Cake, you'll need:
  • Two nine-inch layers of cake- I used Hershey's Black Magic cake (recipe follows) but you could use your favorite.
  • A two-quart bowl- I used a Pyrex bowl. It is helpful if the bowl is glass so you can see through it when you arrange your cake in it. Mine was opaque though, and it worked fine. (original recipe called for a 1 1/2 quart bowl)
  • Plastic wrap to line your bowl
  • One recipe of Marshmallow Frosting (recipe follows)
  • Two cups of shredded sweetened coconut plus 2 drops of red or pink food color
Marshmallow Frosting
Ingredients:
1/2 cup water
2 teaspoons unflavored gelatin
10 tablespoons (1 1/4 sticks) unsalted butter, softened (as in not liquid but really, really soft)
2 teaspoons vanilla extract
1/8 teaspoon salt
3 cups marshmallow cream (about 9-10 oz)
Directions:
Combine water and gelatin in large bowl and let sit until gelatin softens, about 5 minutes. Microwave until mixture is bubbling around edges and gelatin dissolves, about 30 seconds. (Mine took at least a minute, but my microwave is small. Your mixture does need to heat and be bubbling around the edges.) Stir in butter, vanilla and salt until combined. Let mixture cool until just warm to touch, about 5 minutes. (Mine did not take this long to cool.) Whisk in marshmallow creme until smooth. I whisked about one third of the marshmallow creme at a time. When you finish, the mixture will be thin. Refrigerate the mixture until it is thick and spreadable, about 30 minutes.

To Assemble Sno Ball Cake:
  •  Prepare Marshmallow Frosting and put in refrigerator to set. 
  • Combine coconut and food coloring (I whirled it together in my food processor)
  • Line your bowl with plastic wrap, leaving the ends overhanging the edges of the bowl.
  • Cut one of the cooled cake layers into 8 even wedges. Line the bowl with the cake wedges, packing gently so there are no spaces between wedges. This was where I ran into trouble the first time I made it. I couldn't get them to fit together in the bowl.The second time though, I trimmed the top edge (diagonally) off of each of the three sides of each wedge. After trimming the wedges they fit together nicely. There shouldn't be any gaps on the inside or in the parts touching the bowl. If you have any gaps on the inside, fill them with with parts you trimmed off.


  • Fill cake lined bowl "cavity" with one cup of the marshmallow frosting.
  • Top with the remaining nine inch layer cake, trimming it to fit the inside of the bowl.
  • Pull the edges of the plastic wrap over the cake, and put it in the refrigerator about one hour.
  • Unwrap the cake and carefully invert it onto serving dish. Remove plastic.

  • Spread remaining marshmallow mixture evenly over the cake and sprinkle with coconut. (I found the frosting to be  difficult to spread evenly, but the coconut covered it nicely.)
  • Slice, serve and enjoy your little bit of nostalgia! :)


Hershey's Black Magic Cake
Recipe from Hershey's
Ingredients
2 cups sugar
1 3/4 cups all purpose flour
3/4 cup cocoa powder
2 teaspoons baking soda
1 teaspoon baking powder
1 teaspoon salt
1 cup buttermilk
2 eggs
1 cup strong coffee
1/2 cup vegetable oil
1 teaspoon vanilla

Directions
  • Preheat oven to 350°F 
  • Grease and flour 2 nine-inch round cake pans.
  • In your mixer bowl, combine dry ingredients.
  • Stir in eggs, coffee, oil and vanilla.
  • Beat on medium speed for two minutes.
  • Divide batter evenly between the two pans. (Batter will be thin.)
  • Bake 30-35 minutes or until toothpick inserted in the center comes out clean.
  • Remove from oven and cool on wire rack for 10 minutes. Remove from pans and finish cooling on racks.
This post is linked to Ingredient Spotlight: Cocoa @ Eat at HomeFull Plate Thursday at Miz Helen's Country Cottage, and  Sweets for a Saturday at Sweet as Sugar Cookies.

    Saturday, October 30, 2010

    French Fridays with Dorie: Marie-Hélène's Apple Cake


       This recipe for French Fridays with Dorie comes from Dorie's friend, Marie-Hélène who, from Dorie's description, keeps her recipes stored in her head- just like my mom. You know the type- they throw in a "dollop" of this or maybe a "handful" of that, and everything they make always turns out perfectly. (I'm still trying to make biscuits as good as the ones my mom makes!) Luckily, Dorie was able to figure out the recipe for this lovely little cake so that even I could put it together without a bit of trouble.

      This mouth-watering rustic cake almost seemed more like a pudding to me. Or maybe even a crustless deep dish pie. It was chock full of apples all lightly bound together with a super moist cake batter flavored with vanilla and rum. And SO many apples...I used four different kinds- Cameo, Fortune, Macintosh and Golden Delicious- to give the cake a variety of textures and flavors. I used the Rum specified in the recipe this time, but I think apple brandy would be a great choice the next time I make it.


     This cake would be a delightful mid-afternoon treat with a cup of coffee or tea. (Maybe you could even count it as a serving of fruit!) You can find the recipe in Dorie's new book Around My French Table, or on Epicurious, where Dorie shared the recipe herself. Look here to see what other fabulous bloggers have done with the recipe!

     Thanks so much for all of your "Get Well" wishes for my husband. He's doing much better and will soon be home!

    Monday, September 13, 2010

    Fresh Apple Cake


     I've been a bad blogger. AWOL. These last two weeks have been a bit crazy and something had to go. So blogging got shoved to the back burner until I got all of my school stuff under control. And all the other "stuff" too. Well maybe not all of it, but enough of it to be able to sit down and maybe think  about what's been going on in my kitchen. And to dust off my poor neglected camera.

     Thanks to my brother, I've been blessed with several baskets of "just a little bit less than perfect" honey crisp apples. With this wonderful bounty, I've been making applesauce, apple butter and this lovely little apple cake. This is another recipe from my mom, that she got many years ago from someone at church. (There are some really good cooks at our little church. Homecomings with dinner on the grounds are always an occasion to eat way too much good food!)  This cake has just the right combination of spices and will fill your kitchen with scents of apple and cinnamon goodness. The apples (and raisins if you choose to add them) make the cake incredibly moist. You could add a caramel glaze if you like, but I found that it didn't really need another thing. And if by chance you have any of this lovely cake left over, it's even better the next day.


    Fresh Apple Cake

    Ingredients:
    3 cups apples, peeled cored and chopped (I chopped mine pretty small)
    1/2 cup golden raisins (optional)
    1 cup nuts, chopped
    2 eggs, beaten
    3/4 cup oil (I used canola)
    1 cup brown sugar
    1 cup granulated sugar
    2 cups all purpose flour
    1/4 tsp. ground cloves
    1/4 tsp. ground nutmeg
    1/2 tsp. ground cinnamon
    1/2 tsp. salt
    1 1/2 tsp. baking powder
    1 tsp. vanilla extract

    Directions:
    • Grease and flour tube or bundt pan. Preheat oven to 350 degrees Fahrenheit.
    • In a large bowl, whisk together the eggs and oil. 
    • Add sugars and vanilla and mix well.
    • Sift together flour, salt, spices and baking powder. Stir flour mixture into sugar mixture. 
    • Stir in apples, nuts and raisins. 
    • Put apple mixture into prepared pan and bake for 55 to 60 minutes. 
    • Cool for 5 minutes in pan and then invert onto wire rack to finish cooling.

    Monday, July 26, 2010

    Yellow Butter Cake with My Mom's Chocolate Frosting


     Unless you count my one son who always wants lemon meringue pie, this is THE birthday cake requested at my house- yellow cake with chocolate frosting. I must confess that in the past I have made the cakes from a mix, but this time I was on a mission to make a very special cake for my hubby's birthday.

     Blogging about food (and reading other food blogs) has made me much more adventurous and confident in my baking endeavors, so I decided to throw caution to the wind and make this one from scratch. Now I've made plenty of other kinds of cakes from scratch, but I've never tried just a simple yellow butter cake. (Mainly because so many of the "scratch" cakes I've tried have been dry and tasteless.) I knew I wanted to use my Mom's recipe for the frosting, but I didn't really have a "go to" recipe for yellow cake.


     When Memoria at Mangio da Sola went on her search for the perfect yellow cake, I followed along with interest thinking I'd use her winning recipe. But as fate would have it, my internet wasn't working (again) when I went to get the recipe so I had to look around for another. I settled for one that I found was in the Baking at Home with the Culinary Institute of America cookbook.  I made it exactly as directed and found it to be moist and delicately flavored, with a wonderful tender crumb. In other words, absolutely delicious! What was I so afraid of? I topped it off with my Mom's signature chocolate frosting that she's been making forever, and it was perfect.

    The next time I make this (and there will be a next time) I will probably try to increase the frosting to cake ratio because for me, (even though the cake was moist, tender and flavorful) cake is a great excuse to eat frosting.  How about splitting those two layers to make four layers? With some pastry cream sandwiched between them?  I'm sure I'll be able to find some excuse to experiment with this further before I do more birthday baking!

    Yellow Butter Cake
    from Baking at Home With the Culinary Institute of America
    Ingredients:
    3 1/2 cups cake flour
    2 cups sugar
    1 Tablespoon Baking Powder
    1/2 tsp. salt
    1 cup (2 sticks) unsalted butter, diced, at room temperature
    1 cup whole or low-fat milk (divided use)
    4 large eggs (room temperature)
    2 large egg whites (room temperature)
    2 tsp. vanilla
    Directions:
    • Preheat oven to 350 degrees Fahrenheit. Coat two 8" pans with cooking spray.
    • Into the bowl of your mixer, sift together flour, sugar, baking powder and salt.
    • Add butter and milk.
    • Using the whisk attachment of your mixer, mix together on medium speed until smooth, about 4 minutes. Scrape down sides of bowl as needed.
    • In a separate bowl, mix together milk, eggs, egg whites and vanilla.
    • Add egg/milk mixture to flour mixture in three additions, mixing for two minutes after each addition. Scrape sides of bowl after each addition.
    • Divide the batter between prepared pans. Bake 35-40 minutes or until layers spring back when touched in the center.
    • Remove from oven and allow cakes to completely cool in their pans on wire racks. Release sides and bottoms of cakes with metal spatula or knife. Unmold and finish with filling and/or frosting.
    My Mom's Chocolate Frosting
    (I doubled this recipe for this cake. When my mom makes this, it always comes out perfect. I think it must be the way she holds her mouth or something. It's hit or miss for me. I've even watched her do it and I do it exactly the same way. Sometimes the frosting gets too hard, and sometimes I have to cook it again to get it just right. But whatever I do to it, it always tastes great and is what everyone expects to have on their yellow cakes around here.)

    Ingredients:
    1 and 1/2 blocks unsweetened baking chocolate (1 and 1/2 ounces)
    1 cup sugar
    1/2 stick butter (4 tablespoons)
    1/3 cup milk
    pinch of salt
    1 tsp. vanilla
    Directions:
    Over very low heat in a heavy saucepan, melt together chocolate, butter, milk, sugar and salt. Once chocolate is melted, raise the heat and bring mixture to a boil. Boil for exactly one minute. Take off heat and add vanilla. Allow mixture to cool for about 10 minutes. Beat frosting with a wooden spoon until no longer shiny. It should be spreading (not pouring) consistency. Quickly spread frosting on the cake, because at this point it will begin to set.


    Saturday, April 3, 2010

    Heavenly Pineapple Cake

    Heavenly Pineapple Cake

         The thing that makes this cake so heavenly isn't the fact that it's lightly sweet and full of crushed pineapple. It's not because it's deliciously cool and refreshing, especially if you keep it in the refrigerator. It's not even heavenly because it's quick and easy and fat free. Are you ready? This cake is heavenly because it calls for only two ingredients. Yep, you read that right. Two ingredients. All you need is one box of Angel Food cake mix and one 20 oz. can of crushed pineapple. Mix the two together (don't drain the pineapple) and pour them into a 9x13 pan. You don't even have to grease it if you don't want to. Bake at 350 degrees for about 30 minutes. Cool and serve with strawberries or just plain. Isn't that a perfect recipe for a perfect warm weather dessert? Thanks, Rita, for the yummy recipe!


    Heavenly Pineapple Cake
    recipe from Rita
    Ingredients:
    1 box Angel Food Cake mix
    1 (20 oz.) can of crushed pineapple (in juice)
    Directions
    Mix together the dry cake mix and the whole can of pineapple with it's juice. Pour into a 9x13 pan or a tube pan. (If you're using a tube pan, you should probably spray some Pam in it. I didn't grease my 9x13 glass pan and it came out ok.)
    Bake at 350 degrees for 30-40 minutes. (The 9x13 I used was ready after about 30 minutes, but a tube pan might take a bit longer.)
    Cool and serve by itself or with strawberries.

    Thursday, February 11, 2010

    Shh...Dont Tell.


    Don't tell the secret ingredient, that is. Not until everybody has asked for seconds. And even then I'd think about it twice if I were you. Call it spice cake...that would work. Plum cake. Dried plum cake. Dried plums as in prunes, the much maligned cousins of raisins. Please don't let the fact that it is a prune cake stop you from making it. The cake is spicy and moist, and the glaze is good enough to eat all by itself. And there are no ill effects from eating this prune cake. I promise.

    This is Grandma Iny's Prune Cake. Not my grandma... Pioneer Woman's grandma. You can find the recipe here on her website. Complete with detailed photos and directions, and her unique sense of humor. I hope you enjoy it.

    Friday, January 29, 2010

    Texas Sheet Cake


    Back in another lifetime, before husband, kids, or grandbaby, I lived with my friend Denise. She got married, I got married, and unfortunately we lost touch. But I do still have her recipe for Texas Sheet Cake. Delicious fudgy Texas Sheet Cake. And it's just as good now as it was back in 1980.

    It's a great cake to make for a crowd...it's super easy, super fast to make, and is big enough for seconds (which you'll likely want.) It uses ingredients you probably have on hand, and mixes together so fast you can be in chocolate heaven in no time at all. Thank you Denise, wherever you are!

    Texas Sheet Cake (printable recipe here)

    Cake Ingredients
    2 cups all purpose flour
    2 cups sugar
    1/2 tsp salt
    2 sticks butter
    1 cup water
    4 tablespoons cocoa (I heaped them.)
    2 eggs
    1/2 cup buttermilk (If you don't have buttermilk, put 1 tablespoon of vinegar in a measuring cup and fill to the 1/2 cup mark with regular milk.This works just as well as buttermilk.)
    1 teaspoon vanilla
    1 teaspoon baking soda
    • Preheat oven to 350F.
    • In large bowl, mix together flour, sugar, and salt.
    • In a saucepan, melt 2 sticks of butter. Stir in cocoa and then add water. Bring to a brief boil and remove from heat.
    • Beat together eggs and buttermilk. Add vanilla and baking soda and mix well.
    • Pour the butter mixture into the flour mixture and stir together. Add the egg mixture and mix well. Pour into a greased 12x18x1 baking sheet. Bake for 20 minutes. (I've also made it without greasing the pan, and it did just fine.)
    While the cake bakes, make the icing-
    In a medium saucepan, heat together 1 and 1/2 sticks butter, 4 Tablespoons cocoa powder (heaped if you like), and 6 tablespoons milk. Bring to a brief boil and remove from heat. Stir in 1 teaspoon vanilla and gradually add 1 box (1 lb.) powdered sugar. Stir in 1 cup of chopped nuts if desired. Pour the hot icing on the hot cake as soon as it comes out of the oven. Cool and enjoy!


    Saturday, January 23, 2010

    Chocolate Cake...in a mug in a minute!


    Do you ever feel like you need just a little something sweet? Maybe something gooey and chocolate? You look in the refrigerator, you look in the cupboards, but nothing looks appealing? It doesn't have to be a lot...just enough to quell that craving for a little treat. But you don't want to wait forever for it and mess up your whole kitchen making it. If you ever have that feeling, then you're gonna love this!

    My friend Rita sent me a recipe for a lovely little cake you mix up and cook in a mug. Yep, a mug. You can also eat it out of the same mug, therefore keeping the number of dirty dishes to a minimum. (At my house this is very important.) And it cooks in the microwave. For only one minute! And after eating your chocolaty mug full of goodness, you have no leftovers to tempt you later. What a concept!. In its naked state the little cake is chocolaty good. If you want to walk on the wild side, top it with a little chocolate syrup and whipped cream. With a cherry on top. Because you want to.


    Chocolate Cake in a Mug- recipe from Rita
    (printable recipe)
    Spray microwave safe coffee mug with non-stick spray.
    (I just oiled mine with a couple of drops of light flavored olive oil.)
    Add into the mug the following:
    2 tablespoons sugar
    1/4 teaspoon baking powder
    2 teaspoons cocoa powder
    pinch of salt
    2 tablespoons milk
    1/2 teaspoon vanilla
    2 teaspoons oil
    2 tablespoons CAKE flour
    Stir with a fork until smooth and no lumps.
    Microwave on HIGH for 60 seconds!! (I have a mini-microwave that's really low power so I added 20 seconds.)
    You can eat it right out of the mug or turn it out onto a plate. (But why dirty another dish?)
    Enjoy it by itself or with chocolate syrup or whipped cream.

    Thursday, January 7, 2010

    Mama's Cold Oven Pound Cake

    photos by Johnny

    My Mama makes the BEST pound cake in the world. Tender crumb on the inside, with a slightly chewy crust...yummmm. Not too sweet, it's equally good all by itself with a cold glass of milk, or dressed up with strawberries and whipped cream. My mama's secret? Use a hand mixer. She says to beat it well, but not to death. Her pound cake is always better than mine because I'm lazy and use my KitchenAid. (See the big bubbles in mine? My mama's never has those.) Her cake always has a fine crumb and lovely light texture-never heavy. But if you're lazy like me, the bubbles don't make a bit of difference in the taste. However you make it, it's really good. I'd never lead you astray on something as important as pound cake.


    Mama's Cold Oven Pound Cake (printable recipe)

    Ingredients:
    1 cup butter
    1/2 cup shortening
    scant 3 cups sugar
    3 cups cake flour
    1/2 teaspoon salt
    1 cup milk
    4 eggs from happy hens
    1 tsp. vanilla (2 if you don't use the butter and nut)
    1 tsp. butter and nut flavoring (optional)

    Cream together butter, shortening, and sugar.
    Beat in half of the cake flour, half of the milk, and the salt until combined.
    Beat in eggs, one at a time. (Beat each one in until it disappears into the batter.)
    Beat in the rest of the cake flour, milk, and flavorings.

    Pour batter into a greased and floured tube pan. Put in a cold oven and set temperature to 325 degrees. Bake for 1 hour. Increase temperature to 350 degrees and bake for 30 minutes longer or until cake is done. (cake tester comes out clean)
    Related Posts with Thumbnails