Sunday, February 27, 2011

Luscious Meyer Lemon Curd


 Hubby's been craving lemon curd ever since we he finished the jar my sister gave me for Christmas. We haven't had many sweets here lately, and finding these lovely Meyer lemons on our date night in Wegman's  last night motivated me to remedy that situation. A bit sweeter than an ordinary lemon, Meyer lemons are a cross between a lemon and a mandarin orange. (I've been wanting to try them for ages but my local grocery doesn't carry them) I could think of no better way to share their sunshine than with this lovely lemon curd!


And oh, is this lemon curd sweet, tart and delectable- the bright lemon flavor shines! I ate way too much of it just scooped out of the jar with a spoon, but I have plans for whatever is left after my willpower takes effect. I know it's great on English muffins, but I'm thinking of tarts, cupcakes, trifles...the possibilities are endless.


Look at the gorgeous color! That's thanks to my sweet little free range hens and their beautiful eggs. The yolks are such a deep golden color they've spoiled me for run of the mill grocery store eggs.


If you can't find Meyer lemons, just use the regular lemons you can find at your grocery. The curd will still be amazing, and you'll wonder why you waited so long to make it. It's easy to put together, and makes a fabulous versatile spread that's perfect for anything from breakfast to dessert.


Meyer Lemon Curd
adapted from this recipe
Ingredients
juice of 4 Meyer lemons (mine ended up being about 2/3 cup)
6 egg yolks
1 cup granulated sugar
small pinch of salt
1 stick butter, cut into chunks
1 Tablespoon Meyer lemon zest

In a heavy bottomed pan, stir together sugar and egg yolks. Add lemon juice and pinch of salt. Cook (medium heat) and stir constantly with wooden spoon until mixture thickens enough to coat your spoon.  (This takes about 10 minutes. You don't want to cook it too fast or hot, or the eggs will curdle.) Add butter one chunk at a time,and continue to stir until each piece is melted. Pour mixture through a fine strainer and then stir in the lemon zest. Pour into clean jars and store in the refrigerator.  (Keeps two weeks in the refrigerator.)

This post is being shared with:
hearthandsoulhop

Sunday, February 13, 2011

Chicken and Oat Burgers


 I will be the first to admit that I am not a good juggler. Oh, I manage OK when I have a routine and nothing major happens to get it out of kilter. But when I add something new to to my ever-growing list of things to do, I always end up dropping my blog something. So what's new? Hubby and I joined the local YMCA and have been making use of its many opportunities this week. We've both been working out and coming home feeling great, but exhausted. Eventually I'll figure out how to keep everything up in the air.

 I found the recipe for these burgers posted on the bulletin board as I was leaving one evening, and picked up the ingredients on my way home. Quick and easy to put together, we both enjoyed them- and not just because we were both ravenous from working so hard! Instead of being dry like many chicken burgers I've tried, they were juicy and full of flavor. Low fat, heart healthy and delicious, I know I'll make them again. I think the next time I make them though, I'll make half of the recipe into meatballs. They'll be awesome with spaghetti!


Chicken (or Turkey) Oat Burgers
adapted from a Cooking Light recipe

Ingredients
1 1/2 pounds ground chicken (or turkey) breast
1 cup regular (not quick) oats
1 cup finely chopped sweet onion
1 Tablespoon chili powder
1 teaspoon salt
1 (14.5 oz) can no salt added tomatoes, drained and chopped
2 egg whites from large eggs, lightly beaten
*Wheat germ (optional) * I added about 1/2 cup because my chicken mixture wasn't firm enough to make patties. (I think it's because I didn't drain my tomatoes enough.)
Directions:
Combine first seven ingredients. If mixture is not firm enough to form into burgers, add wheat germ. Heat grill pan or electric grill (I used a George Foreman) on medium high heat. Coat surface with cooking spray. Divide mixture into 9 or 10 patties. (If the mixture is too wet to make into firm patties, use an ice cream scoop to scoop a patty sized amount onto the grill pan.) Cook patties 6 minutes on each side, or until done. (I cooked mine about 6 minutes in the George Foreman Grill. The time will really depend on the size of your burgers and the heat setting.)
Serve on a whole wheat bun with your choice of toppings. They were really good with spinach, tomato, avocado, provolone cheese and a thin slice of red onion!

Monday, January 31, 2011

Easy Lentil Soup


  Can you believe that the school year is half over? It seems to me that it just started, but our new semester began today. Last Friday was a work day for teachers, and also the day of our second annual Soup Swap/ Luncheon.  All morning you could smell  simmering goodness coming from crock-pots plugged in throughout the building. It made doing report cards just a little bit easier knowing that the aromas wafting through the halls were previews of what was to come once lunchtime rolled around! While we watched the snow coming down outside, we relaxed and enjoyed a wonderfully diverse assortment of delectable soups, breads and desserts.

 My contribution this year was a Hearty Lentil Soup. Lentils are a nutritional powerhouse, packing 18 grams of protein and 15 grams of fiber in just one cup! There's less than one gram of fat per serving and absolutely no cholesterol in this heart healthy legume. What I really love about lentils is that they don't need to soak before cooking, which makes them a great choice for dinner when you haven't planned ahead of time. (Not that I'd know anything about that.) Most of your "hands on" time is just a bit of chopping, and then you can sit back and relax while the lentils simmer. Or you could use that time to make some homemade tortillas-a perfect accompaniment to this dish that's as easy on your heart as it is on your pocketbook. :)


Lentil Soup
recipe adapted slightly from Alton Brown
Ingredients
2 Tablespoons olive oil (I used 1 tablespoon)
1 cup finely chopped onion
1/2 cup finely chopped carrot
1/2 cup finely chopped celery
2 teaspoons kosher salt (I used less than this.)
1 pound lentils, picked and rinsed-I used the regular brown lentils for this soup
1 cup peeled and chopped tomatoes (I used 1 can of diced tomatoes.)
2 quarts broth, vegetable or chicken (I used low sodium)
1/2 teaspoon ground coriander
1/2 teaspoon ground cumin
1/2 teaspoon freshly ground grains of paradise- I did not have this spice, but I substituted a mixture of black pepper, cardamom and ginger.
Directions
  • Heat olive oil in a soup pot or dutch oven, over medium heat. 
  • Add onions, carrot, celery and salt and "sweat" until the onions are translucent, about 6-7 minutes.
  • Add spices and cook one more minute, stirring
  • Add lentils, tomatoes and broth and stir to combine.
  • Bring to a boil, reduce heat to low and simmer 35-40 minutes or until lentils are tender.
  • Use a stick blender and puree to desired consistency.
I'm sharing this post with:

hearthandsoulgirlichef


Friday, January 28, 2011

French Fridays with Dorie- Chicken B'stilla


 This week's selection for French Fridays with Dorie is chicken b'stilla (or pastilla, as it's sometimes written). A Moroccan dish, it's savory, sweet and full of exotic flavors. Traditionally made with pigeon, Dorie's version is full of chicken, onions, garlic and spices- ginger, cinnamon, coriander and saffron. Honey and a sprinkling of cinnamon sugar give it a slightly sweet edge, and sliced almonds give it a wonderful toothsome texture.

 Dorie says that it's meant to be eaten with your hands at the start of a multi-course meal, but it's hearty and delicious enough to be served as a main course, especially if paired with a nice fruity salad. I had  a bit of trouble with the filo dough- my crust didn't turn out as flaky as I had hoped it would be- but it was still crispy with the cinnamon sugar on top. To see how others prepared this dish, visit this week's  "FFwD Leave Your Link" page and have a wonderful weekend!

Thursday, January 27, 2011

English Muffins- Nooks and Crannies Included

 
 English muffins are one of my favorite breakfast treats. The toppings have all of those nooks and crannies to melt into, making every crunchy bite a tasty treat. They're great toasted, with butter and jam or even peanut butter and jelly.  I especially love them with an egg and cheese on top.  (Every once in a while I might even sneak a piece of crispy bacon on them.)

 I used Alton Brown's super easy recipe for these, but replaced half of the all purpose flour with freshly ground whole wheat. They were tender, tasty and full of those nooks and crannies that make English muffins delicious- I promise! Make sure to split them with a fork instead of slicing them with a knife- that makes them even better in my book.


English Muffins
recipe from Alton Brown
Ingredients
1/2 cup non-fat powdered milk
1 tablespoon sugar
1 teaspoon salt, divided (I used 3/4 teaspoon)
1 tablespoon shortening (I used Smart Balance)
1 cup hot water
1 envelope dry yeast
1/8 teaspoon sugar
1/3 cup warm water
2 cups all-purpose flour (I used half whole wheat) sifted after measuring
Non-stick vegetable spray
Equipment needed: electric griddle, 3 inch metal rings -If you don't have the rings especially made for English muffins, tuna cans with both top and bottom cut out work perfectly. (If you buy the tuna specifically for this, make sure that the brand you choose has a top and bottom that you can remove. Some cans have rounded bottoms.) Or you could use metal cookie cutters- how about hearts?)

Directions
  • In a large bowl, combine the powdered milk, 1 tablespoon of sugar, 1/2 teaspoon salt, shortening and hot water. Stir until shortening is melted and all other ingredients are dissolved. Cool until just warm.
  • In another small bowl, combine the yeast and 1/8 teaspoon sugar with the warm water. Let this rest until the yeast has dissolved. Add this to the dry milk mixture and stir. 
  • Add the sifted flour and beat thoroughly with a wooden spoon.
  • Cover the bowl and let it rest in a warm spot for about 30 minutes.
To cook:
  • Preheat the griddle to 300°F.
  • Add the remaining 1/2 teaspoon of salt to the flour mixture and beat thoroughly. (I added only 1/4 tsp.) 
  • Place metal rings onto the griddle and coat lightly with the vegetable oil spray. 
  • Using an ice cream or cookie scoop that holds about 1/4 cup  (I used my largest Pampered Chef cookie scoop) put a scoop of batter into each ring. 
  • Cover the batter filled rings with a cookie sheet that you've sprayed with non-stick spray. Cook for 5-6 minutes. 
  • Carefully remove the lid and flip the rings using tongs. (I also had to use a spatula, as some of my muffins didn't entirely fill the rings.) 
  • Cover again with the cookie sheet lid and cook for another 5-6 minutes or until golden brown. 
  • Place on a cooling rack, remove rings and cool. Split with fork, toast and serve.
  • Yields 8 muffins
I'm sending these English muffins to Full Plate Thursday at Miz Helen's Country Cottage.

Saturday, January 22, 2011

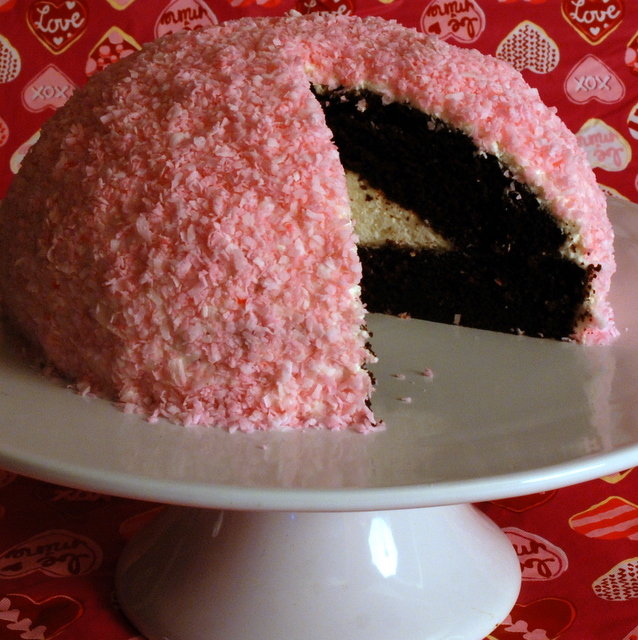
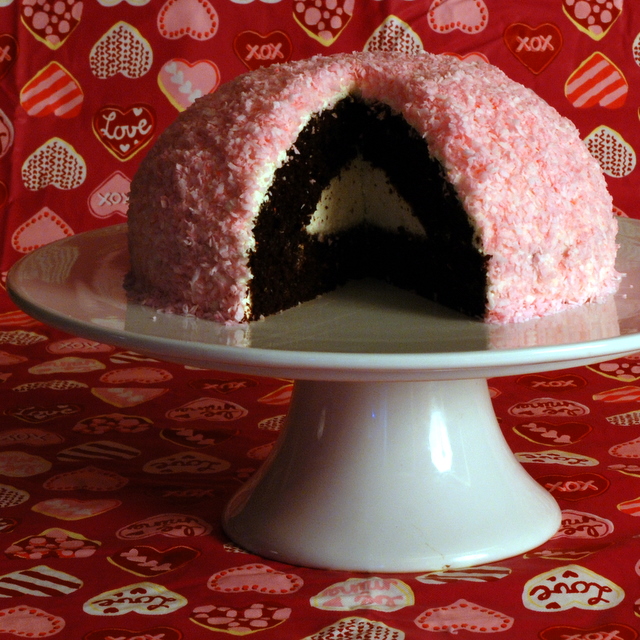
Ode to a Pink Sno Ball


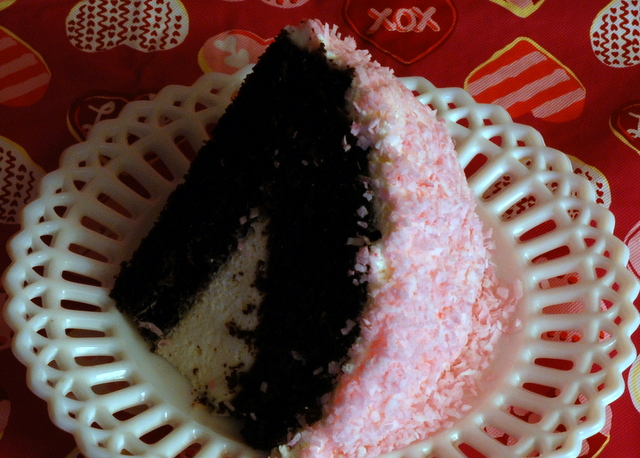
Oh lovely Sno-Ball, your glowing pink coconut beckons. Your silken vanilla creme- a treasure hidden deep within your chocolate deliciousness- concealed under your marshmallow dome. You stole my heart years ago, and I am still hopelessly smitten.


 How about you? Do you hold the same affinity for that time honored Hostess treat? Do you watch for the changing colors of Sno Balls like you watch for the changing of the seasons?

 One of my students gave me the January Cook's Country magazine for Christmas (Thanks again, M.!) and this Chocolate Snowball Cake was pictured inside the back cover. Being a long time lover of those tasty Hostess treats, I knew I had to pay homage to the Sno Ball I've known and loved, by baking this tasty tribute.


 It was absolutely wonderful even though it hasn't replaced the original Sno Ball in my heart of hearts. (It must be something about the preservatives and the crinkly plastic wrapper that keeps bringing me back.) It has, though carved out its own special place in my world, the perfect treat for a birthday or as a special sweet for my Valentine.


No special pan is needed to make your own little bit of nostalgia. You could even use a cake mix if you want. If you're not a chocolate fan, make your cake any flavor you like. It won't be a Sno Ball, but I'm sure it will still be yummy!


For the Sno Ball Cake, you'll need:
  • Two nine-inch layers of cake- I used Hershey's Black Magic cake (recipe follows) but you could use your favorite.
  • A two-quart bowl- I used a Pyrex bowl. It is helpful if the bowl is glass so you can see through it when you arrange your cake in it. Mine was opaque though, and it worked fine. (original recipe called for a 1 1/2 quart bowl)
  • Plastic wrap to line your bowl
  • One recipe of Marshmallow Frosting (recipe follows)
  • Two cups of shredded sweetened coconut plus 2 drops of red or pink food color
Marshmallow Frosting
Ingredients:
1/2 cup water
2 teaspoons unflavored gelatin
10 tablespoons (1 1/4 sticks) unsalted butter, softened (as in not liquid but really, really soft)
2 teaspoons vanilla extract
1/8 teaspoon salt
3 cups marshmallow cream (about 9-10 oz)
Directions:
Combine water and gelatin in large bowl and let sit until gelatin softens, about 5 minutes. Microwave until mixture is bubbling around edges and gelatin dissolves, about 30 seconds. (Mine took at least a minute, but my microwave is small. Your mixture does need to heat and be bubbling around the edges.) Stir in butter, vanilla and salt until combined. Let mixture cool until just warm to touch, about 5 minutes. (Mine did not take this long to cool.) Whisk in marshmallow creme until smooth. I whisked about one third of the marshmallow creme at a time. When you finish, the mixture will be thin. Refrigerate the mixture until it is thick and spreadable, about 30 minutes.

To Assemble Sno Ball Cake:
  •  Prepare Marshmallow Frosting and put in refrigerator to set. 
  • Combine coconut and food coloring (I whirled it together in my food processor)
  • Line your bowl with plastic wrap, leaving the ends overhanging the edges of the bowl.
  • Cut one of the cooled cake layers into 8 even wedges. Line the bowl with the cake wedges, packing gently so there are no spaces between wedges. This was where I ran into trouble the first time I made it. I couldn't get them to fit together in the bowl.The second time though, I trimmed the top edge (diagonally) off of each of the three sides of each wedge. After trimming the wedges they fit together nicely. There shouldn't be any gaps on the inside or in the parts touching the bowl. If you have any gaps on the inside, fill them with with parts you trimmed off.


  • Fill cake lined bowl "cavity" with one cup of the marshmallow frosting.
  • Top with the remaining nine inch layer cake, trimming it to fit the inside of the bowl.
  • Pull the edges of the plastic wrap over the cake, and put it in the refrigerator about one hour.
  • Unwrap the cake and carefully invert it onto serving dish. Remove plastic.

  • Spread remaining marshmallow mixture evenly over the cake and sprinkle with coconut. (I found the frosting to be  difficult to spread evenly, but the coconut covered it nicely.)
  • Slice, serve and enjoy your little bit of nostalgia! :)


Hershey's Black Magic Cake
Recipe from Hershey's
Ingredients
2 cups sugar
1 3/4 cups all purpose flour
3/4 cup cocoa powder
2 teaspoons baking soda
1 teaspoon baking powder
1 teaspoon salt
1 cup buttermilk
2 eggs
1 cup strong coffee
1/2 cup vegetable oil
1 teaspoon vanilla

Directions
  • Preheat oven to 350°F 
  • Grease and flour 2 nine-inch round cake pans.
  • In your mixer bowl, combine dry ingredients.
  • Stir in eggs, coffee, oil and vanilla.
  • Beat on medium speed for two minutes.
  • Divide batter evenly between the two pans. (Batter will be thin.)
  • Bake 30-35 minutes or until toothpick inserted in the center comes out clean.
  • Remove from oven and cool on wire rack for 10 minutes. Remove from pans and finish cooling on racks.
This post is linked to Ingredient Spotlight: Cocoa @ Eat at HomeFull Plate Thursday at Miz Helen's Country Cottage, and  Sweets for a Saturday at Sweet as Sugar Cookies.

    Monday, January 10, 2011

    Sweet Barbecue Meat Loaf


     Hubs came home the other night with a pound of extra lean ground beef. Do you think maybe it was his way of hinting that he needed a break from the mainly vegetarian fare I've been dishing up lately? While red meat isn't exactly the first thing I think of as being on a heart healthy diet, hubby's cardiologist actually gave it his blessing. Who knew? I found this recipe for meatloaf  (in the American Heart Association Cookbook) that I spiced up just a bit to incorporate ingredients I had on hand.

     The original recipe makes a meatloaf glazed with barbecue sauce, raspberry spread and crushed red pepper flakes. I substituted my HabaƱero Gold Jelly for the raspberry spread and pepper flakes, and ended up with a sweet spicy glaze that gave the red pepper and onion studded ground beef just enough zip to make it a treat. It was great hot for dinner, but what I'm looking forward to are the meatloaf sandwiches I can make with the leftovers!

    Sweet Barbecue Meat Loaf
    adapted from The New American Heart Association Cookbook, 8th edition
    1/2 cup barbecue sauce (lowest sodium available)
    1/4 cup habanero gold jelly* slightly melted
    1 pound extra lean ground beef
    1/2 medium red bell pepper, finely chopped
    1/2 medium sweet onion, finely chopped
    1/3 cup uncooked quick-cooking oatmeal
    2 egg whites
    *the original recipe calls for 1/4 cup all-fruit raspberry spread plus 1/8 teaspoon crushed red pepper flakes
    Directions:
    • Preheat oven to 375°F. 
    • Line a baking sheet with aluminum foil. Lightly spray with cooking spray.
    • In a small bowl, stir together the barbecue sauce and jelly.
    • In a medium bowl, combine 1/4 cup barbecue sauce mixture and the remaining ingredients. Shape the mixture into an oval and place on baking sheet.
    • Spoon the remaining barbecue sauce mixture on the top and sides of the meat loaf.
    • Bake for 50 minutes, or until the meat loaf registers 160°F on an instant-read thermometer. Let the meat loaf stand for 5-10 minutes before serving.

    This post has been submitted to the Hearth-n-Soul blog hop at Girlichef.
      Related Posts with Thumbnails