Sunday, November 6, 2016

Chocolate (or not) Sprinkle Cookies


     My daughters-in-law introduced me to these delightful little shortbread gems. They call them "Rusty Logs" and once you've made them it'll be easy to see how they got the name. These cookies might not win any beauty contests, but what they lack in showiness they make up for in flavor. Oats give them a nutty crunch that keeps little (and big) hands reaching into the cookie jar.


     I decided to take some license with the recipe and dressed some up in party clothes for Christmas. You could make these for any occasion just by changing up the sprinkles! The ones that work best (in my opinion) are the "ice cream" type softer sprinkles, but any kind would dress up the edges of this slice and bake type cookie.


     They're more widely known as "Chocolate Shot" cookies, but  I call those little bits sprinkles, not shot. Is it a regional thing do you suppose?  No matter what you call them, they're great, versatile little cookies that are as easy to make as they are to eat. Enjoy! :)

Betty

Chocolate Sprinkle Cookies (AKA Rusty Logs) Recipe
Printable recipe here

Ingredients
1 cup confectioner's (powdered) sugar
1 cup butter, softened but not melted (I use salted)
2 tsp. vanilla extract
1 1/2 cups all purpose flour
1/2 tsp. baking soda
1 cup rolled oats
chocolate "shot" or sprinkles (2 or 3 small (1.5 oz.) bottles or one large tub) You could also use multicolored sprinkles, or even colored sugar.

Instructions
  • Cream together butter and sugar
  • Add vanilla and mix well
  • Sift or whisk together flour, baking soda, and oats. Add to butter mixture and mix until combined.
  • Refrigerate about 1/2 hour, or until dough is firm enough to work with.
  • Divide dough in half and form into two rolls, each having a diameter of about 1 1/2 inches.
  • Pour chocolate sprinkles onto wax paper.
  • Roll formed dough "logs" in chocolate sprinkles until evenly coated.
  • Wrap rolls in wax paper or plastic wrap and refrigerate until firm, or overnight.
  • Slice into cookies about 1/4 - 1/3 inch thick and arrange on parchment covered baking sheets.
  • Preheat oven to 325 degrees Fahrenheit.
  • Bake cookies 18-25 minutes, or until very lightly browned. Remove to a rack to cool.
  • Yield: about 3 dozen

Sunday, October 16, 2016

Stratford Hall Ginger Cookies


    Many different ginger cookies have come out of my oven, but this recipe is one that I keep coming back to. It's a chewy ginger cookie rather than a snap, and it partners as perfectly with a nice cold glass of milk as it does with a cup of hot tea or spiced cider. We like these spicy treats year round at my house, but when fall rolls around it just seems wrong not to have them in the cookie jar.


     The recipe hails from a local landmark, Stratford Hall Plantation. Stratford is the ancestral home of four generations of the Lee family of Virginia (including two signers of The Declaration of Independence), and Birthplace of General Robert E. Lee. The cookies are a tradition at their Candlelight tour at Christmas time, and many folks look forward to sampling their gingery goodness.

    
     We prefer the cookies on the chewy side, but if you'd rather have more of a hard ginger snap perfect for dunking, just forget leave the cookies in the oven for a bit longer. Either way, they'll be grand! :)

Stratford Hall Ginger Cookies
printable recipe available here
Ingredients
1 1/2 cups butter, melted (3 sticks)
1/2 cup molasses
2 cups sugar
2 large eggs
4 cups all purpose flour
4 teaspoons baking soda
2 teaspoons cinnamon
1 teaspoon ginger
1 teaspoon ground cloves
granulated sugar (for coating balls of dough)

Directions
  • Preheat oven to 350 degrees Fahrenheit.
  • Sift or whisk together flour, baking soda, cinnamon, ginger, and cloves. Set aside.
  • In a large mixing bowl, beat together melted butter, molasses and sugar.
  • Add eggs and mix until combined.
  • Add flour mixture to butter mixture and stir until all flour is incorporated.
  • Refrigerate until firm, about 1-2 hours.
  • Roll walnut-sized balls of dough in granulated sugar.
  • Place on parchment covered baking sheet and bake 8-10 minutes, or until set and lightly browned. If you want a crispier cookie like a ginger snap, just let them stay in the oven a bit longer. If you want a softer cookie, bake until just set.
  • Cool on the cookie sheet a couple of minutes before removing to a cooling rack.
  • Yield: about 5 dozen

Wednesday, October 5, 2016

Vanilla Salted Peanut Cookies

  
     It's cookie time! It's been a long time since this little space has gotten any attention, but after these cookies came out of the oven I knew I had to share them. Who can resist chunky vanilla oatmeal cookies loaded with salty peanuts and white chocolate? Think PayDay candy bars, only with a little crunch around the edges instead of the chew. I didn't think of it until after I made these, but I think a little sprinkle of Fleur de Sel on top would make them extra special.

    School has been keeping me extra busy these days, but I'm going to try to make time to share some of my old and new favorite cookies in time for the holidays. Hope to see you soon!

Betty

Vanilla Salted Peanut Cookies
from The Baking Sheet (King Arthur Flour) Spring 2013

Ingredients
1/2 cup (1 stick) butter
1/4 cup vegetable shortening
2 cups brown sugar
2 cups old fashioned rolled oats
2 large eggs
2 Tablespoons vanilla extract
1 teaspoon baking soda
2 cups all purpose flour
1 1/4 cups salted peanuts
1 1/3 cups white chocolate chips

Directions
  • Preheat oven to 350F
  • Cream together butter, shortening and brown sugar.
  • Mix in the eggs, oats, and vanilla
  • Whisk baking soda into flour
  • Incorporate flour mixture into the butter/oat mixture
  • Mix in peanuts and white chocolate
  • Scoop by Tablespoons (I used a medium sized scoop) onto parchment covered baking sheets.
  • Bake for 11-13 minutes, or until golden brown at the edges. (Longer baking times make a crunchier cookie, if that's what you prefer.)
  • Let cool on baking sheets for 5 minutes, then transfer to a rack to finish cooling.
  • Yield: about 4 1/2 dozen cookies


Saturday, March 21, 2015

Sweet Potato Pie


     Truth in labeling. This is, in fact, a pie. A sweet potato pie, a southern staple that I grew up with. My mom has been making this pie for as long as I can remember. (And that's a pretty long time.)
   

     My mom is amazing. She still cooks a huge Sunday dinner every week. I'm there most Sundays, as are my sister and brother and any of our kids (and spouses and grandkids) that happen to be around. She's been doing this forever. And she always has dessert. Sometimes it's her famous cold oven pound cake, or even yellow cake with chocolate frosting. But quite often, it's sweet potato pie.


      A true Southern sweet potato pie is not a pumpkin pie wannabe. You'll not find cloves, nutmeg, or even cinnamon here. Just a little sugar, butter and vanilla added to the custard so the delicate sweet potato really shines through. My mom says "When I want a pumpkin pie, I'll make a pumpkin pie!" It's also an all season pie, too good to relegate to the fall and winter.


     This recipe makes two pies. My mom always bakes one plain and one with flaked coconut on top. There are those who prefer one or the other, but I am equal opportunity when it comes to pie.


    Sweet potatoes are readily available year round, and full of fiber and other things that are good for you. So sweet potato pie is like having dessert with benefits, right? I like to think so. And I hope you do too.


My Mom's Sweet Potato Pie Recipe

Ingredients
3 cups cooked, mashed sweet potato (you can either bake or boil your potatoes until tender)
Use a potato masher or a fork- not a food processor
2 eggs, beaten
Scant cup of sugar (My mom says a full cup is just too sweet for her.)
1 tsp. vanilla
3/4 of a 12 oz. can of evaporated milk- (about 1 cup plus 2 Tablespoons) Save the rest to brush on the crust before baking
2 Tablespoons butter, melted
dash of salt

Instructions
Preheat oven to 350F.
Mix  all ingredients together and pour into two regular (not deep dish) unbaked pie shells.
Sprinkle top with sweetened, flaked coconut if desired. Brush crust with reserved milk.
Bake about an hour, or until filling is puffed and crust is nicely browned. (The amount of moisture in your sweet potatoes will determine the exact time.) If your crust browns too quickly, cover crust with foil. Cool and serve.


Friday, March 13, 2015

Spotted Dog: An Irish Tea Cake


     I had to go pretty far back on my family tree to find my Irish roots, but they're definitely there.  Just enough of them, I suppose, to appreciate this beautiful loaf of what I've always called Irish Soda bread, even though now I've discovered that it really isn't.


     Did you know that there are rules for making Irish Soda Bread? The Society for the Preservation of Irish Soda Bread tells us that any ingredient other than flour, baking soda, sour milk and salt make your loaf an imposter. This loaf, my friends, is definitely an imposter. A tasty one, but an imposter nonetheless.


     This loaf has a bit of added sugar, some butter, a lot of currants- ingredients that deny it the title of an authentic Irish Soda bread, but make it oh-so-delicious. The lovely loaf they do make is called Spotted Dog. I think I like that even better.


     Spotted Dog is a quick and easy loaf to put together to enjoy at breakfast or tea time. Warm out of the oven and slathered with butter? That would be the top o' my mornin' for sure! Leftovers make a great toast too.
     This recipe makes two loaves; enjoy one now and freeze one for later. Better yet, share with a friend. Just please make sure you cut a deep X  into the top of your loaf before baking. Why? To let the fairies out, of course. Who wants to suffer the wrath of toasted fairies? :)


Spotted Dog: An Irish Tea Cake
Adapted from this recipe and this recipe
Ingredients:
4 cups all purpose flour
1 tsp. salt
1 Tblsp. baking powder
1 tsp. baking soda
1/2 cup sugar
1/2 cup cold butter (1 stick) cut into small cubes
2 cups currants or raisins
1 egg, beaten
1 3/4 cups buttermilk
1 tsp. vanilla extract

Instructions:
  • Preheat oven to 350F. Grease a baking sheet or cover with parchment paper.
  • In large mixing bowl, sift together flour, salt, baking powder, baking soda, and sugar.
  • Cut butter into dry ingredients with a fork or dough blender until mixture resembles large crumbs.
  • Stir in currants or raisins.
  • Whisk together the beaten egg, the buttermilk, and the vanilla extract.
  • Make a well in the center of your dry ingredients.
  • Pour buttermilk mixture into the well and gently mix together until the dough is evenly blended. Do not over-mix.
  • Turn sticky dough out onto a generously floured surface. With floured hands, gently knead dough just enough (just flop it over a couple of times) and form into two softball sized balls of dough. Do not over-knead! It will make your bread/cake tough. You don't need your dough to be smooth and shiny- you want a nice craggy surface to make that beautiful crust!
  • Place your dough balls onto your prepared baking sheet and slightly flatten them into round loaves. Leave plenty of room between your loaves for rising.
  • Cut an X shape into the top of each loaf, all the way to the edges. This lets the fairies out!
  • Bake for 40 minutes, or until loaves are browned and sound hollow when you tap them.
  • Slice, slather with butter, and enjoy!

Sunday, February 1, 2015

Chocolate Peanut Butter Globs


Neither judge a book by its cover, nor a cookie by its name! While the moniker "Glob" is not commonly associated with a cookie jar confection, this is a delicious exception to the rule.

Lots of chocolate, walnuts, pecans and peanut butter chips all held together by just a bit of flour, make a huge chunky brownie-like cookie that just begs for a nice tall glass of cold milk.

This recipe comes from Ina Garten's Barefoot Contessa Foolproof. No need to chill the dough, so you can have these ready on short notice, when you have a chocolate craving that just won't quit. Now how easy is that?


Chocolate Peanut Butter Globs
recipe from Barefoot Contessa Foolproof

Ingredients
6 Tblsp. unsalted butter (3/4 stick)
12 oz. semi-sweet chocolate chips, divided
2  oz. unsweetened chocolate
2 extra large eggs
1 Tblsp. instant espresso powder
2 tsp. vanilla extract
3/4 cup granulated sugar
1/3 cup + 1 Tblsp. all purpose flour (I have also used gluten free flour with good success.)
1 tsp. baking powder
1/4 tsp. Kosher salt
1 cup whole walnut halves (NOT chopped)
1 cup whole pecan halves (NOT chopped)
2/3 cup peanut butter chips

Directions
  • Preheat oven to 325 F.
  • In the top part of a double boiler over hot water, melt the butter, the unsweetened chocolate, and 6 oz. of the chocolate chips. Stir until just melted. Remove from heat and let cool 15 minutes. You don't want it to cook your eggs!
  • In a small bowl, stir together 1/3 cup flour, baking soda and salt. Set aside.
  • In another bowl, mix together walnuts, pecans, peanut butter chips, remainder of the chocolate chips and 1 Tblsp. flour. Set aside.
  • In the bowl of an electric mixer (paddle attachment), mix together the eggs, espresso powder and vanilla extract.
  • Add sugar to egg mixture. Beat (medium-high) for two minutes until the batter is thick and falls back on itself in a ribbon.
  • With mixer on low, add cooled, melted chocolate mixture to egg mixture until combined.
  • Fold in the flour mixture with a spatula.
  • Fold in nuts and chips.
  • With two soup spoons (or a large cookie scoop) drop mixture onto parchment covered cookie sheets.
  • Bake exactly 15 minutes. Cool on cookie sheet.
  • Yield: 20-22 large cookies

Friday, January 23, 2015

Caramel Puff Corn


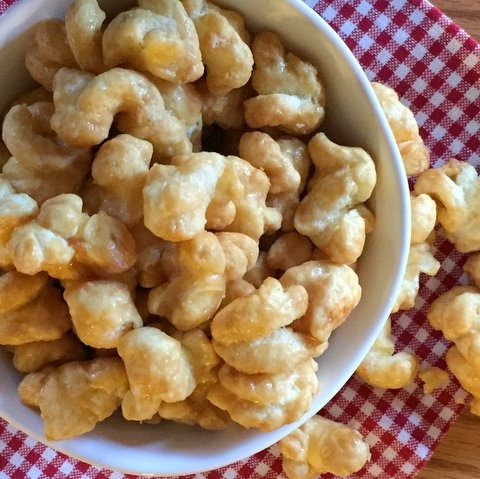
This stuff is seriously addictive, and you'll either love me or hate me for sharing the recipe. Many batches were made over the holidays, and they disappeared so quickly there was barely time to take a photo. It's sweet, salty, buttery, crunchy, ridiculously easy to whip up and even easier to eat. And eat. And eat.

Did you notice that there are no popcorn hulls? No hard kernels or bits to get stuck in your teeth either. That's because it starts with a bag of butter flavored Puffcorn,  a ready made snack food you can buy in the potato chip aisle. I used Chester's Puffcorn, but there are are other brands available that come in different sized bags. Thank you Vicki Bensinger, for introducing me to this irresistible confection!

The caramel corn may be good, but it doesn't hold a candle to this sweet little bundle! I braved the cold of Chicago last week to snuggle with my brand new granddaughter. Isn't she precious? I hope one day she'll love to bake with me as much as my sweet grandson does. I miss them both!


Caramel Puff Corn
Recipe from here, here, and here!

Ingredients
1 cup (2 sticks) butter (no substitutes!)
1 cup light brown sugar
1/2 cup light Karo syrup
1 tsp. baking soda
approx. 8 oz. BUTTER flavored Puff Corn (I could only find Puff Corn in 3.5 oz. bags. I used two bags of Chester's Puff Corn. You could use three bags to get a bigger batch with a lighter caramel coating.)
***If you have a hard time finding Butter flavored Puff Corn, you can use the Snack Finder here to find Chester's Puff Corn in your area. 


Directions
Empty puff corn from bags into large buttered roasting pan. Set aside.
In a 2 qt. saucepan stir together butter, sugar and syrup.
Using medium heat, bring to boil. Boil 2 minutes stirring constantly.
Add baking soda. Mixture will bubble up. Stir and remove from heat.
Pour caramel mixture over puff corn in roaster. Stir until puff corn is coated.
Bake in 250F oven for 45 minutes, stirring every 15 minutes to distribute caramel evenly over puff corn.
Working quickly, turn out onto parchment and separate puffs while they cool. Store in an airtight container. Try not to eat it all before it gets into the container! :)


Friday, January 2, 2015

Scandinavian Almond Bars


     You're not tired of cookies yet, are you? I hope not, because this is a great little recipe to tuck away in your bag of cookie tricks. It's a versatile treat, reminiscent of an almond pastry. It's equally as perfect with your coffee or tea in the morning as it is a pick-me-up in the afternoon.

     This beauty is elegant enough for special occasions, but simple enough to have on hand to fill your cookie jar. To me it's everything a grown-up sugar cookie should be- crunchy edges, a chewy middle and the delicate flavor of almonds and vanilla. (Is it just me, or does anyone else think of Jergens lotion whenever they open up the bottle of almond extract? Do they even make that anymore?)


     I came upon this recipe quite by accident when one of my students brought it to school for an  assignment where they had to bring an example of something from home that had different types of measurements. I've been making these cookies ever since...Who knew that homework could be so rewarding?

     To add to their appeal, they're delightfully easy to make and look like you've spent hours on them. They also freeze well in an airtight container with wax paper between layers. Double the recipe so you can always have them on hand for little cookie emergencies! (And please don't tell me you've never had one of those. :)

Happy New Year to everyone! 
May 2015 bring you joy and good health!

Scandinavian Almond Bars
Recipe from Better Homes and Gardens Biggest Book of Cookies

Cookie Ingredients
1 and 3/4 cups all purpose flour
2 tsp. baking powder
1/4 tsp. salt
1/2 cup butter, softened (1 stick)
1 cup sugar
1 egg
1/2 tsp. almond extract
2 Tblsp. milk
1/2 cup sliced almonds (I used more than this, but I love almonds.)

Icing Ingredients
1 cup sifted powdered sugar
1/4 tsp. almond extract
enough milk (3-4 tsp.) to make drizzling consistency

Cookie Directions
  • In a small bowl, sift together flour, baking powder and salt; set aside.
  • In mixing bowl, beat together softened butter and sugar.
  • Beat in egg and almond extract until combined.
  • Beat in flour mixture. This mixture will be crumbly but will get better as you work with it.
  • Divide dough into four equal portions. Shape each portion into a 12 inch long roll. Place two rolls 4 to 5 inches apart on a parchment (or silpat) covered cookie sheet. 
  • Flatten each roll until it is 3 inches wide. 
  • Brush flattened (3"x12") logs with milk; sprinkle with almonds.
  • Bake at 325F for 12-15 minutes or until edges are lightly (barely!) browned. (I baked mine for 13 minutes, but ovens vary.)
  • While still warm and soft on the cookie sheet, cut each cookie "slab" diagonally into 1-inch wide strips. Carefully transfer cookies to a wire rack and let cool. Drizzle with Almond Icing; let dry.
  • Almond Icing: Stir together 1 cup sifted powdered sugar, 1/4 tsp. Almond extract and enough milk to make drizzling consistency.
  • Store in an airtight container. These cookies are even better after they sit overnight!

Monday, December 15, 2014

Walnut Reindeer Cookies, AKA Walnut Acorn Cookies


     These cute little reindeer were originally supposed to be elegant little acorn shaped cookies.  Buttery walnut shortbread cookies dipped in chocolate and more walnuts to make them look like acorns. But somewhere along the way they ended up looking like mischievous reindeer. These little cuties would be a perfect addition to a Christmas cookie tray or to leave out for the jolly man in the red suit.


     If you're looking for something a little more traditional, or are inclined to make these at any other time of year where reindeer are not as appropriate, I assure you that they're just as delectable without the antlers and noses!

     This recipe was featured in the Gourmet Cookie Book as the best cookie recipe from the year 2000. It was originally submitted to Gourmet magazine by a college friend of mine, who says that it has long been her family's favorite.

Walnut Acorn Cookies
recipe from Suzanne and Gourmet

Ingredients for cookies
2 cups all purpose flour
1/2 teaspoon baking powder
1/4 teaspoon salt
2 sticks unsalted butter, melted
3/4 cup packed light brown sugar
1 teaspoon vanilla
1 cup finely chopped walnuts (4 oz.)

Ingredients for decorating
8 oz. semi-sweet chocolate, melted
1/2 cup finely chopped walnuts
If you're making reindeer, you'll also need candy eyes, red candy for noses, and pretzels for antlers.

Directions for making cookies
  • Sift together flour, baking powder and salt.
  • Beat together butter, brown sugar and vanilla with electric mixer until pale and fluffy.
  • Add flour mixture, and blend together at low speed.
  • Stir in walnuts with wooden spoon.
  • The original recipe does not call for chilling the dough, but I found that my cookies did not spread as much if I chilled the dough for a couple of hours. You may want to try some both ways to see what works best for you!
  • Preheat oven to 375F.
  • Form 2 teaspoons dough (I used a small cookie scoop full) into egg shape. I pressed the dough ball into the bowl of a spoon to get uniform shapes.
  • Arrange "acorns" 1 inch apart on parchment covered baking sheets. Bake on middle rack of oven for 10 minutes, or until bottoms are light brown.
  • Remove cookies to rack to cool.
Decorate
Dip half of each cookie into melted chocolate, and then into chopped nuts. Place on waxed paper or silicone lined baking sheet to set. (about 15 min.- it depends on the temperature of your kitchen!)
If you're making reindeer, dip half of your cookie into melted chocolate, but only coat the front with walnuts. Press two pretzels onto the back of the cookie into the chocolate. Use melted chocolate to affix the eyes and nose.


Sunday, December 7, 2014

Raspberry Almond Shortbread Thumbprints

  
     This cookie needs few words. Buttery tender almond shortbread that practically melts in your mouth. Bright sweet-tart raspberry jam filling the center, contributing a bit of contrast in taste and texture. These are first to disappear from the cookie tray. Most requested at my house. Needs few ingredients and easy to prepare. Make some for a friend. Make some for yourself. You'll both be happy. Need I say more?

Raspberry Almond Shortbread Thumbprints
Recipe from Land O Lakes

Cookie Ingredients
1 cup butter (2 sticks) softened
2/3 cup granulated sugar
1/2 tsp. almond extract
2 cups all purpose flour
1/2 cup seedless raspberry jam (or your favorite flavor)

Glaze Ingredients
1 cup confectioners sugar
2-3 tsp. water (more if needed to get desired consistency)
1 1/2 tsp. almond extract

Directions
  • Combine butter, sugar and 1/2 tsp. almond extract in mixer bowl. Beat at medium speed, scraping bowl often, until creamy.
  • Add flour, scraping bowl often, until well mixed.
  • Cover, and refrigerate until firm- at least one hour. (Cookies will spread more if dough is not chilled.)
  • Preheat oven to 350F
  • Shape dough into 1 inch balls. Place 2 inches apart on parchment covered baking sheets.
  • Make indentation in the center of each cookie with your thumb. (I used the handle of a wooden spoon.)
  • Fill each indentation with 1/4 tsp. of jam.
  • Bake 14-18 minutes, or until edges are lightly browned. Let stand 1 minute on cookie sheet and then transfer to racks to cool completely.
  • Whisk together glaze ingredients until smooth. Drizzle over cooled cookies.

Sunday, November 30, 2014

Lemon Glazed Persimmon Date Bars


 The persimmons I remember from my childhood were small fruits that grew wild in the woods. If you dared to eat one before it was mushy ripe (and that usually didn't happen until after a hard frost) you'd better have been prepared to have your mouth turned inside out. 

I remember my dad singing:
"Possum up the 'simmon tree,
raccoon on the ground,
Raccoon says to the possum,
won't you throw me some 'simmons down."

The persimmons I used in these bars, however, are not the persimmons of my childhood. A sweet friend gifted me with a bag of these lovely Japanese Fuyu persimmons that she grew herself.


Confession: I was afraid to eat these the first week I had them. I was waiting for them to get soft and mushy like the wild ones. I was soon set straight- these can be enjoyed while still firm, like an apple! They were so sweet and delicious that we ate most of them just as they were. The last three though, I made into these lovely bars to add to Thanksgiving dinner. 


You could just call these "Fall in a Cookie," but they'd feel at home on a tray of Christmas cookies as well. They're spicy, chewy, and the lemon glaze on top is the perfect complement to the delicate sweetness of the bars. They're keepers, for sure... now I just need more persimmons!


Lemon Glazed Persimmon Date Bars
Recipe from Saveur

Bar Ingredients
1 3/4 cup all purpose flour
1 tsp. ground cinnamon
1 tsp. freshly ground nutmeg
1 tsp. kosher salt
1/2 tsp. ground cloves
1 cup pureed persimmon pulp
1 1/2 tsp. lemon juice
1 tsp. baking soda
1 cup sugar
1 cup finely chopped dates (I used a food processor to chop these. I chopped them with a tablespoon of the flour included in the recipe to keep them from sticking together.)
1/2 cup vegetable oil
1 egg
Glaze ingredients:
1 cup confectioners sugar
2 Tblsp. lemon juice

Directions: 
  • Heat oven to 350F. Grease and flour 10x15x1 inch jelly roll pan.
  • Whisk together flour, cinnamon, nutmeg, salt and cloves. Set aside.
  • Whisk together persimmon pulp, 1 1/2 tsp. lemon juice and baking soda. Set aside.
  • In a large bowl, mix together sugar, dates, oil and egg. Add dry ingredients and persimmon mixture. (Don't be alarmed if the persimmon mixture appears to gel.) Stir until just combined. Spread with spatula into prepared pan. 
  • Bake until lightly browned, about 25 minutes.
  • Remove from oven, let cool 5 minutes and then spread with glaze.
  • Glaze: Stir together 1 cup confectioners sugar and 2 Tblsp. Lemon juice.
  • Cool to harden glaze, then cut into finger size bars.

Tuesday, April 22, 2014

The Best Carrot Cake


     Carrots are good for you, right? And pineapple, coconut and walnuts? The stuff dreams are made of. This cake is full of 'em. Topped right out of the oven with a dreamy hot buttermilk glaze (that's really more of a butterscotch caramel glaze) and then with a layer of cream cheese frosting, this is a cake I look forward to making again.

     I made this for Easter dinner at my Mom's house. It was good the first day, and even better the next. I recommend making this when there are people to help you eat it. Trust me, no one will complain.  Next time I'll make layers- I needed this one to travel so I opted for a sheet cake. More layers = more frosting per bite. That can't be a bad thing, can it? I followed the recipe as written, and wouldn't change a thing. You can find the recipe- from Southern Living here.
   
Happy Earth Day!


Tuesday, January 21, 2014

Manhattan Clam Chowder


     A snowy day deserves some soup, don't you think? Even though this snow was considerably less than what was originally expected it tacked an extra day onto my three day weekend, giving me some extra time to get some things done that I've been meaning to do for ages. (Like catch up on paperwork and update this poor neglected space.) The 4WD truck is broken too so I may be here a while.

     This bowl is full of colorful vegetables that are so good for you. It's loaded with clams, and has just a tiny bit of bacon in it that you could leave out if you want to, but please don't. The depth of flavor it adds is phenomenal. A big bonus? It comes together quickly and doesn't take hours to cook. That gives you plenty of time to go out and build that snowman, just in case you're so inclined. 


Manhattan Clam Chowder
adapted from this Better Homes and Gardens recipe
Ingredients:
3 cans (6.5 oz) minced clams
8 oz. bottled clam juice (1 cup chicken broth will do in a pinch)
2 slices of bacon -I used 4 slices of pre-cooked bacon (the kind you can buy already cooked) and some avocado oil- see note*
1 cup diced celery
1 medium carrot, diced (about 1/4 cup)
1 med. onion, diced
1 sweet red pepper, diced
2 cups cubed potatoes (I used Yukon Gold)
1 tsp. dried thyme
1/8 tsp. ground cayenne pepper
1/8 tsp. ground black pepper (I just gave it a couple of healthy grinds)
1 dried hot red pepper (optional)
1 can diced tomatoes (14.5 oz) undrained

Directions:
  • Drain canned clams, reserving juice; set clams aside. Add enough water to reserved clam juice to equal 2 cups. Set juice aside.
  • Dice bacon. Saute over medium heat until crisp. Remove bacon pieces and drain. Reserve 2 Tablespoons drippings in pan. *Note: I diced 4 slices of pre-cooked bacon and then gently sauteed it in a couple of Tablespoons of avocado oil (olive would be good too). I may be disillusioned, but I think it might be just a little bit better for me than straight bacon grease.
  • In the reserved bacon grease or oil, saute celery, carrot, onion and red pepper until tender.
  • Add the reserved 2 cups of clam juice and the 8 oz. clam juice or broth. Stir in potatoes, thyme, cayenne and black pepper. Add the whole dried pepper if desired. (It gives a little zing.)
  • Bring to boiling; reduce heat. Simmer, covered, for about ten minutes until vegetables are tender. 
  • Stir in reserved clams, bacon and undrained tomatoes. Return to a boil, reduce heat and cook 2 to 3 minutes more until heated through. Remove the hot pepper before serving. Enjoy!


Sunday, September 29, 2013

Gingered Carrot Soup

   
     Pumpkins, carrots, sweet potatoes, winter squash- it's hard to even see them without thinking of crisp chilly nights, crunchy leaves, flaming bonfires and steaming apple cider. Orange food just seems right for fall, doesn't it?
     A big bag of carrots in my vegetable bin inspired this colorful bowl of comfort for supper the other night. Carrots, sweet nuggets of goodness packed with beta-carotene and vitamin A, make this soup a fabulous choice for those chilly fall nights. (And it's not so shabby for lunch either!)

Carrot Ginger Soup
Ingredients
1 Tablespoon butter
1 Tablespoon coconut oil
2 lbs. carrots, peeled and coarsely chopped (the smaller you chop them, the quicker they cook)
1 large sweet onion, chopped
3 cloves garlic, smashed
1 teaspoon curry powder
a few sprigs of thyme
1/2 teaspoon Kosher salt (or to taste)
2 tablespoons minced or grated ginger (If you freeze your ginger root, then it's really easy to grate with a microplane grater.)
1 quart chicken broth (or vegetable broth)
freshly ground black pepper to taste

Directions
Gently saute onion and garlic in the butter and oil. Add carrots, thyme, ginger, curry powder, salt and chicken broth.
Simmer (covered) until carrots are tender. The length of time this takes varies, depending on your carrots and how large your carrot chunks are.
Remove sprigs of thyme and blend with an immersion or regular blender. (My immersion blender leaves the soup with a little more texture, and the regular blender makes it silky smooth. Be very careful with hot soup in a regular blender. Leave the vent lid open!)
Season to taste with freshly ground pepper.

Monday, September 23, 2013

Pumpkin Spice Pudding Cookies with Pecans and Chocolate Chips


     Happy Fall! The days are getting shorter and it's about time I dusted off my computer and got back into the kitchen. It was a lovely summer though, with visits from all of my children (and an especially long one with my grandson.) A lightning strike left me without internet for a month, and after about a week of withdrawal I actually enjoyed being unplugged! School has been taking up most of my time this past month, but we're settling into routines now and I'm feeling a little bit less frazzled at the end of each day. 

     I'm trying to stay away from sweets enjoy sweets in moderation, but when I saw these cookies from Sweet Treats and More, I had to put Jello Pumpkin Spice pudding on my grocery list. It's only available for a short time (I got it at WalMart) and gives these cookies a nice "pumpkiny" flavor without being too overpowering. In addition to the warm and spicy pumpkin flavor it adds, the pudding keeps the cookies soft and chewy- perfect for satisfying those after-school hunger pangs. :)

Pumpkin Spice Pudding Cookies with Pecans and Chocolate Chips
adapted from Sweet Treats and More

Ingredients
1 cup butter, room temperature
3/4 cup brown sugar
1/4 cup granulated sugar
1 small box (3.4 oz) Pumpkin Spice Pudding (Jello)- I found this with the seasonal baking products at WalMart
2 eggs
1 teaspoon vanilla
2 1/4 cup all purpose flour
1 teaspoon baking soda
1/2 teaspoon salt
3/4 cup chopped pecans
3/4 cup mini chocolate chips

Instructions
Preheat oven to 350F.
In small bowl, whisk together flour, baking soda and salt. 
In mixer bowl, cream together butter and sugars until light. 
Beat in dry pudding mix. Add eggs and vanilla, beating well.
Gradually incorporate flour into mixture. Stir in pecans and chocolate chips.
Use a large cookie scoop to drop cookie dough onto parchment covered baking sheets. (My large scoop is about 3 Tablespoons.)
Bake 8-10 minutes and cool on cookie sheet until cookies are sturdy enough to remove to a cooling rack. Once cooled, store in an airtight container.
Yield: 2 dozen large cookies. (Using a smaller scoop will yield more, and will probably require a shorter baking time.)


Friday, June 28, 2013

Jeweled Golden Rice with Cherries


     Cherry season is an anxiously awaited event in my household.  Even though the price is dear, I can't resist stocking my refrigerator with the luscious ruby-red orbs, and keep a bowl on the counter for popping in my mouth every time I pass by. In addition to being delicious, they're a nutrition powerhouse, fiber rich and full of antioxidants. Way better than bon-bons for you, but with the same "curb appeal."

     This summer rice salad showcases both sweet (fresh) and tart (dried) cherries. I don't even know where to start describing it. Saffron and curry scented rice, tangy and sweet cherries, crunchy pistachios and cashews, bursts of celery and chives, citrus and ginger dressing- it all comes together perfectly to make a mouthwatering bite. It pairs perfectly with grilled chicken or pork, but will easily stand alone as a delightful vegan (and gluten free!) main dish.

Jeweled Golden Rice with Cherries
from Eating Well, June/July 2006

Ingredients
1 cup brown basmati rice
1 can (14 oz.) reduced-sodium chicken (or vegetable)broth
1/3 cup water
1 Tablespoon curry powder (your favorite)
1/2 teaspoon turmeric
1 generous pinch crumbled saffron threads
3 Tablespoons canola oil (I used walnut oil)
1/3 cup lemon juice
3 Tablespoons honey
1 Tablespoon freshly grated orange zest (I used dried)
1 Tablespoon minced fresh ginger (I grated the ginger)
1/4 teaspoon salt
2 cups chopped celery
3/4 cup coarsely chopped dried cherries
1/2 cup chopped scallions or chives, divided
1 cup fresh dark sweet cherries, pitted and chopped
3/4 cup unsalted nuts, chopped -pistachios, almonds and cashews recommended- divided

Instructions
1. Combine rice, broth, water, curry powder, turmeric and saffron in a medium saucepan. Bring to a boil,stir once, cover with a lid. Reduce heat to low (simmer) and cook until the liquid is absorbed, about 35 minutes. Remove from heat and let stand, covered 5 minutes. Fluff with fork.

2. Combine oil, lemon juice, honey, orange zest, ginger and salt in a large non-reactive bowl. Stir in the cooked rice, celery, dried cherries and 1/4 cup chives or scallions. Cover and refrigerate for at least 1 hour. (up to 2 days)

3. To serve, fold fresh cherries and 1/2 cup nuts into the rice mixture. Serve at room temperature, garnished with the remaining 1/4 cup scallions/chives and nuts.

Saturday, June 22, 2013

Fresh Blueberry Sour Cream Pound Cake


     School is out, berries are in, and my cast is off! Does picking up plump blueberries one by one between my thumb and forefinger and purposefully dropping them into my mouth count as physical therapy? Whether it does or doesn't, that's what's been going on here in my kitchen. Blueberries are gorgeous and fresh at the market right now, and hard to resist. I'm glad they're a good snacking option, because I've eaten my share along with someone else's too I'm afraid. (Hope it wasn't yours!)

     Some of my berries were lucky enough to find their way into this buttery pound cake that is currently tempting me from the confines of its cake dome. Those beautiful bursts of blue make each slice of it just as hard to resist as the berries themselves. I'm taking it to my Mom's tomorrow for Sunday dinner- hope I can wait!

Fresh Blueberry Sour Cream Pound Cake
recipe from Taste of Home

Ingredients:
6 eggs, separated (room temperature)
1 cup butter, softened (2 sticks)
3 cups sugar
1 teaspoon vanilla extract
1 teaspoon almond extract
1 teaspoon butter flavoring
3 cups all purpose flour
8 oz. (1 cup) sour cream
1/4 teaspoon baking soda
1 1/2 cups fresh blueberries (may use frozen- do not thaw!)

Instructions:
1. Cream butter and sugar until light and fluffy. Add egg yolks, one at a time, beating after each addition. Add extracts and butter flavoring.

2. Combine flour and baking soda. Add to creamed mixture alternately with sour cream, beating well after each addition.

3. In a separate bowl with clean beaters, beat egg whites on high until stiff peaks form. Fold egg whites into batter. Toss blueberries with about a tablespoon of flour. This keeps them from sinking to the bottom of the pan as the cake cooks. Fold blueberries into batter.

4. Spoon batter into a greased and floured 10 inch tube pan. Bake at 350F for 60-70 minutes, or until a toothpick inserted near the center comes out clean. Cool in pan for 10 minutes. Remove cake from pan to a rack to cool completely.


Friday, May 31, 2013

Spicy Grilled Shrimp


     Since my chopping hand has been on the fritz, Hubby has been making most of our meals. I'm down with that, especially since he's a really good cook and has become quite proficient with his newest obsession  preferred method of cooking. 

     He has made these shrimp several times, and they disappear as soon as they come off the grill. They're great for an appetizer, but they'd also be fabulous on a summer salad or with pasta. They have the perfect amount of heat for me just the way they are, but if you're a fan of hot and spicy you may want to "kick it up" with a little extra cayenne!

     I hope to share more of Hubby's grilling adventures with you soon! My cast comes off in three weeks, but I'm sure my hand will need at least a little more time to recover. I know when I've got it good. :)
 

Spicy Grilled Shrimp
Mark Bittman, from Fish, The Complete Guide to Buying and Cooking

Ingredients
2 lbs. large shrimp (raw), peeled and de-veined, rinsed and dried
1 large clove garlic
1 Tablespoon coarse salt (I use only about a teaspoon and it's plenty for us)
1/2 tsp. cayenne pepper
1 tsp. paprika
2 Tablespoons olive oil
2 tsp. lemon juice

Instructions
Finely mince garlic and mix with salt. Use the flat blade of your knife  or a mortar and pestle to make a paste with the garlic and salt. Mix in cayenne, paprika, olive oil and lemon juice. Combine with shrimp until  the shrimp is evenly covered with the spice mixture.
Grill or broil shrimp (hot fire) 2-3 minutes per side, or until done. Serve immediately or at room temperature, with lemon wedges if desired.

Sunday, May 26, 2013

"The Chewy" Chocolate Chip Cookie


     Okay. So I haven't been spending too much time in the kitchen, as evidenced by my neglected little space here.  My right hand has been out of commission ever since an unfortunate tumble on a riser left me with a torn ligament. Who knew that school pictures were so hazardous? Repairs have been made, but I'll be in a cast for a while yet.

      My grandson in TX requested cookies, so I couldn't let a little thing like a bum thumb get in the way. I looked to Alton Brown and his mixer friendly recipe for  The Chewy, and he did not disappoint me. The only change I made was to use dark brown instead of light brown sugar. And I chilled the dough overnight, which made it even harder to scoop left handed, but made for a nice compact cookie that didn't spread too much in the oven.

     This cookie lived up to its descriptive name, and was still pronounced "yummy" (and still chewy) after a few days in the hands of the postal service. It's definitely a "keeper" recipe, especially since my trusty mixer did most of the hard work! And my grandson's smiles across the miles made it totally worth it. :)


The Chewy
Recipe from Alton Brown, Food Network
I followed the recipe linked above with a few minor changes I've indicated below.
Ingredients- If you have a food scale, I recommend weighing the ingredients- especially the flour.
2 sticks (16 Tblsp.) unsalted butter
12 oz. bread flour (about 2 1/2 cups)
1 tsp. Kosher salt
1 tsp. baking soda
2 oz. granulated sugar (about 4 1/2 Tblsp.)
8 oz. light brown sugar (about one cup) I used dark brown.
1 large egg
1 large egg yolk
1 oz. whole milk (2 Tblsp.)
1 1/2 tsp. vanilla extract
12 oz. chocolate chips
Directions:
  • Melt butter over low heat. Cool slightly.
  • In a stand mixer (using paddle attachment) mix butter and both sugars on med. speed for 2 minutes.
  • Sift together flour, salt and baking soda. (I like to sift onto a piece of waxed paper.)
  • In a small bowl, whisk together the egg, the egg yolk, milk and vanilla. Add to butter and sugar in mixer (on low speed) until combined.
  • Gradually pour in flour mixture, scraping down sides of bowl as needed.
  • Once flour has been incorporated, reduce mixer speed to "stir" and add chocolate chips.
  • Chill dough for at least an hour. (I chilled mine overnight)
  • Preheat oven to 350F.
  • Scoop dough onto parchment covered baking sheets.
  • Bake 13-15 minutes, depending on your oven and the size of your cookies. I used the medium sized scoop from Pampered Chef, and baked them about 14 minutes. Using this scoop, the recipe yielded about 3 1/2 dozen cookies.
  • Slide parchment (cookies and all) onto racks to cool. Remove cookies from parchment to rack when they've cooled enough to firm up.


Friday, March 22, 2013

Lemon Tahini Dressing with The Camper's Special (aka Bean and Grain Burger)


 I have no idea why this is called a Camper's Special, but I do know it's pretty special and I'm a happy camper when I eat it. It's my favorite thing to order at one of my favorite restaurants, Sammy T.'s, and I've been ordering it for years. What makes it special? Well there's the bean and grain burger smothered with grilled peppers, mushrooms, tomatoes and onions. And then there's the Chi-Chi dip (AKA hummus) hiding inside the cheese (mozzarella and cheddar) covered wrap. But really what I love is the Lemon Tahini Dressing that's served on the side. I wish they'd bring it in a vat.

     I looked far and wide for a Lemon Tahini good enough to enjoy with my Camper's Special at home, and made countless batches from countless recipes. None were what I was looking for. But then I had dinner with a dear friend and there it was, hiding in plain sight on her salad- the elusive, delicious Lemon Tahini Dressing.  Just what I needed to go with my homemade Camper's Special.

     Even if you don't have a Camper's Special to eat with it, this Lemon Tahini is fabulous for pouring over your salads or drizzling on your stuffed pita sandwiches or for dunking your veggies. Please excuse me while I go make a vat of it.

Lemon Tahini Dressing
Arthur Gordon, Irregardless Cafe, Raleigh N.C.
Ingredients:
1/4 c. tahini
1/4 c. tamari
1/4 c. onion, minced
2 Tbs. green pepper, minced (My dressing looks a little pink in the photo- I used a red pepper)
1  stalk celery, minced
1/3 c. lemon juice
1 tsp. white pepper
1/2 c. light olive or grapeseed oil
Directions:
2 Tablespoons water (I omit this, because I prefer a thicker dressing)
Blend (or process) the tahini, tamari, onion, bell pepper, and celery. Puree well if you want a smooth texture. Process in lemon juice and white pepper. With motor running, add oil and then enough water to get desired consistency. I prefer it a little on the thick side but that's just a matter of taste.

Camper's Special Top your Bean and Grain Burger (recipe follows) with hummus, sauteed onions, green pepper, tomato and mushrooms. Wrap it in a grilled flour tortilla and top it with mozzarella and cheddar cheese. Heat at 350F until cheese is melted. Serve warm with lemon tahini dressing. Yum.

Bean and Grain Burgers
1 medium onion, finely chopped
1tablespoon olive oil
1 (19 oz.) can garbanzo beans, drained, rinsed and ground or coarsely chopped
3 slices whole wheat bread, blended in food processor
1/4 cup sesame tahini
1/4 cup tamari or low sodium soy sauce
1 clove garlic, finely chopped or 1/2 tsp. garlic powder
1/4 cup fresh parsley, finely chopped
1 cup cooked brown rice
1/3 cup raw wheat germ

Gently saute onions and garlic in olive oil until onions are slightly browned. Mix onions together with remainder of ingredients EXCEPT the wheat germ. Form mixture into 8-10 patties. Coat each patty in raw wheat germ and grill on a non-stick surface until heated through and gently browned.


Related Posts with Thumbnails